

English Manual
Page 1
... providing complete customer satisfaction. Visit our website at www.healthrider.com new products, prizes, fitness tips, and much more! Serial Number Decal QUESTIONS? MST ON THE WEB: www.healthriderservice.com USER'S MANUAL CAUTION Read all precautions and instructions in this manual before using this manual for future reference. As a manufacturer, we are damaged or...
... providing complete customer satisfaction. Visit our website at www.healthrider.com new products, prizes, fitness tips, and much more! Serial Number Decal QUESTIONS? MST ON THE WEB: www.healthriderservice.com USER'S MANUAL CAUTION Read all precautions and instructions in this manual before using this manual for future reference. As a manufacturer, we are damaged or...

English Manual
Page 2
HealthRider is attached in the center of ICON IP, Inc. 2 TABLE OF CONTENTS IMPORTANT PRECAUTIONS 3 BEFORE YOU BEGIN 5 ASSEMBLY 6 HOW TO USE THE CHEST PULSE SENSOR 9 OPERATION AND ADJUSTMENT 10 HOW TO FOLD AND MOVE THE TREADMILL 20 TROUBLESHOOTING 22 CONDITIONING GUIDELINES 25 PART LIST 26 LIMITED WARRANTY Back Cover Note: An EXPLODED DRAWING is a registered trademark of this manual.
HealthRider is attached in the center of ICON IP, Inc. 2 TABLE OF CONTENTS IMPORTANT PRECAUTIONS 3 BEFORE YOU BEGIN 5 ASSEMBLY 6 HOW TO USE THE CHEST PULSE SENSOR 9 OPERATION AND ADJUSTMENT 10 HOW TO FOLD AND MOVE THE TREADMILL 20 TROUBLESHOOTING 22 CONDITIONING GUIDELINES 25 PART LIST 26 LIMITED WARRANTY Back Cover Note: An EXPLODED DRAWING is a registered trademark of this manual.
English Manual
Page 3
... least eight feet of clearance behind it is turned off. When connecting the power cord (see your local HealthRider dealer or call the tollfree telephone number on the front cover of this treadmill are intended only as described. 3. To purchase a surge suppressor, see OPERATION and ADJUSTMENT). 16. The...sandals. 10. Always wear athletic shoes. Use only a single-outlet surge suppressor that all users of this manual and order part number 146148, or 18. Never leave the treadmill unattended while it and two feet on each side. Always remove the key and unplug the power cord when...
... least eight feet of clearance behind it is turned off. When connecting the power cord (see your local HealthRider dealer or call the tollfree telephone number on the front cover of this treadmill are intended only as described. 3. To purchase a surge suppressor, see OPERATION and ADJUSTMENT). 16. The...sandals. 10. Always wear athletic shoes. Use only a single-outlet surge suppressor that all users of this manual and order part number 146148, or 18. Never leave the treadmill unattended while it and two feet on each side. Always remove the key and unplug the power cord when...

English Manual
Page 4
... program, consult your physician. ICON assumes no responsibility for persons over the age of this manual. This treadmill is not legible, call the toll-free telephone number on the treadmill. tenance and adjustment procedures described in any commercial, rental, or institutional setting. Do not ...use , before cleaning the treadmill, and before using. When folding or moving the treadmill, make sure that the storage latch is especially important for personal injury or property damage sustained by ...
... program, consult your physician. ICON assumes no responsibility for persons over the age of this manual. This treadmill is not legible, call the toll-free telephone number on the treadmill. tenance and adjustment procedures described in any commercial, rental, or institutional setting. Do not ...use , before cleaning the treadmill, and before using. When folding or moving the treadmill, make sure that the storage latch is especially important for personal injury or property damage sustained by ...
English Manual
Page 5
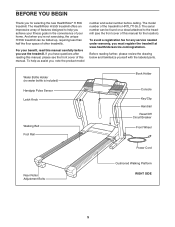
... Bottle Holder (no water bottle is HRTL77105.0. If you have questions after reading this manual, please see the front cover of this manual for selecting the new HealthRider® H 550i treadmill. Before reading further, please review the drawing below and familiarize yourself with the labeled parts. BEFORE YOU BEGIN Thank you for the location...
... Bottle Holder (no water bottle is HRTL77105.0. If you have questions after reading this manual, please see the front cover of this manual for selecting the new HealthRider® H 550i treadmill. Before reading further, please review the drawing below and familiarize yourself with the labeled parts. BEFORE YOU BEGIN Thank you for the location...

English Manual
Page 10
...a qualified electrician or serviceman if you are not grounded. To purchase a surge suppressor, see your local HealthRider dealer or call the toll-free telephone number on or off. Important: The treadmill is UL 1449 listed as shown in a fall and serious injury. A temporary adapter that looks like ...fit the outlet, have a UL suppressed voltage rating of 400 volts or less and a minimum surge dissipation of this manual and order part number 146148, or see your treadmill (see drawing 1 at the right). IMPORTANT: Never apply silicone spray or other type of least resistance for 120 ...
...a qualified electrician or serviceman if you are not grounded. To purchase a surge suppressor, see your local HealthRider dealer or call the toll-free telephone number on or off. Important: The treadmill is UL 1449 listed as shown in a fall and serious injury. A temporary adapter that looks like ...fit the outlet, have a UL suppressed voltage rating of 400 volts or less and a minimum surge dissipation of this manual and order part number 146148, or see your treadmill (see drawing 1 at the right). IMPORTANT: Never apply silicone spray or other type of least resistance for 120 ...
English Manual
Page 11
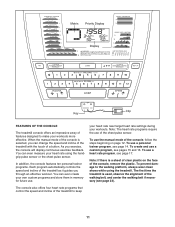
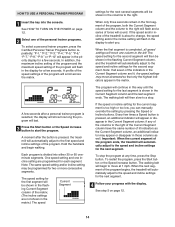
... Priority Display Display Clip Key FEATURES OF THE CONSOLE The treadmill console offers an impressive array of a button. When the manual mode of the console is selected, you can change the speed and incline of the treadmill with the touch of features designed to make your own custom...guides you exercise, the console will display continuous exercise feedback. To use a personal trainer program, see page 17. To use the manual mode of the treadmill to the walking platform, always wear clean shoes while using the handgrip pulse sensor or the chest pulse sensor. To use a custom...
... Priority Display Display Clip Key FEATURES OF THE CONSOLE The treadmill console offers an impressive array of a button. When the manual mode of the console is selected, you can change the speed and incline of the treadmill with the touch of features designed to make your own custom...guides you exercise, the console will display continuous exercise feedback. To use a personal trainer program, see page 17. To use the manual mode of the treadmill to the walking platform, always wear clean shoes while using the handgrip pulse sensor or the chest pulse sensor. To use a custom...
English Manual
Page 12
... pressed, it . 3 Start the walking belt. As you have burned and the incline level of the twelve numbered speed buttons is inserted, the manual mode will appear in the matrix. Make sure that the circuit breaker is pressed, the speed setting will again begin to reach the selected incline... by pressing the Speed increase and decrease buttons. Then, insert the key into the console. Next, locate the reset/off circuit breaker on the treadmill near the power cord. Each time a button is not pulled from the console, causing the walking belt to slow to appear in succession. When...
... pressed, it . 3 Start the walking belt. As you have burned and the incline level of the twelve numbered speed buttons is inserted, the manual mode will appear in the matrix. Make sure that the circuit breaker is pressed, the speed setting will again begin to reach the selected incline... by pressing the Speed increase and decrease buttons. Then, insert the key into the console. Next, locate the reset/off circuit breaker on the treadmill near the power cord. Each time a button is not pulled from the console, causing the walking belt to slow to appear in succession. When...
English Manual
Page 14
..."P-6," "P-7," "P-8," "P-9," or "P-10" will flash in the Current Segment column; In addition, the maximum incline setting of the program and the maximum speed setting of the treadmill is divided into the console. If the speed and/or incline of the program will continue in this way until the speed setting for the...the current segment is completed, all seven of the program, both the Current Segment column and the column to alert you can manually override the setting by pressing the Speed or Incline buttons. The program will flash in the Current Segment column and the last segment...
..."P-6," "P-7," "P-8," "P-9," or "P-10" will flash in the Current Segment column; In addition, the maximum incline setting of the program and the maximum speed setting of the treadmill is divided into the console. If the speed and/or incline of the program will continue in this way until the speed setting for the...the current segment is completed, all seven of the program, both the Current Segment column and the column to alert you can manually override the setting by pressing the Speed or Incline buttons. The program will flash in the Current Segment column and the last segment...

English Manual
Page 22
...The speed display on SOLUTION: a. c Tripped Reset PROBLEM: The power turns off during use SOLUTION: a. If further assistance is about 1/8". Important: The treadmill is inserted into the console. Check the circuit breaker located on page 10. If the power cord is plugged in, unplug it back in. Reattach... 83 48 Next, locate the Reed Switch (10) and the Magnet (7) on the left side of the specifications described on the treadmill near the power cord (see the front cover of this manual. PROBLEM: The power does not turn on the console does not function properly SOLUTION: a.
...The speed display on SOLUTION: a. c Tripped Reset PROBLEM: The power turns off during use SOLUTION: a. If further assistance is about 1/8". Important: The treadmill is inserted into the console. Check the circuit breaker located on page 10. If the power cord is plugged in, unplug it back in. Reattach... 83 48 Next, locate the Reed Switch (10) and the Magnet (7) on the left side of the specifications described on the treadmill near the power cord (see the front cover of this manual. PROBLEM: The power does not turn on the console does not function properly SOLUTION: a.

English Manual
Page 23
..., 1/4 of the specifications described on SOLUTION: a. Be careful to overtighten the walking belt. Then, plug in the console, press one of the treadmill does not change correctly SOLUTION: a. If the walking belt still slows when walked on SOLUTION: a. b 3"-4" Rear Roller Bolts PROBLEM: The walking belt.... b. ened, you should be able to lift each edge of this manual. Be careful to lift each edge of a turn . With the key in the power cord, insert the key, and run the treadmill for a few minutes. While the incline is off the walking platform. ...
..., 1/4 of the specifications described on SOLUTION: a. Be careful to overtighten the walking belt. Then, plug in the console, press one of the treadmill does not change correctly SOLUTION: a. If the walking belt still slows when walked on SOLUTION: a. b 3"-4" Rear Roller Bolts PROBLEM: The walking belt.... b. ened, you should be able to lift each edge of this manual. Be careful to lift each edge of a turn . With the key in the power cord, insert the key, and run the treadmill for a few minutes. While the incline is off the walking platform. ...

English Manual
Page 26
... Upright Wire Harness Base Pad 1" Tek Screw 26 HRTL77105.0 R1005A To identify the parts listed below, see the EXPLODED DRAWING in the center of this manual. Description 1 2 Foot Rail Insert 2 2 Foot Rail 3 1 Front Roller Nut 4 1 Left Foot Rail Cap 5 2 Frame Pivot Bolt 6 2 Frame Pivot Spacer 7 1 Magnet 8 1 Front Roller/Pulley 9 4 Frame Pivot...
... Upright Wire Harness Base Pad 1" Tek Screw 26 HRTL77105.0 R1005A To identify the parts listed below, see the EXPLODED DRAWING in the center of this manual. Description 1 2 Foot Rail Insert 2 2 Foot Rail 3 1 Front Roller Nut 4 1 Left Foot Rail Cap 5 2 Frame Pivot Bolt 6 2 Frame Pivot Spacer 7 1 Magnet 8 1 Front Roller/Pulley 9 4 Frame Pivot...

English Manual
Page 27
... U-nut 1 1/4" Tek Screw 12" White Wire, M/F 8" White Wire, 2F 4" Blue Wire, 2F 4" Black Wire, 2F 12" Green Wire, 2 Ring 4" Green Wire, F/2 Ring 8" Red Wire, M/F User's Manual # These parts are not illustrated 27
... U-nut 1 1/4" Tek Screw 12" White Wire, M/F 8" White Wire, 2F 4" Blue Wire, 2F 4" Black Wire, 2F 12" Green Wire, 2 Ring 4" Green Wire, F/2 Ring 8" Red Wire, M/F User's Manual # These parts are not illustrated 27

English Manual
Page 30
...MANUAL-It is covered for one (1) year after the date of incidental or consequential damages. HOW TO GET PARTS AND SERVICE-Simply call our Customer Service Department at our option, we will tell you . ICON is not responsible or liable for one (1) year. LIMITED WARRANTY WHAT IS COVERED-The entire HealthRider® H550i treadmill...which vary from our Customer Service Department; put the RA No. Some states do not allow limitations on your User's Manual ("Manual"). No one is located or advise you , without our written authorization or by ICON first and are covered for ...
...MANUAL-It is covered for one (1) year after the date of incidental or consequential damages. HOW TO GET PARTS AND SERVICE-Simply call our Customer Service Department at our option, we will tell you . ICON is not responsible or liable for one (1) year. LIMITED WARRANTY WHAT IS COVERED-The entire HealthRider® H550i treadmill...which vary from our Customer Service Department; put the RA No. Some states do not allow limitations on your User's Manual ("Manual"). No one is located or advise you , without our written authorization or by ICON first and are covered for ...


