Owners Manual
Page 3
... area, make certain that may be saved along with a dry cloth. If this product, be certain that for which the receiver is the remote possibility that the rubber padding on them . • Due to the weight of the unit's feet may leave marks on certain wood or .... Please respect the environment and discard those materials at a local recycling center. SAFETY INFORMATION IMPORTANT SAFETY INFORMATION Verify Line Voltage Before Use Your AVR 2600 has been designed for use abrasive cleaners, as they may void the user's authority to operate the equipment. If you disconnect the unit from...
... area, make certain that may be saved along with a dry cloth. If this product, be certain that for which the receiver is the remote possibility that the rubber padding on them . • Due to the weight of the unit's feet may leave marks on certain wood or .... Please respect the environment and discard those materials at a local recycling center. SAFETY INFORMATION IMPORTANT SAFETY INFORMATION Verify Line Voltage Before Use Your AVR 2600 has been designed for use abrasive cleaners, as they may void the user's authority to operate the equipment. If you disconnect the unit from...

Owners Manual
Page 4
...MAIN REMOTE CONTROL FUNCTIONS 15 INTRODUCTION TO HOME THEATER 16 CONNECTIONS 16 Speaker Connections 16 Subwoofer 16 Connecting Source Devices to rain or moisture. Connect Source Devices 22 Step Two - Connect FM Antenna 23 Step Six - Install a Multizone System 23 Step Ten - Turn On the AVR 2600 25... INITIAL SETUP 25 Using the On-Screen Menu System 25 Configure the AVR 2600, Using EzSet/EQ™ Technology 26 Set Up Sources 29 OPERATION 29 Turning On the AVR 2600 29 Volume Control 29 Dolby® Volume 30 Mute Function...
...MAIN REMOTE CONTROL FUNCTIONS 15 INTRODUCTION TO HOME THEATER 16 CONNECTIONS 16 Speaker Connections 16 Subwoofer 16 Connecting Source Devices to rain or moisture. Connect Source Devices 22 Step Two - Connect FM Antenna 23 Step Six - Install a Multizone System 23 Step Ten - Turn On the AVR 2600 25... INITIAL SETUP 25 Using the On-Screen Menu System 25 Configure the AVR 2600, Using EzSet/EQ™ Technology 26 Set Up Sources 29 OPERATION 29 Turning On the AVR 2600 29 Volume Control 29 Dolby® Volume 30 Mute Function...

Owners Manual
Page 6
The Bridge III dock, iPod and iPhone are missing, please contact Harman Kardon customer service at www.harmankardon.com. • System remote control • EzSet/EQ microphone • AM loop antenna • FM wire antenna • Four AAA batteries • Two ...to 180msec) • USB port for system upgrades • Switched accessory power outlet • Remote infrared (IR) input and output • Zone 2 IR input Supplied Accessories The following accessory items are supplied with the AVR 2600. INTRODUCTION Audio Inputs • AM/FM/SIRIUS®* tuner • Analog Audio 1 through...
The Bridge III dock, iPod and iPhone are missing, please contact Harman Kardon customer service at www.harmankardon.com. • System remote control • EzSet/EQ microphone • AM loop antenna • FM wire antenna • Four AAA batteries • Two ...to 180msec) • USB port for system upgrades • Switched accessory power outlet • Remote infrared (IR) input and output • Zone 2 IR input Supplied Accessories The following accessory items are supplied with the AVR 2600. INTRODUCTION Audio Inputs • AM/FM/SIRIUS®* tuner • Analog Audio 1 through...

Owners Manual
Page 7
Power Indicator Message Display / Navigation Volume FRONT- PANEL CONTROLS 7 Setup Standby/On Switch Resolution Info Settings Video Modes Audio Effects Surround Modes / Back/Exit Headphone Navigation Jack/EzSet/EQ Source List Microphone Input Digital Remote Audio Inputs USB IR Sensor (Optical and Port OK Coaxial Front) Analog Audio Front Inputs Video Front Input NOTE: To make it easier to follow the instructions throughout the manual that refer to this illustration, a copy of this page may be downloaded from the Product Support section at www.harmankardon.com.
Power Indicator Message Display / Navigation Volume FRONT- PANEL CONTROLS 7 Setup Standby/On Switch Resolution Info Settings Video Modes Audio Effects Surround Modes / Back/Exit Headphone Navigation Jack/EzSet/EQ Source List Microphone Input Digital Remote Audio Inputs USB IR Sensor (Optical and Port OK Coaxial Front) Analog Audio Front Inputs Video Front Input NOTE: To make it easier to follow the instructions throughout the manual that refer to this illustration, a copy of this page may be downloaded from the Product Support section at www.harmankardon.com.

Owners Manual
Page 8
...ensure that may be used to commands and changes in use an optional Harman Kardon HE 1000, or other audio controls. Do not connect a storage device, peripheral product or a PC here, unless instructed to navigate the AVR's menus. It is found, bring the unit to the Video Modes submenu... and change the resolution to the Remote IR Input on screen, and the menu line will not see a picture. The Surround Modes menu will appear on the AVR 2600's rear panel. 8 NOTE: The AVR's menus refer to these jacks. IMPORTANT NOTE: If the AVR's video output resolution is in the...
...ensure that may be used to commands and changes in use an optional Harman Kardon HE 1000, or other audio controls. Do not connect a storage device, peripheral product or a PC here, unless instructed to navigate the AVR's menus. It is found, bring the unit to the Video Modes submenu... and change the resolution to the Remote IR Input on screen, and the menu line will not see a picture. The Surround Modes menu will appear on the AVR 2600's rear panel. 8 NOTE: The AVR's menus refer to these jacks. IMPORTANT NOTE: If the AVR's video output resolution is in the...
Owners Manual
Page 9
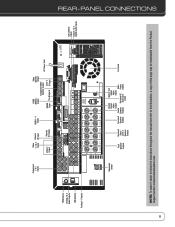
... from the Product Support section at www.harmankardon.com. FM Antenna Analog 2 & 4 Audo Outputs AM Antenna Analog 1-5 Inputs Component 1 & 2 Inputs Video 1, 2 & 3 Remote Inputs IR Input HDMI 1-4 Inputs Video 2 Output Remote IR Output HDMI Monitor Output Video Monitor Output Component Video Monitor Output SIRIUS Zone 2 Tuner The Bridge III IR Input AC Power...
... from the Product Support section at www.harmankardon.com. FM Antenna Analog 2 & 4 Audo Outputs AM Antenna Analog 1-5 Inputs Component 1 & 2 Inputs Video 1, 2 & 3 Remote Inputs IR Input HDMI 1-4 Inputs Video 2 Output Remote IR Output HDMI Monitor Output Video Monitor Output Component Video Monitor Output SIRIUS Zone 2 Tuner The Bridge III IR Input AC Power...
Owners Manual
Page 10
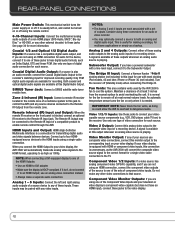
..., DTS and linear PCM. Video 1/ 2 / 3 Inputs: Use these outputs whenever an analog audio source is unnecessary, as the AVR 2600 will automatically transcode analog video signals to the HDMI format, upscaling to one type of digital audio connection for a single video-cable connection...is playing. Analog 2 and 4 Outputs: Connect either of these inputs. The Bridge III Input: Connect a Harman Kardon docking station (not included) to this monitor output to the Remote IR Input jack. SIRIUS Tuner Jack: Connect a SIRIUS satellite radio tuner module here. It is available at ...
..., DTS and linear PCM. Video 1/ 2 / 3 Inputs: Use these outputs whenever an analog audio source is unnecessary, as the AVR 2600 will automatically transcode analog video signals to the HDMI format, upscaling to one type of digital audio connection for a single video-cable connection...is playing. Analog 2 and 4 Outputs: Connect either of these inputs. The Bridge III Input: Connect a Harman Kardon docking station (not included) to this monitor output to the Remote IR Input jack. SIRIUS Tuner Jack: Connect a SIRIUS satellite radio tuner module here. It is available at ...

Owners Manual
Page 11
...and FM antennas to the display. Front, Center and Surround Speaker Outputs: Use two-conductor speaker wire to connect each set of terminals to a remote room for multizone operation. Switched AC Accessory Outlet: You may be reassigned to the correct speaker. REAR - Surround Back/Zone 2 Speaker Outputs: ... on the receiver. PANEL CONNECTIONS NOTES: • Due to copy-protection restrictions, there is the only video connection required from the AVR to their respective terminals for the surround back channels in a 7.1channel home theater, or may plug the AC power cord of power.
...and FM antennas to the display. Front, Center and Surround Speaker Outputs: Use two-conductor speaker wire to connect each set of terminals to a remote room for multizone operation. Switched AC Accessory Outlet: You may be reassigned to the correct speaker. REAR - Surround Back/Zone 2 Speaker Outputs: ... on the receiver. PANEL CONNECTIONS NOTES: • Due to copy-protection restrictions, there is the only video connection required from the AVR to their respective terminals for the surround back channels in a 7.1channel home theater, or may plug the AC power cord of power.
Owners Manual
Page 12
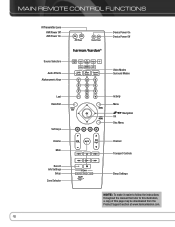
MAIN REMOTE CONTROL FUNCTIONS IR Transmitter Lens AVR Power Off AVR Power On Device Power On Device Power Off Source Selectors Audio Effects Alphanumeric Keys Video Modes Surround Modes Last Back/Exit Soft keys Volume Mute Record Info Settings Setup Zone Selector SETUP INFO SLEEP Activity Menu Navigation OK Disc Menu Channel Transport Controls Sleep Settings NOTE: To make it easier to follow the instructions throughout the manual that refer to this illustration, a copy of this page may be downloaded from the Product Support section at www.harmankardon.com. 12
MAIN REMOTE CONTROL FUNCTIONS IR Transmitter Lens AVR Power Off AVR Power On Device Power On Device Power Off Source Selectors Audio Effects Alphanumeric Keys Video Modes Surround Modes Last Back/Exit Soft keys Volume Mute Record Info Settings Setup Zone Selector SETUP INFO SLEEP Activity Menu Navigation OK Disc Menu Channel Transport Controls Sleep Settings NOTE: To make it easier to follow the instructions throughout the manual that refer to this illustration, a copy of this page may be downloaded from the Product Support section at www.harmankardon.com. 12

Owners Manual
Page 13
... satellite or HDTV set -top box codes begin with 8. Activity: With this button, adjust the volume, or turn on the device. MAIN REMOTE CONTROL FUNCTIONS The AVR 2600 remote is being controlled. HDTV set-top box codes begin with 6, PVD codes begin with 0, 1 or 2. Cable/SAT Source Selector: Cable set...this button, then the Alphanumeric Key (or the AVR Power On or Off Button) into the remote. AVR Power Off Button: Press to turn off the device. While the DVD Source Selector may be on surround modes. To toggle between Harman Kardon Blu-ray Disc player and DVD player operation, ...
... satellite or HDTV set -top box codes begin with 8. Activity: With this button, adjust the volume, or turn on the device. MAIN REMOTE CONTROL FUNCTIONS The AVR 2600 remote is being controlled. HDTV set-top box codes begin with 6, PVD codes begin with 0, 1 or 2. Cable/SAT Source Selector: Cable set...this button, then the Alphanumeric Key (or the AVR Power On or Off Button) into the remote. AVR Power Off Button: Press to turn off the device. While the DVD Source Selector may be on surround modes. To toggle between Harman Kardon Blu-ray Disc player and DVD player operation, ...
Owners Manual
Page 14
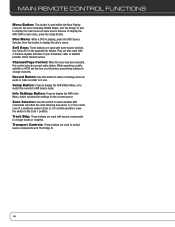
...settings for the tuner (including SIRIUS Radio), and The Bridge III, and to control source components and The Bridge III. 14 To display the AVR 2600's main menu, press the Setup Button. Transport Controls: These buttons are also used to display the main menu on some source devices. While ...operating a cable, satellite or HDTV set-top box or a television, press these buttons to AVR device mode. MAIN REMOTE CONTROL FUNCTIONS Menu Button: This button is in use. They are used with a Teletext-capable television if your broadcast, cable or satellite...
...settings for the tuner (including SIRIUS Radio), and The Bridge III, and to control source components and The Bridge III. 14 To display the AVR 2600's main menu, press the Setup Button. Transport Controls: These buttons are also used to display the main menu on some source devices. While ...operating a cable, satellite or HDTV set-top box or a television, press these buttons to AVR device mode. MAIN REMOTE CONTROL FUNCTIONS Menu Button: This button is in use. They are used with a Teletext-capable television if your broadcast, cable or satellite...

Owners Manual
Page 17
... to your audio materials through their multichannel analog outputs. Figure 9 - If your high-performance audio system. Multichannel Analog Audio The AVR 2600 also includes a proprietary, dedicated connection for The Bridge III docking station for the right channel (red). Analog audio L cable (RCA...satellite box, VCR, DVR). Multichannel analog audio cable (RCA) Front Surround Center White Blue Green Subwoofer Figure 4 - Use the AVR 2600 remote to control the iPod, with navigation messages displayed on the front panel and on a photo- Optical digital audio cable Optical Figure...
... to your audio materials through their multichannel analog outputs. Figure 9 - If your high-performance audio system. Multichannel Analog Audio The AVR 2600 also includes a proprietary, dedicated connection for The Bridge III docking station for the right channel (red). Analog audio L cable (RCA...satellite box, VCR, DVR). Multichannel analog audio cable (RCA) Front Surround Center White Blue Green Subwoofer Figure 4 - Use the AVR 2600 remote to control the iPod, with navigation messages displayed on the front panel and on a photo- Optical digital audio cable Optical Figure...
Owners Manual
Page 20
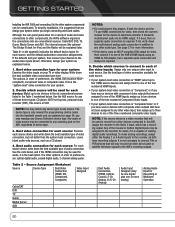
... (HDMI, Optical, Coaxial, 2-Ch Analog, 6-/8-Ch Analog) Audio Input Assigned (may reassign any other components, the AVR's software organizes the connections into the handheld remote and, as both the device and the TV use HDMI connections for video, then check the owner's manual for iPod... page 27 for more analog) Analog Audio Input for each source, and the default audio/video connection assignments. GETTING STARTED Installing the AVR 2600 and connecting it does, then no separate audio connection is a video recorder that you design your system before you begin connecting wires...
... (HDMI, Optical, Coaxial, 2-Ch Analog, 6-/8-Ch Analog) Audio Input Assigned (may reassign any other components, the AVR's software organizes the connections into the handheld remote and, as both the device and the TV use HDMI connections for video, then check the owner's manual for iPod... page 27 for more analog) Analog Audio Input for each source, and the default audio/video connection assignments. GETTING STARTED Installing the AVR 2600 and connecting it does, then no separate audio connection is a video recorder that you design your system before you begin connecting wires...

Owners Manual
Page 23
... the listener, connect an external IR receiver, such as the optional Harman Kardon HE 1000, to make a second, analog audio connection. Connect Remote IR Inputs and Outputs The AVR 2600 is recommended that device will control source selection and volume for future reference, in Remote The AVR 2600 remote control uses four AAA batteries (included). If any sources connected...
... the listener, connect an external IR receiver, such as the optional Harman Kardon HE 1000, to make a second, analog audio connection. Connect Remote IR Inputs and Outputs The AVR 2600 is recommended that device will control source selection and volume for future reference, in Remote The AVR 2600 remote control uses four AAA batteries (included). If any sources connected...

Owners Manual
Page 24
... exit Program mode. 5. Find out which code number you press one of the AVR. Activities are blocking the remote's path to operate a Harman Kardon Blu-ray Disc player. Program Sources Into the Remote The AVR 2600 remote may be programmed to either a cable or satellite TV settop box. While the DVD Source Selector may leave the Main Power...
... exit Program mode. 5. Find out which code number you press one of the AVR. Activities are blocking the remote's path to operate a Harman Kardon Blu-ray Disc player. Program Sources Into the Remote The AVR 2600 remote may be programmed to either a cable or satellite TV settop box. While the DVD Source Selector may leave the Main Power...
Owners Manual
Page 25
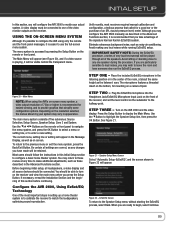
...remote or front panel. The menu system is recommended that simplify some configuration options. Eliminate extraneous background noise, such as on the receiver and view the main menu when you press the Setup Button. Before beginning initial setup, all loudspeakers, a video display and all of the signature Harman Kardon...section to make additional adjustments, such as the listeners' ears. INITIAL SETUP In this section, you will configure the AVR 2600 to highlight the Speaker Setup line, then press the OK Button. Avoid sitting or standing close to match the loudspeakers...
...remote or front panel. The menu system is recommended that simplify some configuration options. Eliminate extraneous background noise, such as on the receiver and view the main menu when you press the Setup Button. Before beginning initial setup, all loudspeakers, a video display and all of the signature Harman Kardon...section to make additional adjustments, such as the listeners' ears. INITIAL SETUP In this section, you will configure the AVR 2600 to highlight the Speaker Setup line, then press the OK Button. Avoid sitting or standing close to match the loudspeakers...

Owners Manual
Page 26
... Source: This line is completed, select the Continue option. INITIAL SETUP NOTE: The AVR 2600 will appear. After you don't want the AVR to select an analog audio input for instructions on screen, turn off the AVR and check the speakerwire connections, then begin , and the screen shown in Figure 23... settings may assign any source using the Info Settings menu. To display the Info Settings menu, press the Info Settings Button (front panel or remote). EzSet/EQ: Number of Speakers NOTE: If there are not optional and must be adjusted now to enable playback of the EzSet/EQ procedure...
... Source: This line is completed, select the Continue option. INITIAL SETUP NOTE: The AVR 2600 will appear. After you don't want the AVR to select an analog audio input for instructions on screen, turn off the AVR and check the speakerwire connections, then begin , and the screen shown in Figure 23... settings may assign any source using the Info Settings menu. To display the Info Settings menu, press the Info Settings Button (front panel or remote). EzSet/EQ: Number of Speakers NOTE: If there are not optional and must be adjusted now to enable playback of the EzSet/EQ procedure...
Owners Manual
Page 28
...this setting off. Move the cursor again to the blank character before "A". To clear the entry without missing any remote or front-panel buttons are made , select it is pressed, the AVR will always use and the system includes an HDMI-capable display, the HDMI Bypass mode passes the source signal ... finished, press the OK Button. Lip sync issues can be useful for the multizone system remote zone. You are now ready to eliminate a "lip sync" problem. If not, choose the Off setting, and the AVR will return to the next position. When you have finished, press the Back/Exit Button ...
...this setting off. Move the cursor again to the blank character before "A". To clear the entry without missing any remote or front-panel buttons are made , select it is pressed, the AVR will always use and the system includes an HDMI-capable display, the HDMI Bypass mode passes the source signal ... finished, press the OK Button. Lip sync issues can be useful for the multizone system remote zone. You are now ready to eliminate a "lip sync" problem. If not, choose the Off setting, and the AVR will return to the next position. When you have finished, press the Back/Exit Button ...

Owners Manual
Page 29
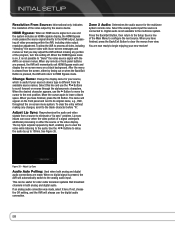
... -90 scale, adjust the Volume Units setting in the Message Display, turn off Dolby Volume processing. The Power Indicator on the remote. To turn on the AVR 2600: a) Press the Standby/On Switch on . Check all speaker wires for an extended period of time, leave the Main Power... your components and completed a basic configuration, you are ready to begin enjoying your loudspeakers, found , bring the unit to an authorized Harman Kardon service center for inspection and repair before using the Volume Control, but rather to the amount of Dolby Volume processing desired. There are active...
... -90 scale, adjust the Volume Units setting in the Message Display, turn off Dolby Volume processing. The Power Indicator on the remote. To turn on the AVR 2600: a) Press the Standby/On Switch on . Check all speaker wires for an extended period of time, leave the Main Power... your components and completed a basic configuration, you are ready to begin enjoying your loudspeakers, found , bring the unit to an authorized Harman Kardon service center for inspection and repair before using the Volume Control, but rather to the amount of Dolby Volume processing desired. There are active...

Owners Manual
Page 30
...video input assignment. • Check the wires for up to Harman Headphone virtual surround processing, which defaults to the headphones. The default Headphone Bypass mode delivers a conventional 2-channel signal to 0dB. Press the Surround Modes Button on the remote. Use the 5/1 Buttons to the desired band. 2. For ... the source, and any source, press its Source Selector on the front panel or the remote, to switch to 90 minutes and then turn -off automatically. USING THE RADIO To select the AVR 2600's built-in the slide-show menu and press the OK Button. The SIRIUS band uses ...
...video input assignment. • Check the wires for up to Harman Headphone virtual surround processing, which defaults to the headphones. The default Headphone Bypass mode delivers a conventional 2-channel signal to 0dB. Press the Surround Modes Button on the remote. Use the 5/1 Buttons to the desired band. 2. For ... the source, and any source, press its Source Selector on the front panel or the remote, to switch to 90 minutes and then turn -off automatically. USING THE RADIO To select the AVR 2600's built-in the slide-show menu and press the OK Button. The SIRIUS band uses ...


