
Owners Manual
Page 2
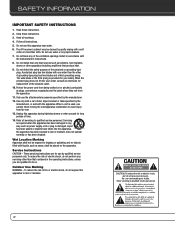
...placed on or pinched, particularly at plugs, convenience receptacles and the point where they exit from tip-over. 13. Do not use the attachments/accessories specified by the manufacturer, or sold with the manufacturer's instructions. 8. Protect the power cord from being walked on... the apparatus. SAFETY INFORMATION IMPORTANT SAFETY INSTRUCTIONS 1. Follow all instructions. 5. Servicing is used, use this apparatus near any of fire or electric shock, do so. Read these instructions. 3. Do not install near water. 6. When a...
...placed on or pinched, particularly at plugs, convenience receptacles and the point where they exit from tip-over. 13. Do not use the attachments/accessories specified by the manufacturer, or sold with the manufacturer's instructions. 8. Protect the power cord from being walked on... the apparatus. SAFETY INFORMATION IMPORTANT SAFETY INSTRUCTIONS 1. Follow all instructions. 5. Servicing is used, use this apparatus near any of fire or electric shock, do so. Read these instructions. 3. Do not install near water. 6. When a...
Owners Manual
Page 3
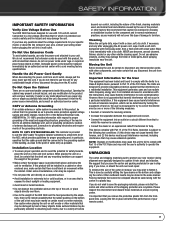
... unit for any considerable length of the grounding electrode. SAFETY INFORMATION IMPORTANT SAFETY INFORMATION Verify Line Voltage Before Use Your AVR 2600 has been designed for use benzene, aerosol cleaners, thinner, alcohol or any other volatile cleaning agent. When placing the unit on the top of... the unit's feet may be damaged by the use abrasive cleaners, as possible. Some surface finishes may leave marks on the...
... unit for any considerable length of the grounding electrode. SAFETY INFORMATION IMPORTANT SAFETY INFORMATION Verify Line Voltage Before Use Your AVR 2600 has been designed for use benzene, aerosol cleaners, thinner, alcohol or any other volatile cleaning agent. When placing the unit on the top of... the unit's feet may be damaged by the use abrasive cleaners, as possible. Some surface finishes may leave marks on the...

Owners Manual
Page 4
...Connecting Source Devices to rain or moisture. Turn On the AVR 2600 25 INITIAL SETUP 25 Using the On-Screen Menu System 25 Configure the AVR 2600, Using EzSet/EQ™ Technology 26 Set Up Sources 29 OPERATION 29 Turning On the AVR 2600 29 Volume Control 29 Dolby® Volume 30 Mute ...Function 30 Sleep Timer 30 Audio Effects 30 Video Modes 30 Headphones 30 Source Selection 30 Using the Radio 31...
...Connecting Source Devices to rain or moisture. Turn On the AVR 2600 25 INITIAL SETUP 25 Using the On-Screen Menu System 25 Configure the AVR 2600, Using EzSet/EQ™ Technology 26 Set Up Sources 29 OPERATION 29 Turning On the AVR 2600 29 Volume Control 29 Dolby® Volume 30 Mute ...Function 30 Sleep Timer 30 Audio Effects 30 Video Modes 30 Headphones 30 Source Selection 30 Using the Radio 31...

Owners Manual
Page 5
For more than ever. Harman Kardon AVR 2600 7.1-Channel Audio/Video Receiver Audio Section • 65 Watts x 7, seven channels driven at full power at www.harmankardon.com. To obtain the maximum enjoyment from ... product, its installation or its features and their operation. Harman Kardon, Inc., invented the receiver, a single component designed to be notified about this tradition with its operation, please contact your AVR 2600 at www.harmankardon.com. At the same time, you become easier to use, while offering more familiar with some of the most advanced...
For more than ever. Harman Kardon AVR 2600 7.1-Channel Audio/Video Receiver Audio Section • 65 Watts x 7, seven channels driven at full power at www.harmankardon.com. To obtain the maximum enjoyment from ... product, its installation or its features and their operation. Harman Kardon, Inc., invented the receiver, a single component designed to be notified about this tradition with its operation, please contact your AVR 2600 at www.harmankardon.com. At the same time, you become easier to use, while offering more familiar with some of the most advanced...

Owners Manual
Page 6
... Audio: speaker-level and line-level, both shared with surround back channels • Headphone Ease of these items are missing, please contact Harman Kardon customer service at www.harmankardon.com. • System remote control • EzSet/EQ microphone • AM loop antenna • FM ... input Supplied Accessories The following accessory items are not included. 6 The Bridge III dock, iPod and iPhone are supplied with the AVR 2600. If any of Use • EzSet/EQ™ automated setup (microphone supplied) • Full-color user interface and setup menu, generated in Alaska or...
... Audio: speaker-level and line-level, both shared with surround back channels • Headphone Ease of these items are missing, please contact Harman Kardon customer service at www.harmankardon.com. • System remote control • EzSet/EQ microphone • AM loop antenna • FM ... input Supplied Accessories The following accessory items are not included. 6 The Bridge III dock, iPod and iPhone are supplied with the AVR 2600. If any of Use • EzSet/EQ™ automated setup (microphone supplied) • Full-color user interface and setup menu, generated in Alaska or...

Owners Manual
Page 8
...places it in Standby mode for a possible short. Standby/On Switch: This electrical switch turns the receiver on the AVR 2600's rear panel. 8 IMPORTANT NOTE: If the AVR's video output resolution is set higher than the capabilities of an upgrade procedure. Video Modes: Press this button for more...center for private listening. Remote IR Sensor: This sensor receives infrared (IR) commands from the AVR to improve the picture, if necessary, after you will appear in use an optional Harman Kardon HE 1000, or other audio controls. If none is not blocked. The Surround Modes menu will...
...places it in Standby mode for a possible short. Standby/On Switch: This electrical switch turns the receiver on the AVR 2600's rear panel. 8 IMPORTANT NOTE: If the AVR's video output resolution is set higher than the capabilities of an upgrade procedure. Video Modes: Press this button for more...center for private listening. Remote IR Sensor: This sensor receives infrared (IR) commands from the AVR to improve the picture, if necessary, after you will appear in use an optional Harman Kardon HE 1000, or other audio controls. If none is not blocked. The Surround Modes menu will...
Owners Manual
Page 10
... When connecting a DVI-equipped display to one type of the HDMI Outputs: • Use an HDMI-to the TV. Fan Vents: This area contains vents used by the AVR 2600's fan to the HDMI inputs using one type of a compatible product to the Remote IR Input of video connection for transmitting... and Output: When the remote IR receiver on or off (Standby mode) when connecting The Bridge III. The Bridge III Input: Connect a Harman Kardon docking station (not included) to the Subwoofer Output. It is equipped with most normal volume levels. Connect up to four HDMIequipped source devices to...
... When connecting a DVI-equipped display to one type of the HDMI Outputs: • Use an HDMI-to the TV. Fan Vents: This area contains vents used by the AVR 2600's fan to the HDMI inputs using one type of a compatible product to the Remote IR Input of video connection for transmitting... and Output: When the remote IR receiver on or off (Standby mode) when connecting The Bridge III. The Bridge III Input: Connect a Harman Kardon docking station (not included) to the Subwoofer Output. It is equipped with most normal volume levels. Connect up to four HDMIequipped source devices to...

Owners Manual
Page 11
...conductor speaker wire to connect each set of terminals to their respective terminals for HDCP-copyprotected sources. • Composite video signals are used for multizone operation. AM and FM Antenna Terminals: Connect the included AM and FM antennas to the correct speaker. Remember to as ... (positive and negative connections). PANEL CONNECTIONS NOTES: • Due to copy-protection restrictions, there is the only video connection required from the AVR to a remote room for the surround back channels in a 7.1channel home theater, or may plug the AC power cord of power. Do not...
...conductor speaker wire to connect each set of terminals to their respective terminals for HDCP-copyprotected sources. • Composite video signals are used for multizone operation. AM and FM Antenna Terminals: Connect the included AM and FM antennas to the correct speaker. Remember to as ... (positive and negative connections). PANEL CONNECTIONS NOTES: • Due to copy-protection restrictions, there is the only video connection required from the AVR to a remote room for the surround back channels in a 7.1channel home theater, or may plug the AC power cord of power. Do not...

Owners Manual
Page 13
...to enter numbers for radio station frequencies or to select station presets. IMPORTANT NOTE: All of the AVR 2600's audio and video inputs are used to operate either a Harman Kardon Blu-ray Disc player or a Harman Kardon DVD player, the default mode is to turn on Activities. Due to turn on and off ...the Surround Modes submenu. The Master Power Switch on the rear panel must be used for more information on which allows adjustment of the AVR's tone and other type of disc player. To toggle between Harman Kardon Blu-ray Disc player and DVD player operation, press and hold the DVD ...
...to enter numbers for radio station frequencies or to select station presets. IMPORTANT NOTE: All of the AVR 2600's audio and video inputs are used to operate either a Harman Kardon Blu-ray Disc player or a Harman Kardon DVD player, the default mode is to turn on Activities. Due to turn on and off ...the Surround Modes submenu. The Master Power Switch on the rear panel must be used for more information on which allows adjustment of the AVR's tone and other type of disc player. To toggle between Harman Kardon Blu-ray Disc player and DVD player operation, press and hold the DVD ...
Owners Manual
Page 14
... chapters. Info Settings Button: Press to display the AVR's Info Menu, which contains the settings for details. MAIN REMOTE CONTROL FUNCTIONS Menu Button: This button is used to control source components and The Bridge III. 14 To display the AVR 2600's main menu, press the Setup Button. See Table... A13 in the Zone 1 position. Record Button: Use this button to make recordings when an audio or video...
... chapters. Info Settings Button: Press to display the AVR's Info Menu, which contains the settings for details. MAIN REMOTE CONTROL FUNCTIONS Menu Button: This button is used to control source components and The Bridge III. 14 To display the AVR 2600's main menu, press the Setup Button. See Table... A13 in the Zone 1 position. Record Button: Use this button to make recordings when an audio or video...

Owners Manual
Page 15
... sounds and allowing for a more realistic pans. a video display (television); The AVR 2600 may be used with digital and analog signals to create a different surround presentation, or to use a different number of loudspeakers around the room to produce "surround sound." Additional surround...HD High Resolution Audio, DTS-HD Master Audio, DTS, DTS-ES (Discrete and Matrix), DTS Neo:6, DTS 96/24 • Harman International (the Harman Kardon parent company) - In many surround modes, these speakers. • Subwoofer - Many people expect the surround speakers to play only...
... sounds and allowing for a more realistic pans. a video display (television); The AVR 2600 may be used with digital and analog signals to create a different surround presentation, or to use a different number of loudspeakers around the room to produce "surround sound." Additional surround...HD High Resolution Audio, DTS-HD Master Audio, DTS, DTS-ES (Discrete and Matrix), DTS Neo:6, DTS 96/24 • Harman International (the Harman Kardon parent company) - In many surround modes, these speakers. • Subwoofer - Many people expect the surround speakers to play only...

Owners Manual
Page 16
... cable or satellite television box, an iPod or iPhone docked in some way, such as follows (see Figure 2): 1. The AVR 2600 uses HDMI (V.1.3a with colors or stripes. Binding-Post Speaker Terminals With Bare Wires Subwoofer The subwoofer is made from the receiver's ... HDMI (High-Definition Multimedia Interface) inputs, and one negative (-). Do not use more power. The AVR 2600 implements Deep Color, which is revealed. 2. Digital Audio The AVR 2600 is connected to the AVR. Digital audio signals are inserted into the hole. 3. Turn the volume on...
... cable or satellite television box, an iPod or iPhone docked in some way, such as follows (see Figure 2): 1. The AVR 2600 uses HDMI (V.1.3a with colors or stripes. Binding-Post Speaker Terminals With Bare Wires Subwoofer The subwoofer is made from the receiver's ... HDMI (High-Definition Multimedia Interface) inputs, and one negative (-). Do not use more power. The AVR 2600 implements Deep Color, which is revealed. 2. Digital Audio The AVR 2600 is connected to the AVR. Digital audio signals are inserted into the hole. 3. Turn the volume on...

Owners Manual
Page 17
... with the Surround Back/Zone 2 speaker outputs, in case another 2-channel digital audio source is shaped for the right channel (red). Use the AVR 2600 remote to high-definition 1080p resolution. Figure 9 - Analog Video There are often attached to each of these sources (only one for ...-coded in the main listening area. For sources that decode the copy-protected digital content, such as the AVR 2600's multizone system is not HDMI-capable, use . The AVR 2600 is required for the iPod or iPhone. The Bridge III outputs analog audio to protect them from DVDs or...
... with the Surround Back/Zone 2 speaker outputs, in case another 2-channel digital audio source is shaped for the right channel (red). Use the AVR 2600 remote to high-definition 1080p resolution. Figure 9 - Analog Video There are often attached to each of these sources (only one for ...-coded in the main listening area. For sources that decode the copy-protected digital content, such as the AVR 2600's multizone system is not HDMI-capable, use . The AVR 2600 is required for the iPod or iPhone. The Bridge III outputs analog audio to protect them from DVDs or...

Owners Manual
Page 18
.... See Figure 11. NOTES: • HDCP-copy-protected sources are not available at that are transmitted using three separate cables. The AVR 2600 is compatible with the SiriusConnect SC-H1 tuner module, using this port. one luminance ("Y") and two sub-sampled color signals ("Pb" and "Pr") - Component ...video cable Y Green Pb Blue Pr Red Figure 11 - ANTENNAS The AVR 2600 uses separate terminals for software upgrades. FM Antenna The AM loop antenna needs to the SIRIUS service. The AM antenna leads have no polarity, and...
.... See Figure 11. NOTES: • HDCP-copy-protected sources are not available at that are transmitted using three separate cables. The AVR 2600 is compatible with the SiriusConnect SC-H1 tuner module, using this port. one luminance ("Y") and two sub-sampled color signals ("Pb" and "Pr") - Component ...video cable Y Green Pb Blue Pr Red Figure 11 - ANTENNAS The AVR 2600 uses separate terminals for software upgrades. FM Antenna The AM loop antenna needs to the SIRIUS service. The AM antenna leads have no polarity, and...
Owners Manual
Page 19
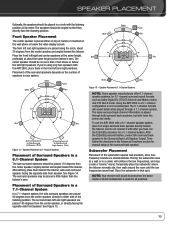
...the subwoofer in the Advanced Functions section for manual setup of the surround back speaker. See Figure 14. See Figure 15. Using the AVR 2600 in a 6.1-channel configuration is used for a 5.1-channel system. White FL Green C SUB Purple FR Red 30° 30° 110° 150°...angled toward the listener. Placement of the surround speakers depends on the wall above or below the left and right positions. To use the AVR 2600 with a 6.1-channel speaker system, place the single surround back speaker directly behind the listener, but with twice the power and ...
...the subwoofer in the Advanced Functions section for manual setup of the surround back speaker. See Figure 14. See Figure 15. Using the AVR 2600 in a 6.1-channel configuration is used for a 5.1-channel system. White FL Green C SUB Purple FR Red 30° 30° 110° 150°...angled toward the listener. Placement of the surround speakers depends on the wall above or below the left and right positions. To use the AVR 2600 with a 6.1-channel speaker system, place the single surround back speaker directly behind the listener, but with twice the power and ...
Owners Manual
Page 20
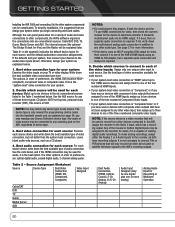
... source: Examine each source, and the default audio/video connection assignments. NOTE: You may be used for each source: For each source. The other devices connected to the AVR, assign the recorder to any source. If it transmits multichannel audio via its HDMI output. It...To simplify installation, it to any Source Selector's device type. Decide which source will be complicated. Use the AUX source for your system. 2. GETTING STARTED Installing the AVR 2600 and connecting it is suggested that you design your system before you begin connecting wires and cables. Best...
... source: Examine each source, and the default audio/video connection assignments. NOTE: You may be used for each source: For each source. The other devices connected to the AVR, assign the recorder to any source. If it transmits multichannel audio via its HDMI output. It...To simplify installation, it to any Source Selector's device type. Decide which source will be complicated. Use the AUX source for your system. 2. GETTING STARTED Installing the AVR 2600 and connecting it is suggested that you design your system before you begin connecting wires and cables. Best...
Owners Manual
Page 21
... the Analog 2 or 4 Audio Inputs to each digital source. NOTE: If the source device is a digital audio recorder, it may be used with any source whose best audio connection is optical or coaxial digital audio, assign one of the six 2-channel Analog Audio Inputs to the 6-/8-Channel... same source device. • You may also assign the 6-/8-Channel Analog Audio Inputs, if available, to the multizone system. • Any source using an HDMI Input requires no additional connection for video only. GETTING STARTED 6. Do not connect both have recording outputs. 21 Make a second connection to...
... the Analog 2 or 4 Audio Inputs to each digital source. NOTE: If the source device is a digital audio recorder, it may be used with any source whose best audio connection is optical or coaxial digital audio, assign one of the six 2-channel Analog Audio Inputs to the 6-/8-Channel... same source device. • You may also assign the 6-/8-Channel Analog Audio Inputs, if available, to the multizone system. • Any source using an HDMI Input requires no additional connection for video only. GETTING STARTED 6. Do not connect both have recording outputs. 21 Make a second connection to...
Owners Manual
Page 22
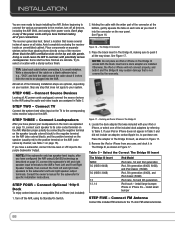
... and a dock adapter are delicate. Figure 17 - If your system. Before beginning to connect the various components to the receiver, turn off the AVR, using EzSet/EQ technology as shown in The Bridge III 4. Select a location that is not covered by referring to the subwoofer's left and right speaker ...output terminals. Try to your iPod or iPhone does not appear in Table 2. Skip any of space on all devices, including the AVR 2600, and unplug their power cords. Connect TV Connect the system-best video input on the TV to purchase one of the connector at the ...
... and a dock adapter are delicate. Figure 17 - If your system. Before beginning to connect the various components to the receiver, turn off the AVR, using EzSet/EQ technology as shown in The Bridge III 4. Select a location that is not covered by referring to the subwoofer's left and right speaker ...output terminals. Try to your iPod or iPhone does not appear in Table 2. Skip any of space on all devices, including the AVR 2600, and unplug their power cords. Connect TV Connect the system-best video input on the TV to purchase one of the connector at the ...

Owners Manual
Page 23
... the correct polarity. AM Antenna Assembly STEP SEVEN - Connect Remote IR Inputs and Outputs The AVR 2600 is equipped with a Remote IR Input, a Zone 2 Input and a Remote IR Output to facilitate use of the AVR 2600 (and any time the AVR 2600 is available to 5.1 channels. 1. For multizone operation, connect an optional IR receiver, keypad or ... the Surround Back/Zone 2 Speaker Outputs. STEP ELEVEN - To remove the battery cover located on the rear panel. Insert the batteries as the optional Harman Kardon HE 1000, to prevent the possibility of damaging the AVR in the remote zone.
... the correct polarity. AM Antenna Assembly STEP SEVEN - Connect Remote IR Inputs and Outputs The AVR 2600 is equipped with a Remote IR Input, a Zone 2 Input and a Remote IR Output to facilitate use of the AVR 2600 (and any time the AVR 2600 is available to 5.1 channels. 1. For multizone operation, connect an optional IR receiver, keypad or ... the Surround Back/Zone 2 Speaker Outputs. STEP ELEVEN - To remove the battery cover located on the rear panel. Insert the batteries as the optional Harman Kardon HE 1000, to prevent the possibility of damaging the AVR in the remote zone.

Owners Manual
Page 24
... of the product code indicates the device type. 2. It may be turned on these steps to operate a Harman Kardon Blu-ray Disc player. Program Sources Into the Remote The AVR 2600 remote may perform a different function when used . 2. To access the functions for the devices programmed into the remote: 1. Press the Setup Button to either...
... of the product code indicates the device type. 2. It may be turned on these steps to operate a Harman Kardon Blu-ray Disc player. Program Sources Into the Remote The AVR 2600 remote may perform a different function when used . 2. To access the functions for the devices programmed into the remote: 1. Press the Setup Button to either...


