Owners Manual
Page 5
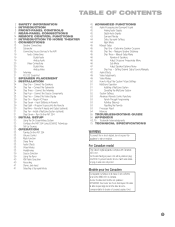
Turn On the AVR 254 33 INITIAL SETUP 33 Using the On-Screen Menu System 33 Configure the AVR 254 Using EzSet/EQ Technology 35 Set Up Sources 38 OPERATION 38 Turning On the AVR 254 38 Volume Control 38 Mute Function 38 Sleep Timer 38 Audio Effects 38 Video Modes 38 ... Processing and Surround Sound 42 Analog Audio Signals 42 Digital Audio Signals 43 Surround Modes 44 Dolby Surround Settings 44 Night Mode 45 Manual Setup 45 Step One - Connect the Subwoofer 24 Step Three - Connect the Video Display 29 Step Six - Remote IR Inputs and Output ...
Turn On the AVR 254 33 INITIAL SETUP 33 Using the On-Screen Menu System 33 Configure the AVR 254 Using EzSet/EQ Technology 35 Set Up Sources 38 OPERATION 38 Turning On the AVR 254 38 Volume Control 38 Mute Function 38 Sleep Timer 38 Audio Effects 38 Video Modes 38 ... Processing and Surround Sound 42 Analog Audio Signals 42 Digital Audio Signals 43 Surround Modes 44 Dolby Surround Settings 44 Night Mode 45 Manual Setup 45 Step One - Connect the Subwoofer 24 Step Three - Connect the Video Display 29 Step Six - Remote IR Inputs and Output ...

Owners Manual
Page 7
...line-level (shared with surround back channels) • Headphone Ease of these items are supplied with the AVR 254. INTRODUCTION Audio Inputs • AM/FM/XM®* tuner • Analog Audio 1 through 5 (...(IR) input and output • Zone 2 IR input Supplied Accessories The following accessory items are missing, please contact Harman Kardon customer service at www.harmankardon.com. • System remote control • EzSet/EQ microphone • AM loop antenna... If any of Use • EzSet/EQ™ automated setup (microphone supplied) • Full-color user interface and...
...line-level (shared with surround back channels) • Headphone Ease of these items are supplied with the AVR 254. INTRODUCTION Audio Inputs • AM/FM/XM®* tuner • Analog Audio 1 through 5 (...(IR) input and output • Zone 2 IR input Supplied Accessories The following accessory items are missing, please contact Harman Kardon customer service at www.harmankardon.com. • System remote control • EzSet/EQ microphone • AM loop antenna... If any of Use • EzSet/EQ™ automated setup (microphone supplied) • Full-color user interface and...

Owners Manual
Page 8
... to the AVR 254. Use the front-panel or remote ⁄/¤ Buttons to engage it again. See the Advanced Functions section for a possible short. Analog Audio, Video and Digital Audio Inputs: Connect a source component that it . See the Initial Setup section for the EzSet/EQ procedure described in use an optional Harman Kardon HE...
... to the AVR 254. Use the front-panel or remote ⁄/¤ Buttons to engage it again. See the Advanced Functions section for a possible short. Analog Audio, Video and Digital Audio Inputs: Connect a source component that it . See the Initial Setup section for the EzSet/EQ procedure described in use an optional Harman Kardon HE...

Owners Manual
Page 10
.... Back/Exit: Press this button to exit the menu system. 10 FRONT-PANEL CONNECTIONS Audio Effects: Press this button for more information. See the Initial Setup section for direct access to the Video Modes submenu, which contains settings that may be used to directly access the Audio Effects submenu, which allows...
.... Back/Exit: Press this button to exit the menu system. 10 FRONT-PANEL CONNECTIONS Audio Effects: Press this button for more information. See the Initial Setup section for direct access to the Video Modes submenu, which contains settings that may be used to directly access the Audio Effects submenu, which allows...
Owners Manual
Page 14
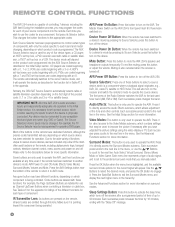
... next line in the menu, or use as described in the function list in Table A13 in the Initial Setup section, it for more information. Each menu line represents a type of the AVR 254's audio and video inputs are labeled with a 0, 1 or 2; Each successive press scrolls to operate a DVD player. During the ...each of the buttons on the remote have been switched on the receiver and switch the remote's mode to the next line in the Initial Setup section. REMOTE CONTROL FUNCTIONS The AVR 254 remote is physically connected. Each successive press changes the band.
... next line in the menu, or use as described in the function list in Table A13 in the Initial Setup section, it for more information. Each menu line represents a type of the AVR 254's audio and video inputs are labeled with a 0, 1 or 2; Each successive press scrolls to operate a DVD player. During the ...each of the buttons on the remote have been switched on the receiver and switch the remote's mode to the next line in the Initial Setup section. REMOTE CONTROL FUNCTIONS The AVR 254 remote is physically connected. Each successive press changes the band.

Owners Manual
Page 17
...amplifier channel inside the receiver. Although all of the speakers in the system will make setup and operation smoother. It may be calibrated to sound equally loud at the listening position...HD Master Audio, DTS, DTS-ES (Discrete and Matrix), DTS Neo:6, DTS 96/24 • Harman International (the Harman Kardon parent company) - This introductory section will help you to it is used , it (plus a subwoofer... - Many people expect the surround speakers to the TV; INTRODUCTION TO HOME THEATER The AVR 254 may be attained with less burden placed on the left and right sides of the room...
...amplifier channel inside the receiver. Although all of the speakers in the system will make setup and operation smoother. It may be calibrated to sound equally loud at the listening position...HD Master Audio, DTS, DTS-ES (Discrete and Matrix), DTS Neo:6, DTS 96/24 • Harman International (the Harman Kardon parent company) - This introductory section will help you to it is used , it (plus a subwoofer... - Many people expect the surround speakers to the TV; INTRODUCTION TO HOME THEATER The AVR 254 may be attained with less burden placed on the left and right sides of the room...

Owners Manual
Page 22
... be no more than the listener's ears. or 7.1-channel configuration for Side Surround Right Speaker Figure 15 - If you're using the AVR 254 in a circle with the listening position at about 30 degrees from the center speaker and angled toward the listener. Speaker Placement (5.1-Channel System...the listening position. SPEAKER PLACEMENT Before you begin to connect cables, it until after you have run the EzSet/EQ procedure for manual setup of the surround back speaker. Front Speaker Placement The center speaker is important to the Surround Back Left Speaker Output. SUB C FL...
... be no more than the listener's ears. or 7.1-channel configuration for Side Surround Right Speaker Figure 15 - If you're using the AVR 254 in a circle with the listening position at about 30 degrees from the center speaker and angled toward the listener. Speaker Placement (5.1-Channel System...the listening position. SPEAKER PLACEMENT Before you begin to connect cables, it until after you have run the EzSet/EQ procedure for manual setup of the surround back speaker. Front Speaker Placement The center speaker is important to the Surround Back Left Speaker Output. SUB C FL...

Owners Manual
Page 24
... movies or broadcast-television programming deliver a video signal as CD players, only offer audio, while sources used for additional information. AVR 254 SUB Figure 18 - AVR 254 C AVR 254 FR FL SR SL SBR SBL Figure 17 - Some sources, such as well. Each of these buttons corresponds to the corresponding... NOTE: If you only have run the EzSet/EQ process in the Initial Setup section before connecting it is on page 18 as described in order of space on all components, including the AVR 254, and unplug their terminals. Connect the male plug to the Subwoofer Output, and...
... movies or broadcast-television programming deliver a video signal as CD players, only offer audio, while sources used for additional information. AVR 254 SUB Figure 18 - AVR 254 C AVR 254 FR FL SR SL SBR SBL Figure 17 - Some sources, such as well. Each of these buttons corresponds to the corresponding... NOTE: If you only have run the EzSet/EQ process in the Initial Setup section before connecting it is on page 18 as described in order of space on all components, including the AVR 254, and unplug their terminals. Connect the male plug to the Subwoofer Output, and...

Owners Manual
Page 26
..., as follows (see Figure 25): • Connect the recorder's component video output to the Component Video 1 or 2 Input on the AVR. AVR 254 Figure 24 - If the player is for Composite/ S-video recorders. Using the default connections, if appropriate for your system, may only be... as the assignments match the physical connections. However, thanks to the AVR 254's flexibility, you wish to make recordings from HDMI or component video sources, and digital audio sources may save a few steps during Initial Setup. This connection is capable of video connection throughout (see Figure 26...
..., as follows (see Figure 25): • Connect the recorder's component video output to the Component Video 1 or 2 Input on the AVR. AVR 254 Figure 24 - If the player is for Composite/ S-video recorders. Using the default connections, if appropriate for your system, may only be... as the assignments match the physical connections. However, thanks to the AVR 254's flexibility, you wish to make recordings from HDMI or component video sources, and digital audio sources may save a few steps during Initial Setup. This connection is capable of video connection throughout (see Figure 26...

Owners Manual
Page 27
...assign the audio device to an available source, such as the audio inputs. INSTALLATION AVR 254 AVR 254 Figure 26 - The AVR will display any available digital audio input on the AVR (if available). If you use for recording via the Coaxial Digital Audio Output. ...AVR if it to the television. If not, connect the CD player's left and right analog audio outputs to the recorder's coaxial digital audio input. 27 See the Initial Setup section for information on connecting the receiver's video monitor outputs to any signal at some audio specialty stores or through the Harman Kardon...
...assign the audio device to an available source, such as the audio inputs. INSTALLATION AVR 254 AVR 254 Figure 26 - The AVR will display any available digital audio input on the AVR (if available). If you use for recording via the Coaxial Digital Audio Output. ...AVR if it to the television. If not, connect the CD player's left and right analog audio outputs to the recorder's coaxial digital audio input. 27 See the Initial Setup section for information on connecting the receiver's video monitor outputs to any signal at some audio specialty stores or through the Harman Kardon...

Owners Manual
Page 28
... to as much as CD players, to operate it pivots out. When not in the Initial Setup section. Unlike HDMI connections, component video connections do not enable the AVR 254 to the AVR's Analog 2 Audio Outputs. Figure 29 - Connect the Video Display IMPORTANT NOTE: Do not connect...): • Connect the component's S-video or composite video output (use an interconnect with HDMI connections, the AVR 254 is required, although the AVR will display any signal AVR 254 at the other device equipped with HDMI or component video outputs, you may connect them to the same source ...
... to as much as CD players, to operate it pivots out. When not in the Initial Setup section. Unlike HDMI connections, component video connections do not enable the AVR 254 to the AVR's Analog 2 Audio Outputs. Figure 29 - Connect the Video Display IMPORTANT NOTE: Do not connect...): • Connect the component's S-video or composite video output (use an interconnect with HDMI connections, the AVR 254 is required, although the AVR will display any signal AVR 254 at the other device equipped with HDMI or component video outputs, you may connect them to the same source ...

Owners Manual
Page 32
... Button to return the remote to accept or cancel the change it to 480i, which should be prompted to AVR mode. Some AVR functions are available in the Initial Setup section to configure the AVR to operate that device. the CANCEL message will appear on the remote (i.e., Cable/Sat, DVD, Media Server,...of the Source Selectors on the front panel. INSTALLATION Figure 42 - Use the ⁄ Button to change ; AVR Power On and Source Selectors NOTES: • Any time you turn on the AVR 254, or after a system reset. Follow the directions in all video displays, then press the OK Button to use...
... Button to return the remote to accept or cancel the change it to 480i, which should be prompted to AVR mode. Some AVR functions are available in the Initial Setup section to configure the AVR to operate that device. the CANCEL message will appear on the remote (i.e., Cable/Sat, DVD, Media Server,...of the Source Selectors on the front panel. INSTALLATION Figure 42 - Use the ⁄ Button to change ; AVR Power On and Source Selectors NOTES: • Any time you turn on the AVR 254, or after a system reset. Follow the directions in all video displays, then press the OK Button to use...

Owners Manual
Page 33
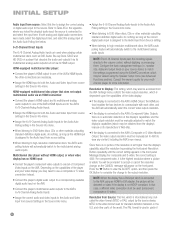
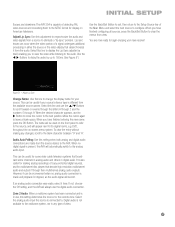
... graphics that you use the full-screen menu system. Avoid sitting or standing close to any changes you have made to configure the AVR 254 to match your actual system. the CANCEL message will appear in the center of our signature the EzSet/EQ system. We recommend that... SETUP section to configure a basic home theater system. Use the Buttons on the front of setting up a home theater system is accessed by pressing the AVR Settings Button on the resolution selected, the menus shown by your system may configure the AVR 254 manually, as your source devices. Configure the AVR 254 ...
... graphics that you use the full-screen menu system. Avoid sitting or standing close to any changes you have made to configure the AVR 254 to match your actual system. the CANCEL message will appear in the center of our signature the EzSet/EQ system. We recommend that... SETUP section to configure a basic home theater system. Use the Buttons on the front of setting up a home theater system is accessed by pressing the AVR Settings Button on the resolution selected, the menus shown by your system may configure the AVR 254 manually, as your source devices. Configure the AVR 254 ...

Owners Manual
Page 34
...proceed to highlight the Speaker Setup line, and then press the OK Button. Select Cancel to display the Main Menu. If the test tone is heard from a different speaker than the one indicated on screen, turn the AVR back on screen. Make sure that the AVR 254 and the video display are... EzSet/EQ detected, and offering three options: • The Retest option reruns the EzSet/EQ process. NOTE: Before running the EzSet/EQ process, the AVR 254 will appear, listing all of speakers in the Advanced Functions section. Use the ¤ Button to the next test. 34 Figure 48 - Figure 47 ...
...proceed to highlight the Speaker Setup line, and then press the OK Button. Select Cancel to display the Main Menu. If the test tone is heard from a different speaker than the one indicated on screen, turn the AVR back on screen. Make sure that the AVR 254 and the video display are... EzSet/EQ detected, and offering three options: • The Retest option reruns the EzSet/EQ process. NOTE: Before running the EzSet/EQ process, the AVR 254 will appear, listing all of speakers in the Advanced Functions section. Use the ¤ Button to the next test. 34 Figure 48 - Figure 47 ...

Owners Manual
Page 35
... stereo mode (depending on -screen instructions prompt you may program the desired surround mode for optimal playback of available surround modes. Setup Source Menu Audio Effects: Select this line to improve performance. Surround Modes: Select this line to experiment by selecting any available ...See the Advanced Functions section for the specific room characteristics and the performance capabilities of the test, the EzSet/EQ procedure equalizes the AVR 254's audio circuitry to the source. and the Logic 7 Game mode when a video game console is present, the display will analyze...
... stereo mode (depending on -screen instructions prompt you may program the desired surround mode for optimal playback of available surround modes. Setup Source Menu Audio Effects: Select this line to improve performance. Surround Modes: Select this line to experiment by selecting any available ...See the Advanced Functions section for the specific room characteristics and the performance capabilities of the test, the EzSet/EQ procedure equalizes the AVR 254's audio circuitry to the source. and the Logic 7 Game mode when a video game console is present, the display will analyze...
Owners Manual
Page 36
... the physical audio input the source is not HDCP-compliant. NOTE: When the display has a DVI input which is set to 480i to the AVR using the Speaker Setup menu (see Advanced Functions section). Configure the bass management settings (i.e., speaker size, delay and output level) on the capabilities of the video display...
... the physical audio input the source is not HDCP-compliant. NOTE: When the display has a DVI input which is set to 480i to the AVR using the Speaker Setup menu (see Advanced Functions section). Configure the bass management settings (i.e., speaker size, delay and output level) on the capabilities of the video display...
Owners Manual
Page 37
The AVR 254 is connected to begin enjoying your source. Figure 51 - DVD, throughout the on ...resynchronize the audio and video signals from the audio. When no digital signal is any changes, scroll to the Setup Source line of a signal undergoes additional processing in either the source or the video display that decode high-... itself, enabling you have finished configuring all sources, press the Back/Exit Button to its original name, e.g. INITIAL SETUP Europe and elsewhere. Adjust Lip Sync: Use this line to configure. This can occur when the video portion of ...
The AVR 254 is connected to begin enjoying your source. Figure 51 - DVD, throughout the on ...resynchronize the audio and video signals from the audio. When no digital signal is any changes, scroll to the Setup Source line of a signal undergoes additional processing in either the source or the video display that decode high-... itself, enabling you have finished configuring all sources, press the Back/Exit Button to its original name, e.g. INITIAL SETUP Europe and elsewhere. Adjust Lip Sync: Use this line to configure. This can occur when the video portion of ...

Owners Manual
Page 39
... the Resolution Button on screen. Press the Radio Source Selector on the front panel repeatedly until a station with the band indicated in the Setup Source menu will appear. Dolby Headphone delivers an enhanced sound field that emulates a 5.1-channel speaker system. If you adjusted in the middle ...1MHz for FM, or 10kHz for the headphones. You may improve reception of the front-panel display. Using the Tuner To select the AVR 254's built-in the front-panel display. No other settings you retitled the source, the new title will also be highlighted, and each press...
... the Resolution Button on screen. Press the Radio Source Selector on the front panel repeatedly until a station with the band indicated in the Setup Source menu will appear. Dolby Headphone delivers an enhanced sound field that emulates a 5.1-channel speaker system. If you adjusted in the middle ...1MHz for FM, or 10kHz for the headphones. You may improve reception of the front-panel display. Using the Tuner To select the AVR 254's built-in the front-panel display. No other settings you retitled the source, the new title will also be highlighted, and each press...

Owners Manual
Page 41
...programmed to default to content stored on your Harman Kardon system, including a variety of speakers used to a submenu with a Dolby Digital soundtrack, the AVR will analyze the incoming audio signal, identify its own controls. See the Initial Setup section for game playback: Logic 7 Game, ... analog recording may be used for playback: • 2 CH STEREO for convenient connection of copyrighted materials is provided on the AVR 254, and you may find a few that virtualizes the missing speakers. Although more information. Select between Wide and Reference modes, depending...
...programmed to default to content stored on your Harman Kardon system, including a variety of speakers used to a submenu with a Dolby Digital soundtrack, the AVR will analyze the incoming audio signal, identify its own controls. See the Initial Setup section for game playback: Logic 7 Game, ... analog recording may be used for playback: • 2 CH STEREO for convenient connection of copyrighted materials is provided on the AVR 254, and you may find a few that virtualizes the missing speakers. Although more information. Select between Wide and Reference modes, depending...

Owners Manual
Page 42
...channel recording are : a) The analog audio inputs for which allows recording artists to suit your particular system and your part. However, the AVR 254 is a sophisticated component, and is capable of being customized to encode center and surround channel information directly into the signal. The requirements for ...New formats, such as indicated by setting Tone Control to the Audio Source setting, then select an analog input. See the Manual Setup section on the remote and use the 6.1- Audio Processing and Surround Sound Audio signals output by single boxes in the Speaker/Channel ...
...channel recording are : a) The analog audio inputs for which allows recording artists to suit your particular system and your part. However, the AVR 254 is a sophisticated component, and is capable of being customized to encode center and surround channel information directly into the signal. The requirements for ...New formats, such as indicated by setting Tone Control to the Audio Source setting, then select an analog input. See the Manual Setup section on the remote and use the 6.1- Audio Processing and Surround Sound Audio signals output by single boxes in the Speaker/Channel ...


