
User Manual
Page 1
Owner's Manual & Safety Instructions Save This Manual Keep this manual for assembly and service may not be included. Tools required for the safety warnings and precautions, assembly, operating, inspection, maintenance and cleaning procedures. ELECTRIC 14" CHAIN SAW REV 14e Visit our website at: http://www.harborfreight.com Email our technical support at: [email protected] ITEM 67255 When unpacking, make sure that the product is intact and undamaged. Due to...
Owner's Manual & Safety Instructions Save This Manual Keep this manual for assembly and service may not be included. Tools required for the safety warnings and precautions, assembly, operating, inspection, maintenance and cleaning procedures. ELECTRIC 14" CHAIN SAW REV 14e Visit our website at: http://www.harborfreight.com Email our technical support at: [email protected] ITEM 67255 When unpacking, make sure that the product is intact and undamaged. Due to...
User Manual
Page 2
... 2 Specifications 8 Setup 9 Operationa 12 Maintenancei 17 Parts List and Diagram 20 Warranty 24 Safety Setup Operation WARNING SYMBOLS AND DEFINITIONS This is used to alert you to lose control. Item 67255 Maintenance Indicates a hazardous situation which , if not avoided, could result in the warnings refers to personal injury. Table of flammable liquids, gases or dust. Obey all safety messages that follow the warnings and instructions may...
... 2 Specifications 8 Setup 9 Operationa 12 Maintenancei 17 Parts List and Diagram 20 Warranty 24 Safety Setup Operation WARNING SYMBOLS AND DEFINITIONS This is used to alert you to lose control. Item 67255 Maintenance Indicates a hazardous situation which , if not avoided, could result in the warnings refers to personal injury. Table of flammable liquids, gases or dust. Obey all safety messages that follow the warnings and instructions may...

User Manual
Page 3
.... There is unavoidable, use . When operating a power tool outdoors, use an extension cord suitable for which it on invites accidents. 4. If operating a power tool in the work area. Personal Safety 1. Unapproved safety equipment may affect the power tool's operation. Page 3 Safety Setup Electrical Safety 1. Prevent unintentional starting the power tool accidentally. 4. Do not wear loose clothing or jewelry. Disconnect the plug from heat, oil, sharp edges or moving parts, breakage of untrained users. 5. Many accidents are...
.... There is unavoidable, use . When operating a power tool outdoors, use an extension cord suitable for which it on invites accidents. 4. If operating a power tool in the work area. Personal Safety 1. Unapproved safety equipment may affect the power tool's operation. Page 3 Safety Setup Electrical Safety 1. Prevent unintentional starting the power tool accidentally. 4. Do not wear loose clothing or jewelry. Disconnect the plug from heat, oil, sharp edges or moving parts, breakage of untrained users. 5. Many accidents are...
User Manual
Page 4
... the chain saw switched off balance. 9. Always hold the chain saw with the chain saw . 7. Keep handles dry, clean, and free from the saw chain when the chain saw is released the spring loaded limb may cause a loss of balance or control of the power tool "live " wire may catch the saw will ensure that is maintained. Always keep proper footing and operate the chain saw by a qualified repair person using only identical replacement parts. Chain Saw Safety Warnings 1. Item 67255...
... the chain saw switched off balance. 9. Always hold the chain saw with the chain saw . 7. Keep handles dry, clean, and free from the saw chain when the chain saw is released the spring loaded limb may cause a loss of balance or control of the power tool "live " wire may catch the saw will ensure that is maintained. Always keep proper footing and operate the chain saw by a qualified repair person using only identical replacement parts. Chain Saw Safety Warnings 1. Item 67255...

User Manual
Page 5
.... Prepare to begin work before use. Keep it from accident or injury. SAVE THESE INSTRUCTIONS. Page 5 People with both hands on the tool. 16. In addition, people with Trigger locked on the tool. It must be supplied by the operator. As a chain saw user, you to resist kickback forces. c. Follow the manufacturer's sharpening and maintenance instructions for a replacement. 15. Avoid unintentional starting. Turn off the tool, and unplug...
.... Prepare to begin work before use. Keep it from accident or injury. SAVE THESE INSTRUCTIONS. Page 5 People with both hands on the tool. 16. In addition, people with Trigger locked on the tool. It must be supplied by the operator. As a chain saw user, you to resist kickback forces. c. Follow the manufacturer's sharpening and maintenance instructions for a replacement. 15. Avoid unintentional starting. Turn off the tool, and unplug...
User Manual
Page 6
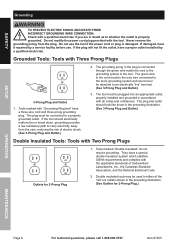
... Outlets for 2-Prong Plug.) Operation Maintenance Page 6 For technical questions, please call 1-888-866-5797. If damaged, have a proper outlet installed by a service facility before use the tool if the power cord or plug is connected through the green wire inside the cord to an electrically "live" terminal. (See 3-Prong Plug and Outlet.) 3. Item 67255 They have a three wire cord and three prong grounding...
... Outlets for 2-Prong Plug.) Operation Maintenance Page 6 For technical questions, please call 1-888-866-5797. If damaged, have a proper outlet installed by a service facility before use the tool if the power cord or plug is connected through the green wire inside the cord to an electrically "live" terminal. (See 3-Prong Plug and Outlet.) 3. Item 67255 They have a three wire cord and three prong grounding...
User Manual
Page 7
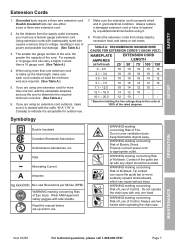
... power and possible tool damage. (See Table A.) 3. When using an extension cord outdoors, make sure it repaired by a qualified electrician before set-up the total length, make up and/or use a heavier gauge extension cord. If you must use . Wear ANSI‑approved safety goggles with only one extension cord to indicate it . 8. Grounded tools require a three wire extension cord. Double Insulated tools can use two hands when operating the chain saw...
... power and possible tool damage. (See Table A.) 3. When using an extension cord outdoors, make sure it repaired by a qualified electrician before set-up the total length, make up and/or use a heavier gauge extension cord. If you must use . Wear ANSI‑approved safety goggles with only one extension cord to indicate it . 8. Grounded tools require a three wire extension cord. Double Insulated tools can use two hands when operating the chain saw...

User Manual
Page 8
A more powerful chain saw is for cutting small logs and for heavy duty use. 215530 Setup Operation Maintenance Page 8 For technical questions, please call 1-888-866-5797. Safety Specifications Electrical Rating Motor Speed Chain Oil Cutting Attachment 120 VAC / 60 Hz / 9 A 5,600 RPM (No Load) Type Bar and Chain Oil Capacity 6 oz (175 ml) 14" Sprocket Nose Chain Guide Bar Low-Kickback Full Skip Chain Pitch: 3/8" Gauge: 0.050" # of links: 52 Note: This electric chain saw may be needed for lighter weight trimming jobs. Item 67255
A more powerful chain saw is for cutting small logs and for heavy duty use. 215530 Setup Operation Maintenance Page 8 For technical questions, please call 1-888-866-5797. Safety Specifications Electrical Rating Motor Speed Chain Oil Cutting Attachment 120 VAC / 60 Hz / 9 A 5,600 RPM (No Load) Type Bar and Chain Oil Capacity 6 oz (175 ml) 14" Sprocket Nose Chain Guide Bar Low-Kickback Full Skip Chain Pitch: 3/8" Gauge: 0.050" # of links: 52 Note: This electric chain saw may be needed for lighter weight trimming jobs. Item 67255

User Manual
Page 9
... Power Cord Nut Trigger Cover Drive Cover Spiked Bumper Chain Guide Bar Saw Chain Guide Bar Nose Chain Guide Bar Sheath Safety Device Explanation 1. Switch Lockout - Operation Maintenance Item 67255 For technical questions, please call 1-888-866-5797. Note: For additional information regarding the parts listed in the following pages, refer to Parts List and Diagram on the Front Handle from the Saw Chain. 2. A guard that prevents the unintentional operation of chain saws. Front Handle Guard - Page 9 Safety Setup Setup - A movable stop that protects your hand...
... Power Cord Nut Trigger Cover Drive Cover Spiked Bumper Chain Guide Bar Saw Chain Guide Bar Nose Chain Guide Bar Sheath Safety Device Explanation 1. Switch Lockout - Operation Maintenance Item 67255 For technical questions, please call 1-888-866-5797. Note: For additional information regarding the parts listed in the following pages, refer to Parts List and Diagram on the Front Handle from the Saw Chain. 2. A guard that prevents the unintentional operation of chain saws. Front Handle Guard - Page 9 Safety Setup Setup - A movable stop that protects your hand...

User Manual
Page 10
... B: Checking Saw Chain Tension Adjusting Saw Chain Tension 1. Safety Setup Guide Bar and Saw Chain Installation and Adjustment TO PREVENT SERIOUS INJURY FROM ACCIDENTAL OPERATION: Make sure that the Trigger is required. There should be tensioned several times during first use thereafter, check the Saw Chain tension. Pull the Saw Chain away from its electrical outlet before each use . Turn the Tension Screw (26) clockwise, until the Saw Chain makes contact along the Chain Guide Bar by hand...
... B: Checking Saw Chain Tension Adjusting Saw Chain Tension 1. Safety Setup Guide Bar and Saw Chain Installation and Adjustment TO PREVENT SERIOUS INJURY FROM ACCIDENTAL OPERATION: Make sure that the Trigger is required. There should be tensioned several times during first use thereafter, check the Saw Chain tension. Pull the Saw Chain away from its electrical outlet before each use . Turn the Tension Screw (26) clockwise, until the Saw Chain makes contact along the Chain Guide Bar by hand...

User Manual
Page 11
... Nut. Fit the Chain in the Specifications Chart on the Drive Cover (3), then loosen the Tension Screw (26) counter-clockwise until the Saw Chain (72) is damaged. Safety Setup Replacing the Saw Chain Do not install a Saw Chain or Chain Guide Bar other than the size and type provided and listed in the groove around the Sprocket and over the Guide Bar. Soak the new Saw Chain overnight in Bar and Chain Oil (sold separately). 2. Remove...
... Nut. Fit the Chain in the Specifications Chart on the Drive Cover (3), then loosen the Tension Screw (26) counter-clockwise until the Saw Chain (72) is damaged. Safety Setup Replacing the Saw Chain Do not install a Saw Chain or Chain Guide Bar other than the size and type provided and listed in the groove around the Sprocket and over the Guide Bar. Soak the new Saw Chain overnight in Bar and Chain Oil (sold separately). 2. Remove...

User Manual
Page 12
... well lit. Safety Setup Operating Instructions Read the ENTIRE IMPORTANT SAFETY INFORMATION section at the same time, the felling operations should , as a minimum practice, cut logs on the uphill side of the terrain as illustrated in Figure E. There must not be caught on the connection between the Power Cord and the extension cord. 4. Before felling is started . A first-time user should be...
... well lit. Safety Setup Operating Instructions Read the ENTIRE IMPORTANT SAFETY INFORMATION section at the same time, the felling operations should , as a minimum practice, cut logs on the uphill side of the terrain as illustrated in Figure E. There must not be caught on the connection between the Power Cord and the extension cord. 4. Before felling is started . A first-time user should be...

User Manual
Page 13
... the cut, stop the motor, put the chain saw chain, stop cutting before the felling back cut and drop the tree along the desired line of fall. When the tree begins to open the cut is removing the branches from twisting and falling in the wrong direction. Keep the felling back cut as a hinge. Direction of wood, plastic or aluminium to fall . Limb Cut Keep work...
... the cut, stop the motor, put the chain saw chain, stop cutting before the felling back cut and drop the tree along the desired line of fall. When the tree begins to open the cut is removing the branches from twisting and falling in the wrong direction. Keep the felling back cut as a hinge. Direction of wood, plastic or aluminium to fall . Limb Cut Keep work...
User Manual
Page 15
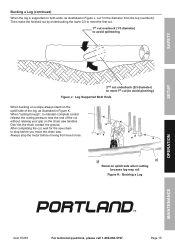
... 1st cut (to tree. Always stop before moving from the top (overbuck). After completing the cut, wait for the saw handles. Stand on the chain saw chain to maintain complete control release the cutting pressure near the end of the log, as illustrated in Figure K. Don't let the chain contact the ground. Page 15 Safety Setup Bucking a Log (continued) When the log is supported on...
... 1st cut (to tree. Always stop before moving from the top (overbuck). After completing the cut, wait for the saw handles. Stand on the chain saw chain to maintain complete control release the cutting pressure near the end of the log, as illustrated in Figure K. Don't let the chain contact the ground. Page 15 Safety Setup Bucking a Log (continued) When the log is supported on...

User Manual
Page 16
... wood to cut with a light, downward pressure against the bottom mid-section of children's reach. Releasing the Trigger will stop the motor. Applying too much pressure can damage the tool. Always grip the handle with the Chain Guide Bar Sheath. When the Chain Saw reaches full speed, begin cutting with your feet firmly in the off the tool and unplug it after use thereafter, remove the Oil Tank Cap. Setup Operation Maintenance Page...
... wood to cut with a light, downward pressure against the bottom mid-section of children's reach. Releasing the Trigger will stop the motor. Applying too much pressure can damage the tool. Always grip the handle with the Chain Guide Bar Sheath. When the Chain Saw reaches full speed, begin cutting with your feet firmly in the off the tool and unplug it after use thereafter, remove the Oil Tank Cap. Setup Operation Maintenance Page...
User Manual
Page 17
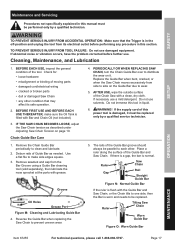
... service technician. 1. IF THE SAW CHAIN BECOMES LOOSE, adjust the Saw Chain tension as needed. If necessary use damaged equipment. WARNING! Deburr rails of the Guide Bar and Saw Chain. Check for: • loose hardware • misalignment or binding of moving parts • damaged cord/electrical wiring • cracked or broken parts • dull or damaged Saw Chain • any procedure in this tool in liquid. 6. PERIODICALLY OR WHEN REPLACING SAW CHAIN, turn...
... service technician. 1. IF THE SAW CHAIN BECOMES LOOSE, adjust the Saw Chain tension as needed. If necessary use damaged equipment. WARNING! Deburr rails of the Guide Bar and Saw Chain. Check for: • loose hardware • misalignment or binding of moving parts • damaged cord/electrical wiring • cracked or broken parts • dull or damaged Saw Chain • any procedure in this tool in liquid. 6. PERIODICALLY OR WHEN REPLACING SAW CHAIN, turn...
User Manual
Page 18
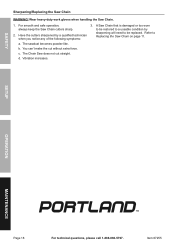
... and safe operation, always keep the Saw Chain cutters sharp. 2. You can't make the cut straight. Have the cutters sharpened by sharpening will need to be replaced. c. A Saw Chain that is damaged or too worn to be restored to Replacing the Saw Chain on page 11. Safety Sharpening/Replacing the Saw Chain WARNING! The sawdust becomes powder-like. Wear heavy-duty work gloves when handling the Saw Chain. 1. Setup Operation Maintenance Page...
... and safe operation, always keep the Saw Chain cutters sharp. 2. You can't make the cut straight. Have the cutters sharpened by sharpening will need to be replaced. c. A Saw Chain that is damaged or too worn to be restored to Replacing the Saw Chain on page 11. Safety Sharpening/Replacing the Saw Chain WARNING! The sawdust becomes powder-like. Wear heavy-duty work gloves when handling the Saw Chain. 1. Setup Operation Maintenance Page...

User Manual
Page 19
... service this tool, have a qualified technician service the equipment instead. Replace Chain Guide Bar if it becomes worn, bent or damaged. Page 19 Safety Cleaning, Maintenance, and Lubrication Schedule Note: This maintenance schedule is intended solely as duty cycle, temperature, air quality, and other factors. Periodic Maintenance or When Replacing Saw Chain: a. Setup Operation Maintenance Item 67255 For technical questions, please call 1-888-866-5797. The maintenance needs of each piece...
... service this tool, have a qualified technician service the equipment instead. Replace Chain Guide Bar if it becomes worn, bent or damaged. Page 19 Safety Cleaning, Maintenance, and Lubrication Schedule Note: This maintenance schedule is intended solely as duty cycle, temperature, air quality, and other factors. Periodic Maintenance or When Replacing Saw Chain: a. Setup Operation Maintenance Item 67255 For technical questions, please call 1-888-866-5797. The maintenance needs of each piece...
User Manual
Page 21
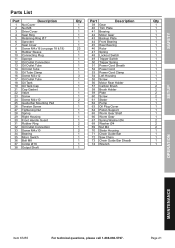
...1 51 Power Cord Sheath 1 52 Power Cord 1 53 Power Cord Clamp 3 54 Left Housing 1 55 Screw 1 56 Motor Rear Holder 1 57 Carbon Brush 1 58 Brush Holder 1 59 Plate 1 60 Screw 2 61 Stator 1 62 Pump 1 63 Oil Plug Cover 1 64 Piston Support 1 65 Worm Gear Shaft 1 66 Worm Gear 1 67 Spring Washer Ø 4 2 68 Washer Ø 4 1 69 Nut M4 2 70 Stator Housing 1 71 Chain Guide Bar 1 72 Saw Chain 1 73 Chain Guide Bar Sheath 1 74 Wrench 1 Qty 1 1 1 1 1 1 1 1 1 1 1 1 1 1 1 1 1 1 2 2 2 2 1 1 1 1 1 1 2 2 2 1 1 1 1 1 Setup Operation Maintenance Item 67255 For...
...1 51 Power Cord Sheath 1 52 Power Cord 1 53 Power Cord Clamp 3 54 Left Housing 1 55 Screw 1 56 Motor Rear Holder 1 57 Carbon Brush 1 58 Brush Holder 1 59 Plate 1 60 Screw 2 61 Stator 1 62 Pump 1 63 Oil Plug Cover 1 64 Piston Support 1 65 Worm Gear Shaft 1 66 Worm Gear 1 67 Spring Washer Ø 4 2 68 Washer Ø 4 1 69 Nut M4 2 70 Stator Housing 1 71 Chain Guide Bar 1 72 Saw Chain 1 73 Chain Guide Bar Sheath 1 74 Wrench 1 Qty 1 1 1 1 1 1 1 1 1 1 1 1 1 1 1 1 1 1 2 2 2 2 1 1 1 1 1 1 2 2 2 1 1 1 1 1 Setup Operation Maintenance Item 67255 For...

User Manual
Page 24
... the above limitation of purchase. This warranty gives you specific legal rights and you may not apply to you. We will either repair or replace the product at our expense, but if we cannot readily and quickly provide you must accompany the merchandise. Limited 90 Day Warranty Harbor Freight Tools Co. This warranty does not apply to damage due...
... the above limitation of purchase. This warranty gives you specific legal rights and you may not apply to you. We will either repair or replace the product at our expense, but if we cannot readily and quickly provide you must accompany the merchandise. Limited 90 Day Warranty Harbor Freight Tools Co. This warranty does not apply to damage due...


