User Manual
Page 3
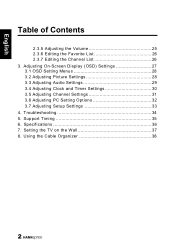
Specifications 36 7. Support Timing 35 6. Troubleshooting 34 5. Setting the TV on the Wall 37 8. Using the Cable Organizer 38 2 English Table of Contents 2.3.5 Adjusting the Volume 25 2.3.6 Editing the Favorite List 26 2.3.7 Editing the Channel List 26 3. Adjusting On-Screen Display (OSD) Settings 27 3.1 OSD Setting Menus 28 3.2 Adjusting Picture Settings 28 3.3 Adjusting Audio Settings 29 3.4 Adjusting Clock and Timer Settings 30 3.5 Adjusting Channel Settings 31 3.6 Adjusting PC Setting Options 32 3.7 Adjusting Setup Settings 33 4.
Specifications 36 7. Support Timing 35 6. Troubleshooting 34 5. Setting the TV on the Wall 37 8. Using the Cable Organizer 38 2 English Table of Contents 2.3.5 Adjusting the Volume 25 2.3.6 Editing the Favorite List 26 2.3.7 Editing the Channel List 26 3. Adjusting On-Screen Display (OSD) Settings 27 3.1 OSD Setting Menus 28 3.2 Adjusting Picture Settings 28 3.3 Adjusting Audio Settings 29 3.4 Adjusting Clock and Timer Settings 30 3.5 Adjusting Channel Settings 31 3.6 Adjusting PC Setting Options 32 3.7 Adjusting Setup Settings 33 4.
User Manual
Page 16
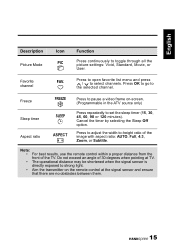
... to select channels. Press to open favorite list menu and press / to the selected channel. Press to adjust the width-to toggle through all the picture settings: Vivid, Standard, Movie, or User. Do not exceed an angle of 30 degrees when pointing at the signal sensor and ensure that there are no...
... to select channels. Press to open favorite list menu and press / to the selected channel. Press to adjust the width-to toggle through all the picture settings: Vivid, Standard, Movie, or User. Do not exceed an angle of 30 degrees when pointing at the signal sensor and ensure that there are no...

User Manual
Page 28
... get acquainted with the placement of the OSD system: ADJUSTABLE ITEMS: Displays the settings/values of menu items. The chosen item is marked by a different color. Picture Audio Clock / Timer Channel Setup INSTRUCTIONS: Quick instructions for adjusting the settings. Picture Mode Brightness Contrast Sharpness Color Tint Digital NR X-Contrast Backlight Aspect ratio Move OK... / VOL- The OSD menu can be accessed through the buttons either on the control panel or the remote control. Before going to adjust the TV settings. Remote Control MENU Arrow Arrow Arrow Arrow OK MENU 27
... get acquainted with the placement of the OSD system: ADJUSTABLE ITEMS: Displays the settings/values of menu items. The chosen item is marked by a different color. Picture Audio Clock / Timer Channel Setup INSTRUCTIONS: Quick instructions for adjusting the settings. Picture Mode Brightness Contrast Sharpness Color Tint Digital NR X-Contrast Backlight Aspect ratio Move OK... / VOL- The OSD menu can be accessed through the buttons either on the control panel or the remote control. Before going to adjust the TV settings. Remote Control MENU Arrow Arrow Arrow Arrow OK MENU 27

User Manual
Page 29
...pressing / to move the scales from 0 to 14. • The Aspect Ratio can be set to Auto, Full, 4:3, Zoom, or Subtitle. • The Color Temp can be set by different adjustment methods. 3.2 Adjusting Picture Settings 1 Press MENU to enter the OSD Main Menu screen. 2 Press / on the remote ...control or PS / PT on the control panel to select Picture menu. 3 Press / OK on the remote control or INPUT ...
...pressing / to move the scales from 0 to 14. • The Aspect Ratio can be set to Auto, Full, 4:3, Zoom, or Subtitle. • The Color Temp can be set by different adjustment methods. 3.2 Adjusting Picture Settings 1 Press MENU to enter the OSD Main Menu screen. 2 Press / on the remote ...control or PS / PT on the control panel to select Picture menu. 3 Press / OK on the remote control or INPUT ...

User Manual
Page 30
...Equalizer, Balance, Audio Effect, Auto Volume (ATV only), Preferred Language (DTV only), Digital MTS (DTV only), Audio Description (DTV only), and Recall settings. on the input signal source. 29 Note: The items available on the OSD may vary depending on the control panel to adjust the scales in..., Portugese, or Polish. • The Digital MTS can be set to Auto, Stereo, Dual 1, or Dual 2. • The Audio Description can be set to Mode or Volume. • The Recall can be used to enter the Audio menu. Picture Audio Clock / Timer Channel Setup Audio Mode Equalizer Balance Audio Effect...
...Equalizer, Balance, Audio Effect, Auto Volume (ATV only), Preferred Language (DTV only), Digital MTS (DTV only), Audio Description (DTV only), and Recall settings. on the input signal source. 29 Note: The items available on the OSD may vary depending on the control panel to adjust the scales in..., Portugese, or Polish. • The Digital MTS can be set to Auto, Stereo, Dual 1, or Dual 2. • The Audio Description can be set to Mode or Volume. • The Recall can be used to enter the Audio menu. Picture Audio Clock / Timer Channel Setup Audio Mode Equalizer Balance Audio Effect...

User Manual
Page 31
... are available for adjustments only if you select Manual in Date. • The Local Offset can be set to Current Time, CT +1h, CT +2h, CT +3h, CT -1h, CT -2h, ...The Clock and Timer menu can be used to adjust the Sleep Timer, Time Mode, Date, and Local Offset settings. on the control panel to change the values or press OK on the remote control or INPUT / VOL+ .... 30 Note: The items available on the OSD may vary depending on the remote control or VOL+ / VOL- Picture Audio Clock / Timer Channel Setup Sleep Timer Time Mode Date Local Offset Move OK Select Menu Return 4 Press / on...
... are available for adjustments only if you select Manual in Date. • The Local Offset can be set to Current Time, CT +1h, CT +2h, CT +3h, CT -1h, CT -2h, ...The Clock and Timer menu can be used to adjust the Sleep Timer, Time Mode, Date, and Local Offset settings. on the control panel to change the values or press OK on the remote control or INPUT / VOL+ .... 30 Note: The items available on the OSD may vary depending on the remote control or VOL+ / VOL- Picture Audio Clock / Timer Channel Setup Sleep Timer Time Mode Date Local Offset Move OK Select Menu Return 4 Press / on...
User Manual
Page 32
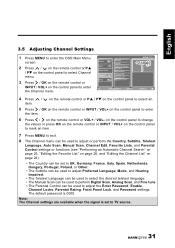
...can be used to adjust or perform the Country, Subtitle, Teletext Language, Auto Scan, Manual Scan, Channel Edit, Favorite Lists, and Parental Control settings or functions (see "Performing an Automatic Channel Search" on page 25, "Editing the Favorite List" on page 26, and "Editing the Channel ...List" on the control panel to enter the Channel menu. Picture Audio Clock / Timer Channel Setup Country Subtitle Teletext Language Auto Scan Manual Scan Channel Edit Favorite Lists Parental Control Move OK Select Menu Return ...
...can be used to adjust or perform the Country, Subtitle, Teletext Language, Auto Scan, Manual Scan, Channel Edit, Favorite Lists, and Parental Control settings or functions (see "Performing an Automatic Channel Search" on page 25, "Editing the Favorite List" on page 26, and "Editing the Channel ...List" on the control panel to enter the Channel menu. Picture Audio Clock / Timer Channel Setup Country Subtitle Teletext Language Auto Scan Manual Scan Channel Edit Favorite Lists Parental Control Move OK Select Menu Return ...
User Manual
Page 33
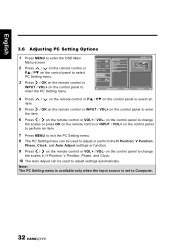
...and Clock. 10 The Auto Adjust can be used to adjust settings automatically. on the remote control or VOL+ / VOL- Note: The PC Setting menu is available only when the input source is set to Computer. 32 Picture Audio Clock / Timer PC Setting Setup H Position V Position Phase Clock Auto Adjust Move OK Select... control or INPUT / VOL+ on the control panel to enter the item. 6 Press / on the control panel to enter the PC Setting menu. English 3.6 Adjusting PC Setting Options 1 Press MENU to enter the OSD Main Menu screen. 2 Press / on the remote control or PS / PT on the control...
...and Clock. 10 The Auto Adjust can be used to adjust settings automatically. on the remote control or VOL+ / VOL- Note: The PC Setting menu is available only when the input source is set to Computer. 32 Picture Audio Clock / Timer PC Setting Setup H Position V Position Phase Clock Auto Adjust Move OK Select... control or INPUT / VOL+ on the control panel to enter the item. 6 Press / on the control panel to enter the PC Setting menu. English 3.6 Adjusting PC Setting Options 1 Press MENU to enter the OSD Main Menu screen. 2 Press / on the remote control or PS / PT on the control...

User Manual
Page 34
... can be used to restore the Setup settings to adjust the OSD Language, OSD Time, Common Interface, SCART1, SCART2, Mode Setting, Hannspree Light, First Time Setup, and Recall settings. If you want to enter the Setup menu. Picture Audio Clock / Timer Channel Setup OSD ...Language OSD Time Common Interface SCART1 SCART2 Mode Setting Hannspree Light First Time Setup Recall Move OK ...
... can be used to restore the Setup settings to adjust the OSD Language, OSD Time, Common Interface, SCART1, SCART2, Mode Setting, Hannspree Light, First Time Setup, and Recall settings. If you want to enter the Setup menu. Picture Audio Clock / Timer Channel Setup OSD ...Language OSD Time Common Interface SCART1 SCART2 Mode Setting Hannspree Light First Time Setup Recall Move OK ...

User Manual
Page 35
...Adjust the Balance in a state such that those settings are colored in gray, the system is not in the Channel OSD menu. No picture and sound. • • • • No picture, or poor picture, • sound is OK. • Picture is in the Audio OSD menu. Press Input ...to reset TV settings. • Cannot operate menus. • Screen image turns over....
...Adjust the Balance in a state such that those settings are colored in gray, the system is not in the Channel OSD menu. No picture and sound. • • • • No picture, or poor picture, • sound is OK. • Picture is in the Audio OSD menu. Press Input ...to reset TV settings. • Cannot operate menus. • Screen image turns over....


