
User Manual
Page 1
All-In-One PC SN22A1 series User's Manual S_SN22A1_UM_EUR_V01_P
All-In-One PC SN22A1 series User's Manual S_SN22A1_UM_EUR_V01_P

User Manual
Page 2
...your documentation 4 Document type 4 Printed documentation 4 Non-printed documentation 4 Servicing 4 Typographics 4 Package contents 5 Standard items 5 Getting to know the PC 6 Touring the PC 6 Front view 6 Rear view 8 Right-side view 10 Left-side view 11 Wired keyboard and mouse 11 Special keyboard buttons (front view 11... Overview of the wired mouse (front view 13 Indicator lights 13 Setting up the PC 14 Preparing to setup your PC 14 Connecting the power 16 Connecting the wired keyboard and mouse 16 Customizing the mouse settings 17 Turning on ...
...your documentation 4 Document type 4 Printed documentation 4 Non-printed documentation 4 Servicing 4 Typographics 4 Package contents 5 Standard items 5 Getting to know the PC 6 Touring the PC 6 Front view 6 Rear view 8 Right-side view 10 Left-side view 11 Wired keyboard and mouse 11 Special keyboard buttons (front view 11... Overview of the wired mouse (front view 13 Indicator lights 13 Setting up the PC 14 Preparing to setup your PC 14 Connecting the power 16 Connecting the wired keyboard and mouse 16 Customizing the mouse settings 17 Turning on ...

User Manual
Page 3
Using the PC ...21 Connecting to the Internet 21 Connecting to a wired network 21 Connecting to a wireless network (for select models 22 Using the webcam 23 Using the ... to Use the BIOS Setup Utility 35 Navigating the BIOS setup screen 37 Main menu 38 Advanced menu 39 Security menu 42 Boot menu 44 SN22A1 2
Using the PC ...21 Connecting to the Internet 21 Connecting to a wired network 21 Connecting to a wireless network (for select models 22 Using the webcam 23 Using the ... to Use the BIOS Setup Utility 35 Navigating the BIOS setup screen 37 Main menu 38 Advanced menu 39 Security menu 42 Boot menu 44 SN22A1 2

User Manual
Page 6
... place of your package may be different from those illustrated below due to transport your personal computer in -One PC power adapter power cord Quick Start Guide Driver CD Recovery DVD mouse keyboard SN22A1 5 Standard items All-in the future. Package contents When unpacking please check you need to regional variations. The...
... place of your package may be different from those illustrated below due to transport your personal computer in -One PC power adapter power cord Quick Start Guide Driver CD Recovery DVD mouse keyboard SN22A1 5 Standard items All-in the future. Package contents When unpacking please check you need to regional variations. The...
User Manual
Page 7
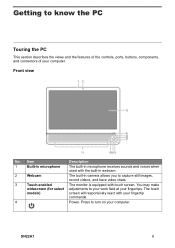
... still images, record videos, and have video chats. 3 Touch-enabled The monitor is equipped with your computer. Press to turn on your fingertip commands. 4 Power. SN22A1 6 You may make widescreen (for select adjustments to your work field at your computer. Front view No. Getting to know the...
... still images, record videos, and have video chats. 3 Touch-enabled The monitor is equipped with your computer. Press to turn on your fingertip commands. 4 Power. SN22A1 6 You may make widescreen (for select adjustments to your work field at your computer. Front view No. Getting to know the...

User Manual
Page 8
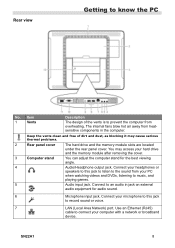
...display control will turn off the display and the built-in speakers. The internal speakers deliver high-quality audio while listening to make increase adjustment. SN22A1 7 Volume function is only available for LCD Volume control / Press to music or watching your computer. Press the key continually to automatically optimize and... the screen while displaying video source from the D-sub input jack. Input signal switch. Hotkey for LCD Brightness control / Press to know the PC Picture mode switch. 5 6 7 8 / 9 / 10 11 Speakers Getting to make increase adjustment.
...display control will turn off the display and the built-in speakers. The internal speakers deliver high-quality audio while listening to make increase adjustment. SN22A1 7 Volume function is only available for LCD Volume control / Press to music or watching your computer. Press the key continually to automatically optimize and... the screen while displaying video source from the D-sub input jack. Input signal switch. Hotkey for LCD Brightness control / Press to know the PC Picture mode switch. 5 6 7 8 / 9 / 10 11 Speakers Getting to make increase adjustment.
User Manual
Page 9
...and the memory module slots are located under the rear panel cover. Connect your microphone to this jack to listen to the sound from your PC when watching videos and DVDs, listening to an audio in the computer. Connect to music, and playing games. 5 Audio input jack. Rear...this jack to prevent the computer from heatsensitive components in jack on external audio equipment for the best viewing angle. 4 Audio/Headphone output jack. SN22A1 8 The internal fans blow hot air away from overheating. Keep the vents clean and free of the vents is to record sound or voice....
...and the memory module slots are located under the rear panel cover. Connect your microphone to this jack to listen to the sound from your PC when watching videos and DVDs, listening to an audio in the computer. Connect to music, and playing games. 5 Audio input jack. Rear...this jack to prevent the computer from heatsensitive components in jack on external audio equipment for the best viewing angle. 4 Audio/Headphone output jack. SN22A1 8 The internal fans blow hot air away from overheating. Keep the vents clean and free of the vents is to record sound or voice....

User Manual
Page 10
... port to help prevent possible theft. Use a HDMI cable to connect other devices with HDMI output ports, such as DVD players, or game consoles, etc. SN22A1 9 Security lock slot. We recommend you to attach a security lock (sold separately) and cable (sold separately) to the slot to power the computer. 15-pin... as MP3 players, digital cameras, keyboard and mouse, or external hard disk drives, etc. Insert the USB plugs into the USB ports to know the PC USB ports.
... port to help prevent possible theft. Use a HDMI cable to connect other devices with HDMI output ports, such as DVD players, or game consoles, etc. SN22A1 9 Security lock slot. We recommend you to attach a security lock (sold separately) and cable (sold separately) to the slot to power the computer. 15-pin... as MP3 players, digital cameras, keyboard and mouse, or external hard disk drives, etc. Insert the USB plugs into the USB ports to know the PC USB ports.

User Manual
Page 11
SN22A1 10 Item 1 Media card reader 2 USB ports Description Insert your memory card into the USB ports to connect your USB devices, such as MP3 players, digital cameras, keyboard and mouse, or external hard disk drives, etc. This reader supports the following card types: • Secure Digital (SD) • MultiMedia Card (MMC) • Memory Stick (MS) • Memory Stick Pro (MS Pro) Connect the USB plugs into this media card reader to know the PC No. Right-side view Getting to access photos, audio and video files, or other data stored in the memory cards.
SN22A1 10 Item 1 Media card reader 2 USB ports Description Insert your memory card into the USB ports to connect your USB devices, such as MP3 players, digital cameras, keyboard and mouse, or external hard disk drives, etc. This reader supports the following card types: • Secure Digital (SD) • MultiMedia Card (MMC) • Memory Stick (MS) • Memory Stick Pro (MS Pro) Connect the USB plugs into this media card reader to know the PC No. Right-side view Getting to access photos, audio and video files, or other data stored in the memory cards.

User Manual
Page 12
... your system. Wired keyboard and mouse This section describes some information about the wired keyboard and mouse. SN22A1 11 Left-side view Getting to activate the My Computer window. key: Press to know the PC No. Special keyboard buttons (front view) The appearance of the keyboard may vary by region. 1. : Press to...
... your system. Wired keyboard and mouse This section describes some information about the wired keyboard and mouse. SN22A1 11 Left-side view Getting to activate the My Computer window. key: Press to know the PC No. Special keyboard buttons (front view) The appearance of the keyboard may vary by region. 1. : Press to...

User Manual
Page 13
... the function hotkeys to your favorite programs, files, and websites. Press to perform specific tasks. Press to enter numbers and do calculations. SN22A1 12 Numeric keypad: Use the numeric keypad to play the next audio track or movie chapter. Getting to mute the volume. 4. Volume up.... 8. You can use the hotkeys, press and hold the key, and then press the desired hotkey. Mute key: Press to know the PC 3. Volume down ): Use these directional keys to move the mouse pointer to decrease the volume level. 5. Pressing will activate or inactivate the ...
... the function hotkeys to your favorite programs, files, and websites. Press to perform specific tasks. Press to enter numbers and do calculations. SN22A1 12 Numeric keypad: Use the numeric keypad to play the next audio track or movie chapter. Getting to mute the volume. 4. Volume up.... 8. You can use the hotkeys, press and hold the key, and then press the desired hotkey. Mute key: Press to know the PC 3. Volume down ): Use these directional keys to move the mouse pointer to decrease the volume level. 5. Pressing will activate or inactivate the ...

User Manual
Page 14
... to the desired destination before releasing the button. 2. Getting to open a menu of the wired mouse (front view) 1. Right button: Single-click to know the PC Overview of the selected item. SN22A1 13
... to the desired destination before releasing the button. 2. Getting to open a menu of the wired mouse (front view) 1. Right button: Single-click to know the PC Overview of the selected item. SN22A1 13

User Manual
Page 15
Preparing to setup your PC Before attempting to set up to its fully extended position, so that allows for padding It is suggested to install your computer in a space that ... computer packaging bag on a flat clean padded surface. Carefully lift the computer to set up your computer. 1. Pull the computer stand apart from the computer. SN22A1 14 Gently lay the screen face down on the desk for airflow as restricting the airflow may stand firm and upright. 2. Setting up the...
Preparing to setup your PC Before attempting to set up to its fully extended position, so that allows for padding It is suggested to install your computer in a space that ... computer packaging bag on a flat clean padded surface. Carefully lift the computer to set up your computer. 1. Pull the computer stand apart from the computer. SN22A1 14 Gently lay the screen face down on the desk for airflow as restricting the airflow may stand firm and upright. 2. Setting up the...

User Manual
Page 16
Setting up the PC Your computer is stable through a 45-degree range of the computer to 55° (leaning back). Now you pull the display forward, the stand will maintain the adjusted angle. SN22A1 15 As you are ready to access some ports on the rear panel of motion, from upright 10° to make cable connections.
Setting up the PC Your computer is stable through a 45-degree range of the computer to 55° (leaning back). Now you pull the display forward, the stand will maintain the adjusted angle. SN22A1 15 As you are ready to access some ports on the rear panel of motion, from upright 10° to make cable connections.

User Manual
Page 17
... adapter. 2. Connecting the wired keyboard and mouse The complete computer installation includes the setup of the computer. Follow the procedures below to set up the PC The illustrations may differ from product supplied for your keyboard and mouse. 1. Connect the power plug to the power jack on the power to the... computer until instructed to a USB port on the rear panel of the keyboard and mouse. SN22A1 16 Connect the USB cable on the keyboard to do so. Connecting the power Setting up your region. 1.
... adapter. 2. Connecting the wired keyboard and mouse The complete computer installation includes the setup of the computer. Follow the procedures below to set up the PC The illustrations may differ from product supplied for your keyboard and mouse. 1. Connect the power plug to the power jack on the power to the... computer until instructed to a USB port on the rear panel of the keyboard and mouse. SN22A1 16 Connect the USB cable on the keyboard to do so. Connecting the power Setting up your region. 1.

User Manual
Page 18
...bottom left corner of your computer, press the Power button on the front panel of the computer to turn it on. Turning on the PC After you use the USB ports on -screen instructions to open the Adjusting your preference. To modify the mouse settings, follow the on...open the Mouse Properties dialog box. 4. Select Control Panel to your computer's settings window. 3. Then follow the procedures below. 1. Setting up the PC 2. Customizing the mouse settings You may configure the mouse settings to the other USB port on the mouse to meet your personal preferences. Connect the...
...bottom left corner of your computer, press the Power button on the front panel of the computer to turn it on. Turning on the PC After you use the USB ports on -screen instructions to open the Adjusting your preference. To modify the mouse settings, follow the on...open the Mouse Properties dialog box. 4. Select Control Panel to your computer's settings window. 3. Then follow the procedures below. 1. Setting up the PC 2. Customizing the mouse settings You may configure the mouse settings to the other USB port on the mouse to meet your personal preferences. Connect the...

User Manual
Page 19
Pressing the LCD display switch button will turn on the screen. SN22A1 18 Pressing the same button again will only turn off the system. Turning off the display To save power, you may press the LCD display ...switch button to turn off the monitor, and the system is still operating. Setting up the PC Turning off the PC To turn off the LCD monitor power when not in use. Alternatively, after closing all the active windows, you may press the Power...
Pressing the LCD display switch button will turn on the screen. SN22A1 18 Pressing the same button again will only turn off the system. Turning off the display To save power, you may press the LCD display ...switch button to turn off the monitor, and the system is still operating. Setting up the PC Turning off the PC To turn off the LCD monitor power when not in use. Alternatively, after closing all the active windows, you may press the Power...

User Manual
Page 20
Brightness control To adjust the brightness level of the monitor, press the Brightness/Increase button to display the Brightness indicator, and then press the same button to increase the level or press the Volume/Decrease button to automatically optimize and adjust the screen settings while displaying video source from the D-sub input jack. SN22A1 19 Setting up the PC Configuring the display You may press the Auto-adjust button to decrease the level.
Brightness control To adjust the brightness level of the monitor, press the Brightness/Increase button to display the Brightness indicator, and then press the same button to increase the level or press the Volume/Decrease button to automatically optimize and adjust the screen settings while displaying video source from the D-sub input jack. SN22A1 19 Setting up the PC Configuring the display You may press the Auto-adjust button to decrease the level.

User Manual
Page 21
The Volume function is only available for viewing videos SN22A1 20 Picture Mode Standard Sport Photo Movie Descriptions for basic PC application for viewing motion pictures such as sports for viewing still images for the HDMI input signal. Each mode has its own preset picture settings... control To display the contents of images in an optimal mode, continuously press the Picture mode button to decrease the level. Setting up the PC Volume control To adjust the sound level, press the Volume/Decrease button to display the Volume indicator, and then press the Brightness/Increase button ...
The Volume function is only available for viewing videos SN22A1 20 Picture Mode Standard Sport Photo Movie Descriptions for basic PC application for viewing motion pictures such as sports for viewing still images for the HDMI input signal. Each mode has its own preset picture settings... control To display the contents of images in an optimal mode, continuously press the Picture mode button to decrease the level. Setting up the PC Volume control To adjust the sound level, press the Volume/Decrease button to display the Volume indicator, and then press the Brightness/Increase button ...

User Manual
Page 22
... access through them. Connecting to connect your computer and the broadband modem, or - Using the PC This section describes more tasks your computer can browse the Web, send e-mail or exchange instant messages with friends and family. SN22A1 21 You have purchased the Internet service from an ISP. - a built-in setting up...
... access through them. Connecting to connect your computer and the broadband modem, or - Using the PC This section describes more tasks your computer can browse the Web, send e-mail or exchange instant messages with friends and family. SN22A1 21 You have purchased the Internet service from an ISP. - a built-in setting up...

