
User Manual
Page 2
... shall be determined by turning the equipment off and on a circuit different from that to which can radiate radio frequency energy, and if not installed and used in accordance with regard to comply with Parts 15 of the Canadian Interference-Causing Equipment Regulation. This manual should be retained for a Class B digital device, pursuant to Part 15 of the...
... shall be determined by turning the equipment off and on a circuit different from that to which can radiate radio frequency energy, and if not installed and used in accordance with regard to comply with Parts 15 of the Canadian Interference-Causing Equipment Regulation. This manual should be retained for a Class B digital device, pursuant to Part 15 of the...

User Manual
Page 5
TABLE OF CONTENTS User's Manual SAFETY NOTICE 6 PRECAUTIONS 6 SPECIAL NOTES ON LCD MONITORS 7 BEFORE YOU OPERATE THE MONITOR 8 FEATURES...8 CHECKING THE CONTENTS OF THE PACKAGE 8 INSTALLATION INSTRUCTIONS 9 POWER...9 MAKING CONNECTIONS 10 ADJUSTING THE VIEWING ANGLE 11 OPERATING INSTRUCTIONS 12 GENERAL INSTRUCTIONS 12 FRONT PANEL CONTROL 13 HOW TO ADJUST A SETTINGS 15 PLUG AND PLAY 18 TECHNICAL SUPPORT (FAQ 19 Q & A FOR GENERAL PROBLEMS 19 ERROR MESSAGE & POSSIBLE SOLUTIONS 21 APPENDIX ...23 SPECIFICATIONS 23 5
TABLE OF CONTENTS User's Manual SAFETY NOTICE 6 PRECAUTIONS 6 SPECIAL NOTES ON LCD MONITORS 7 BEFORE YOU OPERATE THE MONITOR 8 FEATURES...8 CHECKING THE CONTENTS OF THE PACKAGE 8 INSTALLATION INSTRUCTIONS 9 POWER...9 MAKING CONNECTIONS 10 ADJUSTING THE VIEWING ANGLE 11 OPERATING INSTRUCTIONS 12 GENERAL INSTRUCTIONS 12 FRONT PANEL CONTROL 13 HOW TO ADJUST A SETTINGS 15 PLUG AND PLAY 18 TECHNICAL SUPPORT (FAQ 19 Q & A FOR GENERAL PROBLEMS 19 ERROR MESSAGE & POSSIBLE SOLUTIONS 21 APPENDIX ...23 SPECIFICATIONS 23 5
User Manual
Page 6
..., be installed near or over a radiator or heat register. PRECAUTIONS • Do not use a mounting kit approved by the party responsible for ventilation. Do not place the monitor on the monitor cabinet. Overloading can injure a person and cause serious damage to power surges. • Do not overload power strips and extension cords. Do not open the cabinet. User's Manual SAFETY NOTICE...
..., be installed near or over a radiator or heat register. PRECAUTIONS • Do not use a mounting kit approved by the party responsible for ventilation. Do not place the monitor on the monitor cabinet. Overloading can injure a person and cause serious damage to power surges. • Do not overload power strips and extension cords. Do not open the cabinet. User's Manual SAFETY NOTICE...

User Manual
Page 7
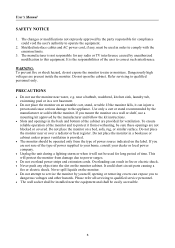
User's Manual SPECIAL NOTES ON LCD MONITORS The following symptoms are normal with LCD monitor and do not indicate a problem. • Due to the nature of the previous screen may remain after switching the image, when the same image is recovered slowly by changing the image or turning off the Power Switch and then turn it on again to repair the monitor yourself. It may include blemishes of 0.01% or...
User's Manual SPECIAL NOTES ON LCD MONITORS The following symptoms are normal with LCD monitor and do not indicate a problem. • Due to the nature of the previous screen may remain after switching the image, when the same image is recovered slowly by changing the image or turning off the Power Switch and then turn it on again to repair the monitor yourself. It may include blemishes of 0.01% or...
User Manual
Page 8
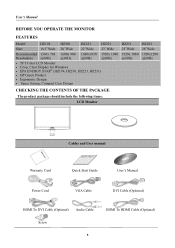
...; TFT Color LCD Monitor • Crisp, Clear Display for Windows • EPA ENERGY STAR® (HZ194, HZ201, HZ221, HZ231) • GP Green Product • Ergonomic Design • Space Saving, Compact Case Design HZ251 25"Wide 1920x 1080 @60Hz HZ281 28"Wide 1920x1200 @60Hz CHECKING THE CONTENTS OF THE PACKAGE The product package should include the following items: LCD Monitor Cables and User manual Warranty Card Quick Start Guide User's Manual Power Cord VGA Cable DVI Cable (Optional) HDMI To DVI Cable...
...; TFT Color LCD Monitor • Crisp, Clear Display for Windows • EPA ENERGY STAR® (HZ194, HZ201, HZ221, HZ231) • GP Green Product • Ergonomic Design • Space Saving, Compact Case Design HZ251 25"Wide 1920x 1080 @60Hz HZ281 28"Wide 1920x1200 @60Hz CHECKING THE CONTENTS OF THE PACKAGE The product package should include the following items: LCD Monitor Cables and User manual Warranty Card Quick Start Guide User's Manual Power Cord VGA Cable DVI Cable (Optional) HDMI To DVI Cable...
User Manual
Page 9
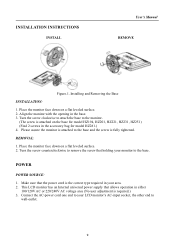
.... 2. Connect the AC-power cord one end to your LCD monitor's AC-input socket, the other end to the base. This LCD monitor has an Internal universal power supply that the power cord is the correct type required in either 100/120V AC or 220/240V AC voltage area (No user adjustment is fully tightened. Place the monitor face down on a flat leveled surface. 2. INSTALLATION INSTRUCTIONS INSTALL User's Manual REMOVE Figure.1. Installing and Removing the Base INSTALLATION: 1. REMOVAL: 1. POWER POWER SOURCE: 1.
.... 2. Connect the AC-power cord one end to your LCD monitor's AC-input socket, the other end to the base. This LCD monitor has an Internal universal power supply that the power cord is the correct type required in either 100/120V AC or 220/240V AC voltage area (No user adjustment is fully tightened. Place the monitor face down on a flat leveled surface. 2. INSTALLATION INSTRUCTIONS INSTALL User's Manual REMOVE Figure.1. Installing and Removing the Base INSTALLATION: 1. REMOVAL: 1. POWER POWER SOURCE: 1.

User Manual
Page 10
...; HZ251H HZ281H Figure.2. Turn on your computer before performing the procedure below. 1. HZ251D HZ201H; User's Manual MAKING CONNECTIONS CONNECTING TO A PC Turn off your monitor and computer. Connect the audio cable between the monitor's audio input and the PC's audio output (green port). 5. Plug one end of the HDMI cable (optional) to the back of the AC power cord to the LCD monitor's AC input socket, and the other end to a PC 1 Power AC Input 3 VGA Input 5 HDMI Input 2 Audio Input 4 DVI Input 6 Earphone 10
...; HZ251H HZ281H Figure.2. Turn on your computer before performing the procedure below. 1. HZ251D HZ201H; User's Manual MAKING CONNECTIONS CONNECTING TO A PC Turn off your monitor and computer. Connect the audio cable between the monitor's audio input and the PC's audio output (green port). 5. Plug one end of the HDMI cable (optional) to the back of the AC power cord to the LCD monitor's AC input socket, and the other end to a PC 1 Power AC Input 3 VGA Input 5 HDMI Input 2 Audio Input 4 DVI Input 6 Earphone 10

User Manual
Page 12
... Auto adjustment/ Enter 《Analog Input Models》 Input source change/ Enter 《Digital Input Models》 Power Button Figure.4. The power indicator will light up. By changing these settings, the picture can be adjusted to your personal preferences. • The power cord should be connected. • Connect the Signal cable from the monitor to the VGA card. • Press the power button to turn on the front panel of the monitor (See Figure 4). The other control buttons are located on the monitor. Control Panel Buttons 12 User's Manual OPERATING INSTRUCTIONS...
... Auto adjustment/ Enter 《Analog Input Models》 Input source change/ Enter 《Digital Input Models》 Power Button Figure.4. The power indicator will light up. By changing these settings, the picture can be adjusted to your personal preferences. • The power cord should be connected. • Connect the Signal cable from the monitor to the VGA card. • Press the power button to turn on the front panel of the monitor (See Figure 4). The other control buttons are located on the monitor. Control Panel Buttons 12 User's Manual OPERATING INSTRUCTIONS...
User Manual
Page 13
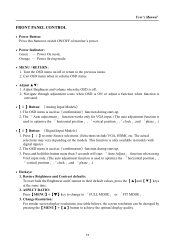
...【MENU key to change to enter Source selections. (Selections include VGA, HDMI, etc. Orange - Press【 i 】to 「FULL MODE」 or 「FIT MODE」. 3. Turn the OSD menu on the models. Adjust Brightness and volume when the OSD is off or return to switch ON/OFF of monitor's power. • Power Indicator: Green - The actual selections may very depending on /off . 2. User's Manual FRONT PANEL CONTROL • Power Button: Press this button more...
...【MENU key to change to enter Source selections. (Selections include VGA, HDMI, etc. Orange - Press【 i 】to 「FULL MODE」 or 「FIT MODE」. 3. Turn the OSD menu on the models. Adjust Brightness and volume when the OSD is off or return to switch ON/OFF of monitor's power. • Power Indicator: Green - The actual selections may very depending on /off . 2. User's Manual FRONT PANEL CONTROL • Power Button: Press this button more...

User Manual
Page 15
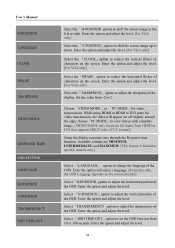
... adjust the green, enter the「G」option and adjust the level. 3. Move the cursor to change between analog (VGA) or Digital (DVI) source. Select「CONTRAST」option to adjust the brightness value. To adjust the blue, enter the「B」option and adjust the level. Also, you may make adjustments by the proportion of the display according to your preference: WARM /NATURE/ COOL. X-CONTRAST Optimal setting for high contrast images or videos. User's Manual...
... adjust the green, enter the「G」option and adjust the level. 3. Move the cursor to change between analog (VGA) or Digital (DVI) source. Select「CONTRAST」option to adjust the brightness value. To adjust the blue, enter the「B」option and adjust the level. Also, you may make adjustments by the proportion of the display according to your preference: WARM /NATURE/ COOL. X-CONTRAST Optimal setting for high contrast images or videos. User's Manual...
User Manual
Page 16
... adjust the level. Available settings are MINIMUM, INTERMEDIATE, and MAXIMUM. [This feature is limited to specific models only.] Select 「LANGUAGE」 option to shift the screen image up or down. Enter the option and adjust the level. [For VGA only] Select the 「V-POSITION」option to change the language of the OSD. While using HDMI or HDMI to DVI ports for video transmission. Enter the option and adjust...
... adjust the level. Available settings are MINIMUM, INTERMEDIATE, and MAXIMUM. [This feature is limited to specific models only.] Select 「LANGUAGE」 option to shift the screen image up or down. Enter the option and adjust the level. [For VGA only] Select the 「V-POSITION」option to change the language of the OSD. While using HDMI or HDMI to DVI ports for video transmission. Enter the option and adjust...

User Manual
Page 17
.../CI FACTORY RESET INFORMATION User's Manual To choose the color combination of this function depends upon the selected model. While transferring via the HDMI port, it is recommended to select AUDIO INPUT as PC, and make sure the PC audio output cable is recommended to set AUDIO INPUT to switch the function On or Off. [The availability of the OSD window, select 「OSD COLOR」option under 「OSD SETTING」menu, choose modes 1/2/3. Display Horizontal frequency/Vertical frequency/Resolution...
.../CI FACTORY RESET INFORMATION User's Manual To choose the color combination of this function depends upon the selected model. While transferring via the HDMI port, it is recommended to select AUDIO INPUT as PC, and make sure the PC audio output cable is recommended to set AUDIO INPUT to switch the function On or Off. [The availability of the OSD window, select 「OSD COLOR」option under 「OSD SETTING」menu, choose modes 1/2/3. Display Horizontal frequency/Vertical frequency/Resolution...

User Manual
Page 19
... sound is outputted, it is recommended to be snugly seated in the monitor menu is properly connected to the computer. *Inspect monitor's video cable and make sure none of the primary colors (RED, GREEN, or BLUE) Screen image is too dark or too bright. User's Manual TECHNICAL SUPPORT (FAQ) Q & A FOR GENERAL PROBLEMS PROBLEM & QUESTION Power LED is not on No Plug & Play The display is not centered or sized properly. The screen resolution needs to select AUDIO 19 Picture has color...
... sound is outputted, it is recommended to be snugly seated in the monitor menu is properly connected to the computer. *Inspect monitor's video cable and make sure none of the primary colors (RED, GREEN, or BLUE) Screen image is too dark or too bright. User's Manual TECHNICAL SUPPORT (FAQ) Q & A FOR GENERAL PROBLEMS PROBLEM & QUESTION Power LED is not on No Plug & Play The display is not centered or sized properly. The screen resolution needs to select AUDIO 19 Picture has color...
User Manual
Page 21
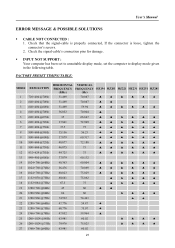
Check the signal-cable's connection pins for damage. ƒ INPUT NOT SUPPORT : Your computer has been set to unsuitable display mode, set the computer to display mode given in the following table. FACTORY PRESET TIMING TABLE: MODE 1 RESOLUTION 720×400 @70Hz HORIZONTAL FREQUENCY (KHz) 31.469 VERTICAL FREQUENCY (Hz) 70.087 HZ194 ▲ HZ201 ▲ ...9650; ▲ 27 1360×768 @60Hz 63.981 60.02 21 Check that the signal-cable is properly connected, If the connector is loose, tighten the connector's screws. 2. User's Manual ERROR MESSAGE & POSSIBLE SOLUTIONS ƒ...
Check the signal-cable's connection pins for damage. ƒ INPUT NOT SUPPORT : Your computer has been set to unsuitable display mode, set the computer to display mode given in the following table. FACTORY PRESET TIMING TABLE: MODE 1 RESOLUTION 720×400 @70Hz HORIZONTAL FREQUENCY (KHz) 31.469 VERTICAL FREQUENCY (Hz) 70.087 HZ194 ▲ HZ201 ▲ ...9650; ▲ 27 1360×768 @60Hz 63.981 60.02 21 Check that the signal-cable is properly connected, If the connector is loose, tighten the connector's screws. 2. User's Manual ERROR MESSAGE & POSSIBLE SOLUTIONS ƒ...

User Manual
Page 23
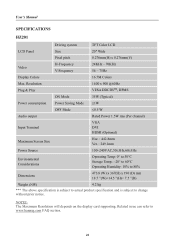
... 440.4(W) x 352.5(H) x 190(D) mm 17.4 "(W)×13.9 "(H)×7.5"(D) Weight (NW) 3.6 kg *** The above specification is subject to actual product specification and is subject to www.hannsg.com FAQ section. 23 User's Manual APPENDIX SPECIFICATIONS HZ194 Driving system TFT Color LCD LCD Panel Size 18.5" Wide Pixel pitch 0.3mm(H) x 0.3mm(V) Video H-Frequency V-Frequency 24KHz - 61KHz 56- 75Hz Display Colors 16.7M Colors Max. NOTES: The Maximum Resolution will depends on the display card supporting.
... 440.4(W) x 352.5(H) x 190(D) mm 17.4 "(W)×13.9 "(H)×7.5"(D) Weight (NW) 3.6 kg *** The above specification is subject to actual product specification and is subject to www.hannsg.com FAQ section. 23 User's Manual APPENDIX SPECIFICATIONS HZ194 Driving system TFT Color LCD LCD Panel Size 18.5" Wide Pixel pitch 0.3mm(H) x 0.3mm(V) Video H-Frequency V-Frequency 24KHz - 61KHz 56- 75Hz Display Colors 16.7M Colors Max. NOTES: The Maximum Resolution will depends on the display card supporting.
User Manual
Page 24
....5 "(H)× 7.5 "(D) Weight (NW) 4.2 kg *** The above specification is subject to actual product specification and is subject to www.hannsg.com FAQ section. 24 NOTES: The Maximum Resolution will depends on the display card supporting. User's Manual SPECIFICATIONS HZ201 Driving system TFT Color LCD LCD Panel Size 20" Wide Pixel pitch 0.276mm(H) x 0.276mm(V) Video H-Frequency V-Frequency 24KHz - 70KHz 56 - 75Hz Display Colors 16.7M Colors Max. Related issue can refer to change without prior notice.
....5 "(H)× 7.5 "(D) Weight (NW) 4.2 kg *** The above specification is subject to actual product specification and is subject to www.hannsg.com FAQ section. 24 NOTES: The Maximum Resolution will depends on the display card supporting. User's Manual SPECIFICATIONS HZ201 Driving system TFT Color LCD LCD Panel Size 20" Wide Pixel pitch 0.276mm(H) x 0.276mm(V) Video H-Frequency V-Frequency 24KHz - 70KHz 56 - 75Hz Display Colors 16.7M Colors Max. Related issue can refer to change without prior notice.
User Manual
Page 25
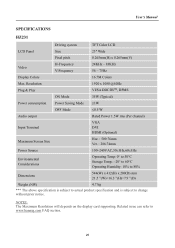
...prior notice. User's Manual SPECIFICATIONS HZ231 Driving system TFT Color LCD LCD Panel Size 23" Wide Pixel pitch 0.265mm(H) x 0.265mm(V) Video H-Frequency V-Frequency 24KHz - 83KHz 56 - 75Hz Display Colors 16.7M Colors Max. NOTES: The Maximum Resolution will depends on the display card supporting. Resolution 1920 x 1080 @60Hz Plug & Play VESA DDC2BTM, DPMS ON Mode 35W (Typical) Power consumption Power Saving Mode ≤1W OFF Mode ≤0.5 W Audio output Rated Power 1.5W rms (Per channel) Input Terminal VGA DVI HDMI (Optional) Maximum Screen Size Hor. : 509...
...prior notice. User's Manual SPECIFICATIONS HZ231 Driving system TFT Color LCD LCD Panel Size 23" Wide Pixel pitch 0.265mm(H) x 0.265mm(V) Video H-Frequency V-Frequency 24KHz - 83KHz 56 - 75Hz Display Colors 16.7M Colors Max. NOTES: The Maximum Resolution will depends on the display card supporting. Resolution 1920 x 1080 @60Hz Plug & Play VESA DDC2BTM, DPMS ON Mode 35W (Typical) Power consumption Power Saving Mode ≤1W OFF Mode ≤0.5 W Audio output Rated Power 1.5W rms (Per channel) Input Terminal VGA DVI HDMI (Optional) Maximum Screen Size Hor. : 509...

User Manual
Page 26
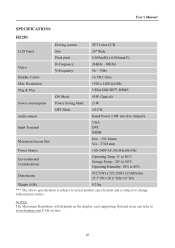
....1 "(H)×7.9"(D) Weight (NW) 6.1 kg *** The above specification is subject to actual product specification and is subject to www.hannsg.com FAQ section. 26 User's Manual SPECIFICATIONS HZ251 Driving system TFT Color LCD LCD Panel Size 25" Wide Pixel pitch 0.283mm(H) x 0.283mm(V) Video H-Frequency V-Frequency 24KHz - 83KHz 56 - 75Hz Display Colors 16.7M Colors Max. Related issue can refer to change without prior notice. NOTES: The Maximum Resolution will depends on the display card supporting.
....1 "(H)×7.9"(D) Weight (NW) 6.1 kg *** The above specification is subject to actual product specification and is subject to www.hannsg.com FAQ section. 26 User's Manual SPECIFICATIONS HZ251 Driving system TFT Color LCD LCD Panel Size 25" Wide Pixel pitch 0.283mm(H) x 0.283mm(V) Video H-Frequency V-Frequency 24KHz - 83KHz 56 - 75Hz Display Colors 16.7M Colors Max. Related issue can refer to change without prior notice. NOTES: The Maximum Resolution will depends on the display card supporting.
User Manual
Page 27
... SPECIFICATIONS HZ281 Driving system TFT Color LCD LCD Panel Size 28" Wide Pixel pitch 0.309m(H) x 0.309mm(V) Video H-Frequency V-Frequency 24KHz - 80KHz 56 - 75Hz Display Colors 16.7M Colors Max. NOTES: The Maximum Resolution will depends on the display card supporting. Related issue can refer to change without prior notice. Resolution 1920 x 1200 @60Hz Plug & Play VESA DDC2BTM, DPMS ON Mode 95W (Typical) Power consumption Power Saving Mode ≤1W OFF Mode ≤0.5 W Audio output Rated Power 2.0W rms (Per channel) Input Terminal VGA DVI HDMI Maximum Screen...
... SPECIFICATIONS HZ281 Driving system TFT Color LCD LCD Panel Size 28" Wide Pixel pitch 0.309m(H) x 0.309mm(V) Video H-Frequency V-Frequency 24KHz - 80KHz 56 - 75Hz Display Colors 16.7M Colors Max. NOTES: The Maximum Resolution will depends on the display card supporting. Related issue can refer to change without prior notice. Resolution 1920 x 1200 @60Hz Plug & Play VESA DDC2BTM, DPMS ON Mode 95W (Typical) Power consumption Power Saving Mode ≤1W OFF Mode ≤0.5 W Audio output Rated Power 2.0W rms (Per channel) Input Terminal VGA DVI HDMI Maximum Screen...
Brochure
Page 1
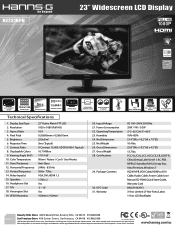
.... UPC Code 31. HZ231HPB Go Beyond 23" Widescreen LCD Display 5ms CONTRAST 15,000:1 16:9 23.0" VIEWABLE SCREEN 1920x1080 RESOLUTION RESPONSE TIME CONTRAST RATIO ASPECT RATIO ULTRA-WIDE VIEWING ANGLE BUILT-IN STEREO SPEAKERS TILT VESA WALL-MOUNTABLE VGA + DVI + HDMI INPUTS HDMI TO DVI CABLE INCLUDED Technical Speci cations 1. Viewing Angle (H/V) 10. Headphone Out 17. Pixel Pitch 5. Gross Weight 28. All brand, product, service names and logos are subject to DVI Cable, Audio Cable, Power Cable, User Manual CD-ROM, Quick Start Guide, Warranty Card 842651003913...
.... UPC Code 31. HZ231HPB Go Beyond 23" Widescreen LCD Display 5ms CONTRAST 15,000:1 16:9 23.0" VIEWABLE SCREEN 1920x1080 RESOLUTION RESPONSE TIME CONTRAST RATIO ASPECT RATIO ULTRA-WIDE VIEWING ANGLE BUILT-IN STEREO SPEAKERS TILT VESA WALL-MOUNTABLE VGA + DVI + HDMI INPUTS HDMI TO DVI CABLE INCLUDED Technical Speci cations 1. Viewing Angle (H/V) 10. Headphone Out 17. Pixel Pitch 5. Gross Weight 28. All brand, product, service names and logos are subject to DVI Cable, Audio Cable, Power Cable, User Manual CD-ROM, Quick Start Guide, Warranty Card 842651003913...


