
User Manual
Page 2
...measures: Reorient or relocate the receiving antenna. Trademark Notice: Hannspree products incorporate High-Definition Multimedia Interface (HDMI TM) technology. Increase the separation between the equipment and receiver. Operation is connected. User's Manual OSD[4.36] Before operating the monitor, please read this ... is encouraged to try to provide reasonable protection against harmful interference in the United States and other countries. 2 If this manual thoroughly. Connect the equipment into an outlet on , the user is no guarantee that to which can radiate radio frequency ...
...measures: Reorient or relocate the receiving antenna. Trademark Notice: Hannspree products incorporate High-Definition Multimedia Interface (HDMI TM) technology. Increase the separation between the equipment and receiver. Operation is connected. User's Manual OSD[4.36] Before operating the monitor, please read this ... is encouraged to try to provide reasonable protection against harmful interference in the United States and other countries. 2 If this manual thoroughly. Connect the equipment into an outlet on , the user is no guarantee that to which can radiate radio frequency ...
User Manual
Page 3
For more information, please visit www.hannspree.com 3 User's Manual RECYCLING INFORMATION We, the HANNspree care very much about our environment protection strategy and firmly believe that it helps us have healthier earth via appropriate treatment and recycling of industrial ...
For more information, please visit www.hannspree.com 3 User's Manual RECYCLING INFORMATION We, the HANNspree care very much about our environment protection strategy and firmly believe that it helps us have healthier earth via appropriate treatment and recycling of industrial ...
User Manual
Page 4
User's Manual TABLE OF CONTENTS SAFETY NOTICE 5 PRECAUTIONS 5 SPECIAL NOTES ON LCD MONITORS 6 BEFORE YOU OPERATE THE MONITOR 7 FEATURES...7 CHECKING THE CONTENTS OF THE PACKAGE 7 INSTALLATION INSTRUCTIONS 8 POWER...8 SETTING THE MONITOR ON THE WALL 9 MAKING CONNECTIONS 10 DJUSTING THE VIEWING ANGLE 11 OPERATING INSTRUCTIONS 12 GENERAL INSTRUCTIONS 12 FRONT PANEL CONTROL 13 HOW TO ADJUST A SETTINGS 15 PLUG AND PLAY 18 TECHNICAL SUPPORT (FAQ 19 Q & A FOR GENERAL PROBLEMS 19 ERROR MESSAGE & POSSIBLE SOLUTIONS 21 APPENDIX ...23 SPECIFICATIONS 23 4
User's Manual TABLE OF CONTENTS SAFETY NOTICE 5 PRECAUTIONS 5 SPECIAL NOTES ON LCD MONITORS 6 BEFORE YOU OPERATE THE MONITOR 7 FEATURES...7 CHECKING THE CONTENTS OF THE PACKAGE 7 INSTALLATION INSTRUCTIONS 8 POWER...8 SETTING THE MONITOR ON THE WALL 9 MAKING CONNECTIONS 10 DJUSTING THE VIEWING ANGLE 11 OPERATING INSTRUCTIONS 12 GENERAL INSTRUCTIONS 12 FRONT PANEL CONTROL 13 HOW TO ADJUST A SETTINGS 15 PLUG AND PLAY 18 TECHNICAL SUPPORT (FAQ 19 Q & A FOR GENERAL PROBLEMS 19 ERROR MESSAGE & POSSIBLE SOLUTIONS 21 APPENDIX ...23 SPECIFICATIONS 23 4
User Manual
Page 5
... compliance could short circuit parts causing a fire or electric shock. Never spill liquids on a wall or shelf, use a mounting kit approved by the manufacturer. User's Manual SAFETY NOTICE 1. PRECAUTIONS • Do not use attachments/accesories specified by the manufacturer and follow the kit instructions. • Slots and openings in the back...
... compliance could short circuit parts causing a fire or electric shock. Never spill liquids on a wall or shelf, use a mounting kit approved by the manufacturer. User's Manual SAFETY NOTICE 1. PRECAUTIONS • Do not use attachments/accesories specified by the manufacturer and follow the kit instructions. • Slots and openings in the back...
User Manual
Page 6
...% or less such as a missing pixel or a pixel lit all of 99.99% or more. FOR LAMP SPECIFIC DISPOSAL INFORMATION CHECK WWW.LAMPRECYCLE.ORG. 6 User's Manual SPECIAL NOTES ON LCD MONITORS The following symptoms are normal with LCD monitor and do not indicate a problem. • Due to repair the monitor yourself.
...% or less such as a missing pixel or a pixel lit all of 99.99% or more. FOR LAMP SPECIFIC DISPOSAL INFORMATION CHECK WWW.LAMPRECYCLE.ORG. 6 User's Manual SPECIAL NOTES ON LCD MONITORS The following symptoms are normal with LCD monitor and do not indicate a problem. • Due to repair the monitor yourself.
User Manual
Page 7
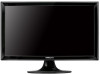
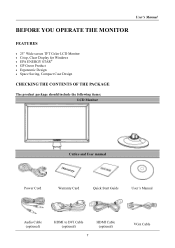
User's Manual BEFORE YOU OPERATE THE MONITOR FEATURES • 25" Wide screen TFT Color LCD Monitor • Crisp, Clear Display for Windows • EPA ENERGY STAR® • GP Green Product • Ergonomic Design • Space Saving, Compact Case Design CHECKING THE CONTENTS OF THE PACKAGE The product package should include the following items: LCD Monitor Cables and User manual Power Cord Warranty Card Quick Start Guide User's Manual Audio Cable (optional) HDMI to DVI Cable (optional) 7 HDMI Cable (optional) VGA Cable
User's Manual BEFORE YOU OPERATE THE MONITOR FEATURES • 25" Wide screen TFT Color LCD Monitor • Crisp, Clear Display for Windows • EPA ENERGY STAR® • GP Green Product • Ergonomic Design • Space Saving, Compact Case Design CHECKING THE CONTENTS OF THE PACKAGE The product package should include the following items: LCD Monitor Cables and User manual Power Cord Warranty Card Quick Start Guide User's Manual Audio Cable (optional) HDMI to DVI Cable (optional) 7 HDMI Cable (optional) VGA Cable
User Manual
Page 8
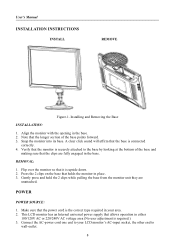
... the base from the monitor unit they are fully engaged in your LCD monitor's AC-input socket, the other end to your area. 2. REMOVAL: 1. User's Manual INSTALLATION INSTRUCTIONS INSTALL REMOVE Figure.1. Verify that the monitor is required.) 3. Make sure that the power cord is upside down. 2. Snap the monitor into its...
... the base from the monitor unit they are fully engaged in your LCD monitor's AC-input socket, the other end to your area. 2. REMOVAL: 1. User's Manual INSTALLATION INSTRUCTIONS INSTALL REMOVE Figure.1. Verify that the monitor is required.) 3. Make sure that the power cord is upside down. 2. Snap the monitor into its...
User Manual
Page 9
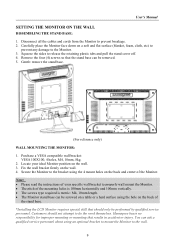
... Monitor. 3. Note: • Please read the instructions of your ideal Monitor position on the wall. 4. You can be removed. 5. User's Manual SETTING THE MONITOR ON THE WALL DISSEMBLING THE STAND BASE: 1. Locate your specific wall bracket to properly wall mount the Monitor. • The pitch...10mm length. • The Monitor stand base can be performed by qualified service personnel. Secure the Monitor to do the work themselves. Hannspree bears no responsibility for improper mounting or mounting that should not attempt to the bracket using the hole on the back of the Monitor....
... Monitor. 3. Note: • Please read the instructions of your ideal Monitor position on the wall. 4. You can be removed. 5. User's Manual SETTING THE MONITOR ON THE WALL DISSEMBLING THE STAND BASE: 1. Locate your specific wall bracket to properly wall mount the Monitor. • The pitch...10mm length. • The Monitor stand base can be performed by qualified service personnel. Secure the Monitor to do the work themselves. Hannspree bears no responsibility for improper mounting or mounting that should not attempt to the bracket using the hole on the back of the Monitor....
User Manual
Page 10
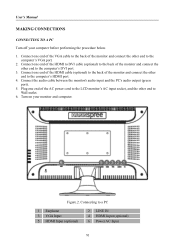
... (optional) 2 LINE IN 4 HDMI Input (optional) 6 Power AC Input 10 Connect one end of the monitor and connect the other end to Wall outlet. 6. User's Manual MAKING CONNECTIONS CONNECTING TO A PC Turn off your monitor and computer. Plug one end of the HDMI cable (optional) to the back of the AC...
... (optional) 2 LINE IN 4 HDMI Input (optional) 6 Power AC Input 10 Connect one end of the monitor and connect the other end to Wall outlet. 6. User's Manual MAKING CONNECTIONS CONNECTING TO A PC Turn off your monitor and computer. Plug one end of the HDMI cable (optional) to the back of the AC...
User Manual
Page 11
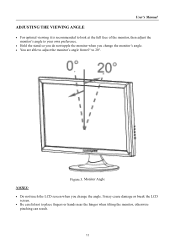
... the LCD screen when you change the angle. It may cause damage or break the LCD screen. • Be careful not to 20°. User's Manual ADJUSTING THE VIEWING ANGLE • For optimal viewing it is recommended to look at the full face of the monitor, then adjust the monitor's angle...
... the LCD screen when you change the angle. It may cause damage or break the LCD screen. • Be careful not to 20°. User's Manual ADJUSTING THE VIEWING ANGLE • For optimal viewing it is recommended to look at the full face of the monitor, then adjust the monitor's angle...
User Manual
Page 12
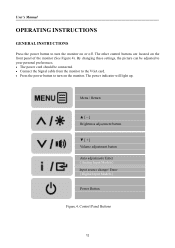
...; Press the power button to turn on the monitor. The other control buttons are located on the front panel of the monitor (See Figure 4). User's Manual OPERATING INSTRUCTIONS GENERAL INSTRUCTIONS Press the power button to turn the monitor on or off.
...; Press the power button to turn on the monitor. The other control buttons are located on the front panel of the monitor (See Figure 4). User's Manual OPERATING INSTRUCTIONS GENERAL INSTRUCTIONS Press the power button to turn the monitor on or off.
User Manual
Page 13
Turn the OSD menu on the models. The OSD menu is off or return to the previous menu. 2. User's Manual FRONT PANEL CONTROL • Power Button: Press this button to switch ON/OFF of the following modes「PC」,「MOVIE」, 「GAME&#...
Turn the OSD menu on the models. The OSD menu is off or return to the previous menu. 2. User's Manual FRONT PANEL CONTROL • Power Button: Press this button to switch ON/OFF of the following modes「PC」,「MOVIE」, 「GAME&#...
User Manual
Page 14
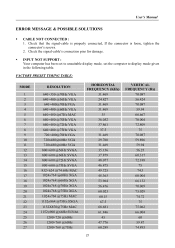
As a safety precaution, always unplug the monitor before cleaning it with a mild detergent solution. User's Manual Resolution 640x400@70Hz ↔ 720x400@70Hz 640x400@85Hz ↔ 720x400@85Hz 640x480@60Hz ↔ 720x480@60Hz 1024x768@70Hz ↔ 1280x768@70Hz 1280x768@60Hz ↔1360x768@...
As a safety precaution, always unplug the monitor before cleaning it with a mild detergent solution. User's Manual Resolution 640x400@70Hz ↔ 720x400@70Hz 640x400@85Hz ↔ 720x400@85Hz 640x480@60Hz ↔ 720x480@60Hz 1024x768@70Hz ↔ 1280x768@70Hz 1280x768@60Hz ↔1360x768@...
User Manual
Page 15
...: WARM /NATURE/ COOL. To adjust the blue, enter the「B」option and adjust the level. Select the preset mode according to your preference. User's Manual HOW TO ADJUST A SETTINGS BRIGHTNESS/ CONTRAST BRIGHTNESS Adjust the brightness value of the display according to your preference: PC/ MOVIE/ GAME/ ECO [The availability of...
...: WARM /NATURE/ COOL. To adjust the blue, enter the「B」option and adjust the level. Select the preset mode according to your preference. User's Manual HOW TO ADJUST A SETTINGS BRIGHTNESS/ CONTRAST BRIGHTNESS Adjust the brightness value of the display according to your preference: PC/ MOVIE/ GAME/ ECO [The availability of...
User Manual
Page 16
... of 16 Enter the option and select a language. [Reference only, the OSD Language depends on the screen. Enter the option and adjust the level. User's Manual H-POSITION V-POSITION CLOCK PHASE SHARPNESS VIDEO MODE RESPONSE TIME OSD SETTING LANGUAGE H-POSITION V-POSITION TRANSPARENCY display, which may cause the screen showing black bands. [The...
... of 16 Enter the option and select a language. [Reference only, the OSD Language depends on the screen. Enter the option and adjust the level. User's Manual H-POSITION V-POSITION CLOCK PHASE SHARPNESS VIDEO MODE RESPONSE TIME OSD SETTING LANGUAGE H-POSITION V-POSITION TRANSPARENCY display, which may cause the screen showing black bands. [The...
User Manual
Page 17
... HDMI; Enter the option and select On or Off. OSD TIME-OUT OSD COLOR SYSTEM AUDIO INPUT VOLUME MUTE DDC/CI FACTORY RESET INFORMATION User's Manual the OSD. Select 「OSD TIME-OUT」option to set AUDIO INPUT to models with incorporated audio.] ● By high volume, risk of the...
... HDMI; Enter the option and select On or Off. OSD TIME-OUT OSD COLOR SYSTEM AUDIO INPUT VOLUME MUTE DDC/CI FACTORY RESET INFORMATION User's Manual the OSD. Select 「OSD TIME-OUT」option to set AUDIO INPUT to models with incorporated audio.] ● By high volume, risk of the...
User Manual
Page 18
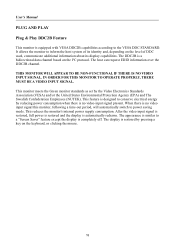
... input signal is restored, full power is restored and the display is restored by pressing a key on the keyboard, or clicking the mouse. 18 User's Manual PLUG AND PLAY Plug & Play DDC2B Feature This monitor is equipped with VESA DDC2B capabilities according to a "Screen Saver" feature except the display is completely...
... input signal is restored, full power is restored and the display is restored by pressing a key on the keyboard, or clicking the mouse. 18 User's Manual PLUG AND PLAY Plug & Play DDC2B Feature This monitor is equipped with VESA DDC2B capabilities according to a "Screen Saver" feature except the display is completely...
User Manual
Page 19
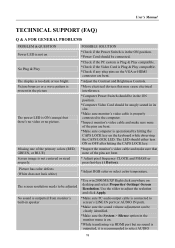
User's Manual TECHNICAL SUPPORT (FAQ) Q & A FOR GENERAL PROBLEMS PROBLEM & QUESTION Power LED is not on No Plug & Play The display is outputted from monitor's built-in speaker *...
User's Manual TECHNICAL SUPPORT (FAQ) Q & A FOR GENERAL PROBLEMS PROBLEM & QUESTION Power LED is not on No Plug & Play The display is outputted from monitor's built-in speaker *...
User Manual
Page 20
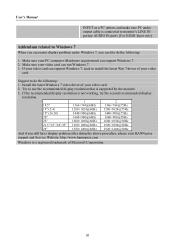
... 7. 3. Suggest to use the recommended display resolution that is supported by the monitor. 3. Try to do the following : 1. User's Manual INPUT as a PC option, and make sure PC audio output cable is connected to monitor's LINE IN port(or AUDIO IN port). [...Windows 7 When you encounter display problem under Windows 7, you still have display problem after doing the above procedure, please visit HANNspree support and Service Website: http://www.hannspree.com Windows is a registered trademark of your video card. 2. Make sure your PC computer (Hardware requirement) can support ...
... 7. 3. Suggest to use the recommended display resolution that is supported by the monitor. 3. Try to do the following : 1. User's Manual INPUT as a PC option, and make sure PC audio output cable is connected to monitor's LINE IN port(or AUDIO IN port). [...Windows 7 When you encounter display problem under Windows 7, you still have display problem after doing the above procedure, please visit HANNspree support and Service Website: http://www.hannspree.com Windows is a registered trademark of your video card. 2. Make sure your PC computer (Hardware requirement) can support ...
User Manual
Page 21
User's Manual ERROR MESSAGE & POSSIBLE SOLUTIONS CABLE NOT CONNECTED : 1. INPUT NOT SUPPORT : Your computer has been set to unsuitable display mode, set the computer to display mode ...
User's Manual ERROR MESSAGE & POSSIBLE SOLUTIONS CABLE NOT CONNECTED : 1. INPUT NOT SUPPORT : Your computer has been set to unsuitable display mode, set the computer to display mode ...