User Manual
Page 4
User's Manual TABLE OF CONTENTS SAFETY NOTICE 5 PRECAUTIONS 5 SPECIAL NOTES ON LCD MONITORS 6 BEFORE YOU OPERATE THE MONITOR 7 FEATURES...7 CHECKING THE CONTENTS OF THE PACKAGE 7 INSTALLATION INSTRUCTIONS 8 POWER...8 MAKING CONNECTIONS 9 ADJUSTING THE VIEWING ANGLE 11 OPERATING INSTRUCTIONS 12 GENERAL INSTRUCTIONS 12 FRONT PANEL CONTROL 13 HOW TO ADJUST A SETTINGS 15 PLUG AND PLAY 18 TECHNICAL SUPPORT (FAQ 19 Q & A FOR GENERAL PROBLEMS 19 ERROR MESSAGE & POSSIBLE SOLUTIONS 21 APPENDIX ...23 SPECIFICATIONS 23 4
User's Manual TABLE OF CONTENTS SAFETY NOTICE 5 PRECAUTIONS 5 SPECIAL NOTES ON LCD MONITORS 6 BEFORE YOU OPERATE THE MONITOR 7 FEATURES...7 CHECKING THE CONTENTS OF THE PACKAGE 7 INSTALLATION INSTRUCTIONS 8 POWER...8 MAKING CONNECTIONS 9 ADJUSTING THE VIEWING ANGLE 11 OPERATING INSTRUCTIONS 12 GENERAL INSTRUCTIONS 12 FRONT PANEL CONTROL 13 HOW TO ADJUST A SETTINGS 15 PLUG AND PLAY 18 TECHNICAL SUPPORT (FAQ 19 Q & A FOR GENERAL PROBLEMS 19 ERROR MESSAGE & POSSIBLE SOLUTIONS 21 APPENDIX ...23 SPECIFICATIONS 23 4
User Manual
Page 12
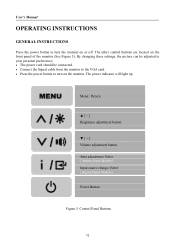
By changing these settings, the picture can be adjusted to your personal preferences. • The power cord should be connected. • Connect the Signal cable from the monitor to ...
By changing these settings, the picture can be adjusted to your personal preferences. • The power cord should be connected. • Connect the Signal cable from the monitor to ...
User Manual
Page 15
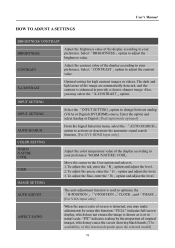
...VGA) or Digital (DVI,HDMI) source. To adjust the red, enter the「R」option and adjust the level. 2. X-CONTRAST Optimal setting for high contrast images or videos. Enter the option and select Analog or Digital. [Dual input mode optional] From the Signal Selection menu, ...「X-CONTRAST」option. Select「BRIGHTNESS」option to your preference: WARM /NATURE/ COOL. User's Manual HOW TO ADJUST A SETTINGS BRIGHTNESS/ CONTRAST BRIGHTNESS Adjust the brightness value of the display according to adjust the brightness value. Move the cursor to the User option and...
...VGA) or Digital (DVI,HDMI) source. To adjust the red, enter the「R」option and adjust the level. 2. X-CONTRAST Optimal setting for high contrast images or videos. Enter the option and select Analog or Digital. [Dual input mode optional] From the Signal Selection menu, ...「X-CONTRAST」option. Select「BRIGHTNESS」option to your preference: WARM /NATURE/ COOL. User's Manual HOW TO ADJUST A SETTINGS BRIGHTNESS/ CONTRAST BRIGHTNESS Adjust the brightness value of the display according to adjust the brightness value. Move the cursor to the User option and...
User Manual
Page 16
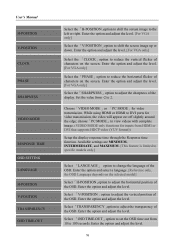
... MODE only functions for video transmission. choose「PC MODE」to adjust the horizontal position of characters on the screen. Available settings are MINIMUM, INTERMEDIATE, and MAXIMUM. [This feature is limited to specific models only.] Select 「LANGUAGE」 option to 2....Reference only, the OSD Language depends on the screen. User's Manual H-POSITION V-POSITION CLOCK PHASE SHARPNESS VIDEO MODE RESPONSE TIME OSD SETTING LANGUAGE H-POSITION V-POSITION TRANSPARENCY OSD TIME-OUT Select the「H-POSITION」option to shift the screen image to DVI ports for...
... MODE only functions for video transmission. choose「PC MODE」to adjust the horizontal position of characters on the screen. Available settings are MINIMUM, INTERMEDIATE, and MAXIMUM. [This feature is limited to specific models only.] Select 「LANGUAGE」 option to 2....Reference only, the OSD Language depends on the screen. User's Manual H-POSITION V-POSITION CLOCK PHASE SHARPNESS VIDEO MODE RESPONSE TIME OSD SETTING LANGUAGE H-POSITION V-POSITION TRANSPARENCY OSD TIME-OUT Select the「H-POSITION」option to shift the screen image to DVI ports for...
User Manual
Page 17
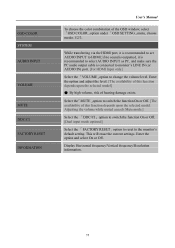
...function depends upon the selected model] ● By high volume, risk of the OSD window, select 「OSD COLOR」option under 「OSD SETTING」menu, choose modes 1/2/3. While transferring via the HDMI port, it is recommended to select AUDIO INPUT as PC, and make sure the PC ...) port. [For HDMI Input only] Select the 「VOLUME」option to HDMI; Select the「MUTE」option to the monitor's default setting. Enter the option and select On or Off. Adjusting the volume while muted cancels Mute mode.] Select the 「DDC/CI」option to switch...
...function depends upon the selected model] ● By high volume, risk of the OSD window, select 「OSD COLOR」option under 「OSD SETTING」menu, choose modes 1/2/3. While transferring via the HDMI port, it is recommended to select AUDIO INPUT as PC, and make sure the PC ...) port. [For HDMI Input only] Select the 「VOLUME」option to HDMI; Select the「MUTE」option to the monitor's default setting. Enter the option and select On or Off. Adjusting the volume while muted cancels Mute mode.] Select the 「DDC/CI」option to switch...
User Manual
Page 18
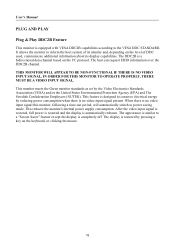
... NON-FUNCTIONAL IF THERE IS NO VIDEO INPUT SIGNAL. When there is no video-input signal present. This monitor meets the Green monitor standards as set by reducing power consumption when there is designed to inform the host system of its identity and, depending on the level of DDC used, communicate...
... NON-FUNCTIONAL IF THERE IS NO VIDEO INPUT SIGNAL. When there is no video-input signal present. This monitor meets the Green monitor standards as set by reducing power consumption when there is designed to inform the host system of its identity and, depending on the level of DDC used, communicate...

User Manual
Page 19
... to be clearly identified. *Make sure the System > Silence option in speaker *Use win 2000/ME/XP Right click anywhere on desktop and select Properties>Settings>Screen Resolution. Picture has color defects (White does not look white) *Adjust RGB color or select color temperature. Use the silder to adjust the reslution...
... to be clearly identified. *Make sure the System > Silence option in speaker *Use win 2000/ME/XP Right click anywhere on desktop and select Properties>Settings>Screen Resolution. Picture has color defects (White does not look white) *Adjust RGB color or select color temperature. Use the silder to adjust the reslution...
User Manual
Page 21
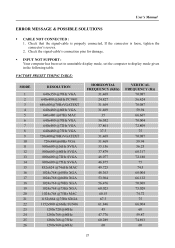
... the connector is loose, tighten the connector's screws. 2. Check the signal-cable's connection pins for damage. INPUT NOT SUPPORT : Your computer has been set to unsuitable display mode, set the computer to display mode given in the following table. FACTORY PRESET TIMING TABLE: MODE 1 2 3 4 5 6 7 8 9 10 11 12 13 14 15 16 17...
... the connector is loose, tighten the connector's screws. 2. Check the signal-cable's connection pins for damage. INPUT NOT SUPPORT : Your computer has been set to unsuitable display mode, set the computer to display mode given in the following table. FACTORY PRESET TIMING TABLE: MODE 1 2 3 4 5 6 7 8 9 10 11 12 13 14 15 16 17...