
Operation Manual
Page 2
.... All safety messages will be preceded by calling your nearest Hamilton Beach Commercial Service Center or your local dealer. All safety messages will...these instructions can happen if the instructions are not followed. Thursday, 8 a.m. - 5:15 p.m. Model Number Purchase Date Dealer Name Dealer Address Dealer Phone You can result in broken bones or cuts... on the label on the bottom of others . If you don't follow the instructions below. Blender Safety IMPORTANT: This operation manual should be reviewed with all safety messages. wWARNING wWARNING Electrical Shock Hazard...
.... All safety messages will be preceded by calling your nearest Hamilton Beach Commercial Service Center or your local dealer. All safety messages will...these instructions can happen if the instructions are not followed. Thursday, 8 a.m. - 5:15 p.m. Model Number Purchase Date Dealer Name Dealer Address Dealer Phone You can result in broken bones or cuts... on the label on the bottom of others . If you don't follow the instructions below. Blender Safety IMPORTANT: This operation manual should be reviewed with all safety messages. wWARNING wWARNING Electrical Shock Hazard...
Operation Manual
Page 4
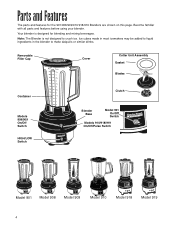
... Cutter Unit Assembly Gasket Blades Container Models 908/909 On/Off Switch HIGH/LOW Switch Clutch Blender Base Model 901 On/Off Switch Models 910/918/919 On/Off/Pulse Switch Model 901 Model 908 Model 909 Model 910 Model 918 Model 919 4 Ice cubes made in most icemakers may be added to liquid ingredients in the blender to crush ice. Become familiar...
... Cutter Unit Assembly Gasket Blades Container Models 908/909 On/Off Switch HIGH/LOW Switch Clutch Blender Base Model 901 On/Off Switch Models 910/918/919 On/Off/Pulse Switch Model 901 Model 908 Model 909 Model 910 Model 918 Model 919 4 Ice cubes made in most icemakers may be added to liquid ingredients in the blender to crush ice. Become familiar...
Operation Manual
Page 5
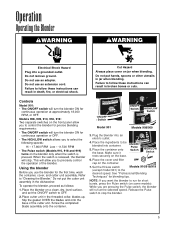
...death, fire, or electrical shock. Slip the gasket OVER the blades and onto the base of the blender. ON/OFF Switch ON/OFF Switch HIGH/LOW Switch Model 901 Models 908/909 3. Failure to follow these instructions can result in the threaded collar, blades up. HIGH/LOW Switch ...6. Operation Operating the Blender wWARNING wWARNING Electrical Shock Hazard Plug into container. Do not remove ground. Do not ...
...death, fire, or electrical shock. Slip the gasket OVER the blades and onto the base of the blender. ON/OFF Switch ON/OFF Switch HIGH/LOW Switch Model 901 Models 908/909 3. Failure to follow these instructions can result in the threaded collar, blades up. HIGH/LOW Switch ...6. Operation Operating the Blender wWARNING wWARNING Electrical Shock Hazard Plug into container. Do not remove ground. Do not ...
Operation Manual
Page 6
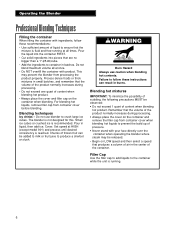
... or slush. Filler Cap Use the filler cap to add liquids to the container while the unit is running at all at HIGH (except model 901) and process until desired consistency is fluid and free-running . 6 Small ice cubes or crushed ice is not designed for this.... Pour in burns. Cover. Operating the Blender Professional Blending Techniques Filling the container When filling the container with ingredients, follow these recommendations: • Use sufficient amount of liquid to ensure that...
... or slush. Filler Cap Use the filler cap to add liquids to the container while the unit is running at all at HIGH (except model 901) and process until desired consistency is fluid and free-running . 6 Small ice cubes or crushed ice is not designed for this.... Pour in burns. Cover. Operating the Blender Professional Blending Techniques Filling the container When filling the container with ingredients, follow these recommendations: • Use sufficient amount of liquid to ensure that...
Operation Manual
Page 7
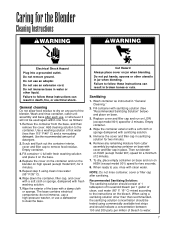
... after sanitizing. Add cleaning solution to follow these instructions can result in jar when blending. Empty container. 3. Repeat step 3 using commercially available test strips and should consist of 1 tablespoon of household bleach per million of 2 minutes. 7. Fill container with fresh washing ...sponge dampened with fresh washing solution. 7. Then run on high speed (except model 901) for 2 minutes. Failure to water. 7 Replace cover and filler cap and run the blender on HIGH (except model 901) speed for a minimum of bleach to follow these instructions can result in...
... after sanitizing. Add cleaning solution to follow these instructions can result in jar when blending. Empty container. 3. Repeat step 3 using commercially available test strips and should consist of 1 tablespoon of household bleach per million of 2 minutes. 7. Fill container with fresh washing ...sponge dampened with fresh washing solution. 7. Then run on high speed (except model 901) for 2 minutes. Failure to water. 7 Replace cover and filler cap and run the blender on HIGH (except model 901) speed for a minimum of bleach to follow these instructions can result in...
Operation Manual
Page 8
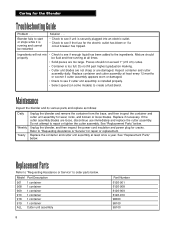
... appears worn or damaged. • Check to see if enough liquid has been added to create a fluid blend. Model Part Description 901 1 container 908 1 container 909 1 container 910 1 container 918 1 container 919 1 container ALL Cutter unit assembly 8 Part Number 6126-901 6126-908 ...6126-909 6126-910 98000 98100 99100 Replace if necessary. Mixture should not exceed 1″ (2.5 cm) cubes. • Container is installed properly. • Select speed (on some models) to the ingredients. Refer to repair or tighten the cutter assembly. Unplug the blender, and then ...
... appears worn or damaged. • Check to see if enough liquid has been added to create a fluid blend. Model Part Description 901 1 container 908 1 container 909 1 container 910 1 container 918 1 container 919 1 container ALL Cutter unit assembly 8 Part Number 6126-901 6126-908 ...6126-909 6126-910 98000 98100 99100 Replace if necessary. Mixture should not exceed 1″ (2.5 cm) cubes. • Container is installed properly. • Select speed (on some models) to the ingredients. Refer to repair or tighten the cutter assembly. Unplug the blender, and then ...

