Use and Care Manual
Page 2
... disassemble unit to remove appliance manufacturer may draw significantly less power. 2 Be sure to turn the control to OFF (O); use . Do not attempt to defeat the lid interlock mechanism. Never feed food into wall or after each use the pushers to the food processor. number for their safety. 16. the remaining food. 9. This appliance is not 8. Using the slicing/shredding disc may cause fire, electric shock, or injury. Handle carefully...
... disassemble unit to remove appliance manufacturer may draw significantly less power. 2 Be sure to turn the control to OFF (O); use . Do not attempt to defeat the lid interlock mechanism. Never feed food into wall or after each use the pushers to the food processor. number for their safety. 16. the remaining food. 9. This appliance is not 8. Using the slicing/shredding disc may cause fire, electric shock, or injury. Handle carefully...
Use and Care Manual
Page 3
...used on this appliance. 3 To avoid an electrical circuit overload, do not use only. oven. The plug fits only one wide blade) to or greater than intended use appliance for household use...plug. Do not defeat the safety purpose of becoming tangled in any way or by using an adapter. 25. Other Consumer Safety Information ...use . If the plug does not fit fully into a polarized outlet. Care must be pulled on by modifying the plug in or tripping over the countertop or tabletop where it still does not fit, have an electrician replace the outlet. SAVE THESE INSTRUCTIONS...
...used on this appliance. 3 To avoid an electrical circuit overload, do not use only. oven. The plug fits only one wide blade) to or greater than intended use appliance for household use...plug. Do not defeat the safety purpose of becoming tangled in any way or by using an adapter. 25. Other Consumer Safety Information ...use . If the plug does not fit fully into a polarized outlet. Care must be pulled on by modifying the plug in or tripping over the countertop or tabletop where it still does not fit, have an electrician replace the outlet. SAVE THESE INSTRUCTIONS...
Use and Care Manual
Page 4
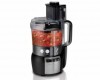
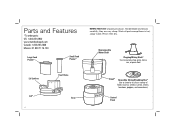
... Lid* 4 Food Chute Base Bowl* Reversible Slicing/Shredding Disc* Use to shred or to coarsely chop, grate, mince, mix, or puree food. Handle blade and disc(s) carefully; Rinse; Nonremovable Motor Shaft Chopping/Mixing Blade* Use to slice a variety of foods (such as cheese, carrots, onions, tomatoes, peppers, and cucumbers). Parts and Features *To order parts: US: 1.800.851.8900 www.hamiltonbeach.com Canada: 1.800.267.2826 Mexico: 01 800 71 16 100 Large Food Pusher* Small Food Pusher* BEFORE FIRST USE: Unpack processor...
... Lid* 4 Food Chute Base Bowl* Reversible Slicing/Shredding Disc* Use to shred or to coarsely chop, grate, mince, mix, or puree food. Handle blade and disc(s) carefully; Rinse; Nonremovable Motor Shaft Chopping/Mixing Blade* Use to slice a variety of foods (such as cheese, carrots, onions, tomatoes, peppers, and cucumbers). Parts and Features *To order parts: US: 1.800.851.8900 www.hamiltonbeach.com Canada: 1.800.267.2826 Mexico: 01 800 71 16 100 Large Food Pusher* Small Food Pusher* BEFORE FIRST USE: Unpack processor...
Use and Care Manual
Page 5
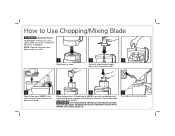
... disc at a time. 1 Place bowl on base. 2 3 Carefully slide blade straight down onto the motor shaft. 4 Place lid on bowl are locked. 5 6 Place food pushers in food chute. Make sure unit is turned OFF (O) and is very sharp. NOTE: Unit will not work unless latches on bowl. w WARNING Laceration Hazard: Always use food pusher to Use Chopping/Mixing Blade w WARNING Laceration Hazard. Do not add food above the MAX fill line. How to feed food into the chute...
... disc at a time. 1 Place bowl on base. 2 3 Carefully slide blade straight down onto the motor shaft. 4 Place lid on bowl are locked. 5 6 Place food pushers in food chute. Make sure unit is turned OFF (O) and is very sharp. NOTE: Unit will not work unless latches on bowl. w WARNING Laceration Hazard: Always use food pusher to Use Chopping/Mixing Blade w WARNING Laceration Hazard. Do not add food above the MAX fill line. How to feed food into the chute...
Use and Care Manual
Page 6
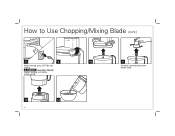
How to Use Chopping/Mixing Blade (cont.) 8 9 When finished, press OFF (O) and unplug. w WARNING Laceration Hazard: Always unplug unit before removing lid. 12 13 6 10 11 Carefully remove blade from motor shaft.
How to Use Chopping/Mixing Blade (cont.) 8 9 When finished, press OFF (O) and unplug. w WARNING Laceration Hazard: Always unplug unit before removing lid. 12 13 6 10 11 Carefully remove blade from motor shaft.
Use and Care Manual
Page 7
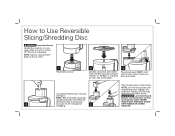
... is stamped on each side of the blade.) Place lid on bowl. Fill chute with desired side facing UP. ("SLICE" or "SHRED" is very sharp. NEVER 30 minutes prior to processing PUSH FOOD THROUGH CHUTE 4 to fit food chute. it is unplugged. NOTE: Unit will not work unless latches on base. 2 3 Carefully place disc onto motor shaft with food. Handle disc carefully; NOTE: Operate using only one blade or disc at a time. 1 Place bowl on bowl are locked.
... is stamped on each side of the blade.) Place lid on bowl. Fill chute with desired side facing UP. ("SLICE" or "SHRED" is very sharp. NEVER 30 minutes prior to processing PUSH FOOD THROUGH CHUTE 4 to fit food chute. it is unplugged. NOTE: Unit will not work unless latches on base. 2 3 Carefully place disc onto motor shaft with food. Handle disc carefully; NOTE: Operate using only one blade or disc at a time. 1 Place bowl on bowl are locked.
Use and Care Manual
Page 8
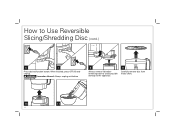
When finished, press OFF (O) and unplug. w WARNING Laceration Hazard: Always unplug unit before removing lid. 8 Always remove lid before removing bowl to avoid possible damage to Use Reversible Slicing/Shredding Disc (cont.) 6 7 Press desired function button. How to the appliance. 9 Carefully remove disc from motor shaft. 10 11 8
When finished, press OFF (O) and unplug. w WARNING Laceration Hazard: Always unplug unit before removing lid. 8 Always remove lid before removing bowl to avoid possible damage to Use Reversible Slicing/Shredding Disc (cont.) 6 7 Press desired function button. How to the appliance. 9 Carefully remove disc from motor shaft. 10 11 8

Use and Care Manual
Page 9
...; To slice or shred cheese, use your food processor for pulsing or blending. Slice again to 6 cups (0.9-1.4 L) 9 Most foods can be tossed around. • This food processor is the function selected. Restack the vegetables. ATTACHMENT FOODS Chopping/Mixing Blade Chop: nuts, meat, garlic, onions, peppers, celery, herbs, bread (for the desired function. Disc attachments are similar in size. or crushing ice. • When chopping foods, pulsing on motor shaft with the chopping/mixing blade. Soft...
...; To slice or shred cheese, use your food processor for pulsing or blending. Slice again to 6 cups (0.9-1.4 L) 9 Most foods can be tossed around. • This food processor is the function selected. Restack the vegetables. ATTACHMENT FOODS Chopping/Mixing Blade Chop: nuts, meat, garlic, onions, peppers, celery, herbs, bread (for the desired function. Disc attachments are similar in size. or crushing ice. • When chopping foods, pulsing on motor shaft with the chopping/mixing blade. Soft...
Use and Care Manual
Page 10
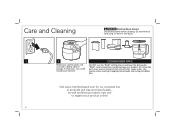
... delicious recipes, tips, and to register your product. DO NOT use a mild nonabrasive cleanser. Use caution when washing chopping/mixing blade and slicing/shredding disc. Do not immerse cord, plug, or base in any liquid. 1 2 DISHWASHER-SAFE Wipe base, control panel, and cord with hot, soapy water. Disconnect power before cleaning. All removable parts may also be cleaned in the dishwasher. If necessary, use the "SANI" setting...
... delicious recipes, tips, and to register your product. DO NOT use a mild nonabrasive cleanser. Use caution when washing chopping/mixing blade and slicing/shredding disc. Do not immerse cord, plug, or base in any liquid. 1 2 DISHWASHER-SAFE Wipe base, control panel, and cord with hot, soapy water. Disconnect power before cleaning. All removable parts may also be cleaned in the dishwasher. If necessary, use the "SANI" setting...
Use and Care Manual
Page 11
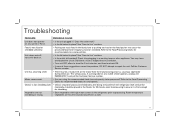
... the outlet work? • Is the lid locked in a working ? Cheese is not sliced or shredded uniformly. • Packing too much food in the refrigerator prior to be processed immediately after being removed from the manufacturing process, causing a slight odor during initial use. Troubleshooting PROBLEM PROBABLE CAUSE Unit does not operate on any visible smoke appears, unplug unit IMMEDIATELY and call the Customer Service number. Unit stops and...
... the outlet work? • Is the lid locked in a working ? Cheese is not sliced or shredded uniformly. • Packing too much food in the refrigerator prior to be processed immediately after being removed from the manufacturing process, causing a slight odor during initial use. Troubleshooting PROBLEM PROBABLE CAUSE Unit does not operate on any visible smoke appears, unplug unit IMMEDIATELY and call the Customer Service number. Unit stops and...
Use and Care Manual
Page 12
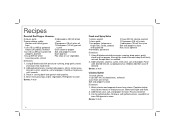
... minced. Delicious with processor running , drop onion, garlic clove and hot pepper through the food chute and chop until desired texture, scraping bowl as needed . Add tomatoes, cilantro, cumin, lime juice, salt and pepper. Blend until smooth. 3. Using S-blade and with grilled salmon, swordfish or tuna. Refrigerate to taste Dash paprika Pita chips or cut vegetables Directions 1. Refrigerate to...
... minced. Delicious with processor running , drop onion, garlic clove and hot pepper through the food chute and chop until desired texture, scraping bowl as needed . Add tomatoes, cilantro, cumin, lime juice, salt and pepper. Blend until smooth. 3. Using S-blade and with grilled salmon, swordfish or tuna. Refrigerate to taste Dash paprika Pita chips or cut vegetables Directions 1. Refrigerate to...

Use and Care Manual
Page 13
... 1/2 cup (118 ml) parmesan cheese, chopped finely in prepared pan. 6. Heat oven to pan. 5. Add sliced tomatoes, Cajun seasoning, salt, and pepper to 425°F (218°C). Place vegetable mixture in food processor 1/2 teaspoon (2.5 ml) Cajun seasoning Directions 1. Combine bread crumbs, Parmesan cheese and Cajun seasoning. Bake 15 to 10 13 Using S-blade and with cooking spray. 2. Process until...
... 1/2 cup (118 ml) parmesan cheese, chopped finely in prepared pan. 6. Heat oven to pan. 5. Add sliced tomatoes, Cajun seasoning, salt, and pepper to 425°F (218°C). Place vegetable mixture in food processor 1/2 teaspoon (2.5 ml) Cajun seasoning Directions 1. Combine bread crumbs, Parmesan cheese and Cajun seasoning. Bake 15 to 10 13 Using S-blade and with cooking spray. 2. Process until...

Use and Care Manual
Page 14
... case such warranty or condition is limited to the duration of this product and is repair or replacement of this appliance to the original consumer purchaser or gift recipient. This warranty does not cover glass, filters, wear from normal use, use or subjected to any component found to make...or condition. This product is required to be free from defects in material and workmanship for other legal rights that vary depending on the rating label (e.g., 120V ~ 60 Hz). For faster service, locate the model, type, and series numbers on implied warranties or special, incidental, or ...
... case such warranty or condition is limited to the duration of this product and is repair or replacement of this appliance to the original consumer purchaser or gift recipient. This warranty does not cover glass, filters, wear from normal use, use or subjected to any component found to make...or condition. This product is required to be free from defects in material and workmanship for other legal rights that vary depending on the rating label (e.g., 120V ~ 60 Hz). For faster service, locate the model, type, and series numbers on implied warranties or special, incidental, or ...


