Use & Care
Page 2
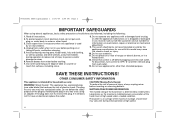
...11. SAVE THESE INSTRUCTIONS! To reduce the risk of table or counter or touch hot surfaces, including stove. 8. To protect against risk of the hand mixer at high speed. 2 Do not use appliance for use only. Keep hands, hair, and clothing, as well as the maximum stabilized power consumption of... electrical shock, do not put cord, plug, or mixer body in water or other than intended purpose. If it still does not fit, have an electrician replace the outlet. 840163501 ENv03.qxd:Layout 1 ...
...11. SAVE THESE INSTRUCTIONS! To reduce the risk of table or counter or touch hot surfaces, including stove. 8. To protect against risk of the hand mixer at high speed. 2 Do not use appliance for use only. Keep hands, hair, and clothing, as well as the maximum stabilized power consumption of... electrical shock, do not put cord, plug, or mixer body in water or other than intended purpose. If it still does not fit, have an electrician replace the outlet. 840163501 ENv03.qxd:Layout 1 ...
Use & Care
Page 3
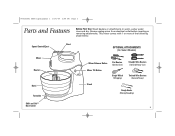
... Bowl Turntable Shift and StirTM Bowl Lever Burst OPTIONAL ATTACHMENTS (On Select Models) Mixer Release Button Mixer Tilt Button Flat Beaters (General Use) Single Whisk (Whipping) Straight Wire Beaters (General/Heavy Use) Twisted Wire Beaters (General/Heavy) Stand Dough Hooks (Mixing/Kneading) 3 ...840163501 ENv03.qxd:Layout 1 10/6/09 3:44 PM Page 3 Parts and Features Before First Use: Wash beaters or attachments in warm, sudsy water; Always unplug mixer from electrical outlet before inserting or removing attachments.
... Bowl Turntable Shift and StirTM Bowl Lever Burst OPTIONAL ATTACHMENTS (On Select Models) Mixer Release Button Mixer Tilt Button Flat Beaters (General Use) Single Whisk (Whipping) Straight Wire Beaters (General/Heavy Use) Twisted Wire Beaters (General/Heavy) Stand Dough Hooks (Mixing/Kneading) 3 ...840163501 ENv03.qxd:Layout 1 10/6/09 3:44 PM Page 3 Parts and Features Before First Use: Wash beaters or attachments in warm, sudsy water; Always unplug mixer from electrical outlet before inserting or removing attachments.

Use & Care
Page 4
Push and click into proper openings on bottom of mixer, insert desired attachment(s) into place. 5 Move speed control to OFF ( O ). 840163501 ENv03.qxd:Layout 1 10/6/09 3:44 PM Page 4 How to Use Your Hand Mixer 1 2 3 4 Always make sure mixer is unplugged and speed control is set to desired speed. Following diagrams on the speed control. to OFF ( O ). 8 To eject attachments, push straight down on bottom of mixer. Start at 1 and increase speed as needed. 4 6 7 When finished, turn speed control Unplug mixer.
Push and click into proper openings on bottom of mixer, insert desired attachment(s) into place. 5 Move speed control to OFF ( O ). 840163501 ENv03.qxd:Layout 1 10/6/09 3:44 PM Page 4 How to Use Your Hand Mixer 1 2 3 4 Always make sure mixer is unplugged and speed control is set to desired speed. Following diagrams on the speed control. to OFF ( O ). 8 To eject attachments, push straight down on bottom of mixer. Start at 1 and increase speed as needed. 4 6 7 When finished, turn speed control Unplug mixer.
Use & Care
Page 5
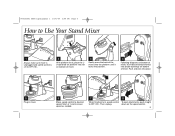
... attachments, push straight down on bottom of mixer, insert desired attachment(s) into place. 5 Plug in mixer. 6 Move speed control to desired speed. 840163501 ENv03.qxd:Layout 1 10/6/09 3:44 PM Page 5 How to Use Your Stand Mixer 1 Always make sure mixer is unplugged and speed control is set to... 2 With platform level, place the Lshaped tab on platform into slot on bottom of mixer. 3 Gently press the back of the mixer onto the platform until it locks into position. 4 Following diagrams on bottom of mixer. Start at 1 and increase speed as needed. 7 When finished, turn speed control...
... attachments, push straight down on bottom of mixer, insert desired attachment(s) into place. 5 Plug in mixer. 6 Move speed control to desired speed. 840163501 ENv03.qxd:Layout 1 10/6/09 3:44 PM Page 5 How to Use Your Stand Mixer 1 Always make sure mixer is unplugged and speed control is set to... 2 With platform level, place the Lshaped tab on platform into slot on bottom of mixer. 3 Gently press the back of the mixer onto the platform until it locks into position. 4 Following diagrams on bottom of mixer. Start at 1 and increase speed as needed. 7 When finished, turn speed control...
Use & Care
Page 6
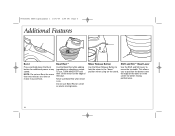
To use Bowl Rest on small or plastic mixing bowls. Do not use , TURN MIXER OFF and then set the mixer on the edge of the bowl or in the "down the Burst button for additional power at a time or motor may overheat. Never use Burst ... mixing performance. 6 This allows you to position the beaters near the edge of the bowl. NOTE: Do not use Bowl Rest when mixer is on. Mixer Release Button Use the Mixer Release Button to move the turntable. 840163501 ENv03.qxd:Layout 1 10/6/09 3:44 PM Page 6 Additional Features Burst Press and hold down...
To use Bowl Rest on small or plastic mixing bowls. Do not use , TURN MIXER OFF and then set the mixer on the edge of the bowl or in the "down the Burst button for additional power at a time or motor may overheat. Never use Burst ... mixing performance. 6 This allows you to position the beaters near the edge of the bowl. NOTE: Do not use Bowl Rest when mixer is on. Mixer Release Button Use the Mixer Release Button to move the turntable. 840163501 ENv03.qxd:Layout 1 10/6/09 3:44 PM Page 6 Additional Features Burst Press and hold down...
Use & Care
Page 8
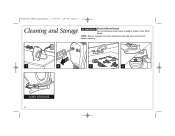
Do not immerse mixer, cord, or plug in water or any other liquid. NOTE: Always unplug mixer from electrical outlet and eject attachments before cleaning. 1 2 3 4 CORD STORAGE 8 840163501 ENv03.qxd:Layout 1 10/6/09 3:44 PM Page 8 Cleaning and Storage w WARNING Electrical Shock Hazard.
Do not immerse mixer, cord, or plug in water or any other liquid. NOTE: Always unplug mixer from electrical outlet and eject attachments before cleaning. 1 2 3 4 CORD STORAGE 8 840163501 ENv03.qxd:Layout 1 10/6/09 3:44 PM Page 8 Cleaning and Storage w WARNING Electrical Shock Hazard.


