Use & Care
Page 2
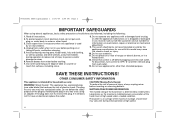
.... 8. Do not place on or near children. 4. SAVE THESE INSTRUCTIONS! WATTAGE/PEAK POWER INFORMATION The marked rating of the hand mixer is dropped or damaged in use only. Avoid contacting moving parts. Remove beaters from beaters during initial operation at high speed under a loaded condition. Do not use appliance for household use , before plugging cord into a polarized outlet. CAUTION! Unplug from wall outlet. 13. Keep...
.... 8. Do not place on or near children. 4. SAVE THESE INSTRUCTIONS! WATTAGE/PEAK POWER INFORMATION The marked rating of the hand mixer is dropped or damaged in use only. Avoid contacting moving parts. Remove beaters from beaters during initial operation at high speed under a loaded condition. Do not use appliance for household use , before plugging cord into a polarized outlet. CAUTION! Unplug from wall outlet. 13. Keep...
Use & Care
Page 3
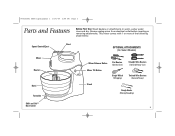
... attachments: Speed Control/Eject Mixer Beaters Bowl Turntable Shift and StirTM Bowl Lever Burst OPTIONAL ATTACHMENTS (On Select Models) Mixer Release Button Mixer Tilt Button Flat Beaters (General Use) Single Whisk (Whipping) Straight Wire Beaters (General/Heavy Use) Twisted Wire Beaters (General/Heavy) Stand Dough Hooks (Mixing/Kneading) 3 rinse and dry. 840163501 ENv03.qxd:Layout 1 10/6/09 3:44 PM Page 3 Parts and Features Before First Use: Wash beaters or attachments in warm, sudsy water; Always unplug mixer from electrical outlet before inserting or removing attachments...
... attachments: Speed Control/Eject Mixer Beaters Bowl Turntable Shift and StirTM Bowl Lever Burst OPTIONAL ATTACHMENTS (On Select Models) Mixer Release Button Mixer Tilt Button Flat Beaters (General Use) Single Whisk (Whipping) Straight Wire Beaters (General/Heavy Use) Twisted Wire Beaters (General/Heavy) Stand Dough Hooks (Mixing/Kneading) 3 rinse and dry. 840163501 ENv03.qxd:Layout 1 10/6/09 3:44 PM Page 3 Parts and Features Before First Use: Wash beaters or attachments in warm, sudsy water; Always unplug mixer from electrical outlet before inserting or removing attachments...

Use & Care
Page 4
to OFF ( O ). 840163501 ENv03.qxd:Layout 1 10/6/09 3:44 PM Page 4 How to Use Your Hand Mixer 1 2 3 4 Always make sure mixer is unplugged and speed control is set to OFF ( O ). 8 To eject attachments, push straight down on the speed control. Push and click into proper openings on bottom of mixer. Start at 1 and increase speed as needed. 4 6 7 When finished, turn speed control Unplug mixer. Following diagrams on bottom of mixer, insert desired attachment(s) into place. 5 Move speed control to desired speed.
to OFF ( O ). 840163501 ENv03.qxd:Layout 1 10/6/09 3:44 PM Page 4 How to Use Your Hand Mixer 1 2 3 4 Always make sure mixer is unplugged and speed control is set to OFF ( O ). 8 To eject attachments, push straight down on the speed control. Push and click into proper openings on bottom of mixer. Start at 1 and increase speed as needed. 4 6 7 When finished, turn speed control Unplug mixer. Following diagrams on bottom of mixer, insert desired attachment(s) into place. 5 Move speed control to desired speed.
Use & Care
Page 5
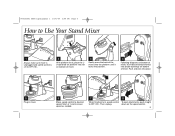
... to Use Your Stand Mixer 1 Always make sure mixer is unplugged and speed control is set to OFF ( O ). 2 With platform level, place the Lshaped tab on platform into slot on bottom of mixer. 3 Gently press the back of the mixer onto the platform until it locks into position. 4 Following diagrams on bottom of mixer, insert desired attachment(s) into place. 5 Plug in mixer. 6 Move speed control to OFF...
... to Use Your Stand Mixer 1 Always make sure mixer is unplugged and speed control is set to OFF ( O ). 2 With platform level, place the Lshaped tab on platform into slot on bottom of mixer. 3 Gently press the back of the mixer onto the platform until it locks into position. 4 Following diagrams on bottom of mixer, insert desired attachment(s) into place. 5 Plug in mixer. 6 Move speed control to OFF...
Use & Care
Page 6
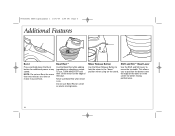
... a recipe. To use Burst for additional power at a time or motor may overheat. Never use Bowl Rest on the stand. Do not use Bowl Rest when mixer is on the edge of the bowl or in the "down the Burst button for more than two minutes at any speed. This allows you to position the beaters near the edge of the bowl. Mixer Release Button Use the Mixer Release...
... a recipe. To use Burst for additional power at a time or motor may overheat. Never use Bowl Rest on the stand. Do not use Bowl Rest when mixer is on the edge of the bowl or in the "down the Burst button for more than two minutes at any speed. This allows you to position the beaters near the edge of the bowl. Mixer Release Button Use the Mixer Release...
Use & Care
Page 7
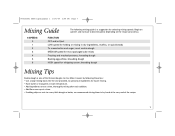
... 7 Mixing Guide The following these tips: • Use a large mixing bowl, like the one provided, to mix. kneading dough HIGH speed for selecting mixing speeds. Make it easier by hand at the very end of the thickest doughs to spread out ingredients for folding or mixing in by following mixing guide is one cup at a time, thoroughly mixing after each addition. • Add flour one of the recipe...
... 7 Mixing Guide The following these tips: • Use a large mixing bowl, like the one provided, to mix. kneading dough HIGH speed for selecting mixing speeds. Make it easier by hand at the very end of the thickest doughs to spread out ingredients for folding or mixing in by following mixing guide is one cup at a time, thoroughly mixing after each addition. • Add flour one of the recipe...
Use & Care
Page 8
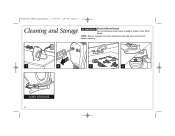
Do not immerse mixer, cord, or plug in water or any other liquid. NOTE: Always unplug mixer from electrical outlet and eject attachments before cleaning. 1 2 3 4 CORD STORAGE 8 840163501 ENv03.qxd:Layout 1 10/6/09 3:44 PM Page 8 Cleaning and Storage w WARNING Electrical Shock Hazard.
Do not immerse mixer, cord, or plug in water or any other liquid. NOTE: Always unplug mixer from electrical outlet and eject attachments before cleaning. 1 2 3 4 CORD STORAGE 8 840163501 ENv03.qxd:Layout 1 10/6/09 3:44 PM Page 8 Cleaning and Storage w WARNING Electrical Shock Hazard.
Use & Care
Page 9
... sales receipt, as proof of purchase is repair or replacement of express or implied warranty. Every implied warranty, including any other warranty or condition. You may not apply to you. For faster service, locate the model, type, and series numbers ...warranty does not cover glass parts, glass containers, cutter/strainers, blades, seals, gaskets, clutches, motor brushes, and/or agitators, wear from normal use, use . Some states or provinces do not return this warranty to you specific legal rights. however, you live. We exclude all costs associated with the printed directions...
... sales receipt, as proof of purchase is repair or replacement of express or implied warranty. Every implied warranty, including any other warranty or condition. You may not apply to you. For faster service, locate the model, type, and series numbers ...warranty does not cover glass parts, glass containers, cutter/strainers, blades, seals, gaskets, clutches, motor brushes, and/or agitators, wear from normal use, use . Some states or provinces do not return this warranty to you specific legal rights. however, you live. We exclude all costs associated with the printed directions...


