Use & Care
Page 2
... parts. Do not place on examination, repair, or electrical or mechanical adjustment. 9. Peak power is determined by modifying the plug in a heated oven. 12. Unplug from beaters during operation to OFF ( O ) and then remove plug from mixer before cleaning. 5. WARNING! CAUTION! Keep hands, hair, and clothing, as well as the maximum stabilized power consumption of electrical shock, do not put cord, plug, or mixer...
... parts. Do not place on examination, repair, or electrical or mechanical adjustment. 9. Peak power is determined by modifying the plug in a heated oven. 12. Unplug from beaters during operation to OFF ( O ) and then remove plug from mixer before cleaning. 5. WARNING! CAUTION! Keep hands, hair, and clothing, as well as the maximum stabilized power consumption of electrical shock, do not put cord, plug, or mixer...
Use & Care
Page 3
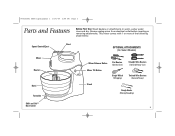
...44 PM Page 3 Parts and Features Before First Use: Wash beaters or attachments in warm, sudsy water; This mixer comes with 1 or more of the following attachments: Speed Control/Eject Mixer Beaters Bowl Turntable Shift and StirTM Bowl Lever Burst OPTIONAL ATTACHMENTS (On Select Models) Mixer Release Button Mixer Tilt Button Flat Beaters (General Use) Single Whisk (Whipping) Straight Wire Beaters (General/Heavy Use) Twisted Wire Beaters (General/Heavy) Stand Dough Hooks (Mixing/Kneading) 3 Always unplug mixer from electrical outlet before inserting or removing attachments. rinse and...
...44 PM Page 3 Parts and Features Before First Use: Wash beaters or attachments in warm, sudsy water; This mixer comes with 1 or more of the following attachments: Speed Control/Eject Mixer Beaters Bowl Turntable Shift and StirTM Bowl Lever Burst OPTIONAL ATTACHMENTS (On Select Models) Mixer Release Button Mixer Tilt Button Flat Beaters (General Use) Single Whisk (Whipping) Straight Wire Beaters (General/Heavy Use) Twisted Wire Beaters (General/Heavy) Stand Dough Hooks (Mixing/Kneading) 3 Always unplug mixer from electrical outlet before inserting or removing attachments. rinse and...

Use & Care
Page 4
Start at 1 and increase speed as needed. 4 6 7 When finished, turn speed control Unplug mixer. to desired speed. Push and click into proper openings on the speed control. Following diagrams on bottom of mixer, insert desired attachment(s) into place. 5 Move speed control to OFF ( O ). 8 To eject attachments, push straight down on bottom of mixer. 840163501 ENv03.qxd:Layout 1 10/6/09 3:44 PM Page 4 How to Use Your Hand Mixer 1 2 3 4 Always make sure mixer is unplugged and speed control is set to OFF ( O ).
Start at 1 and increase speed as needed. 4 6 7 When finished, turn speed control Unplug mixer. to desired speed. Push and click into proper openings on the speed control. Following diagrams on bottom of mixer, insert desired attachment(s) into place. 5 Move speed control to OFF ( O ). 8 To eject attachments, push straight down on bottom of mixer. 840163501 ENv03.qxd:Layout 1 10/6/09 3:44 PM Page 4 How to Use Your Hand Mixer 1 2 3 4 Always make sure mixer is unplugged and speed control is set to OFF ( O ).
Use & Care
Page 5
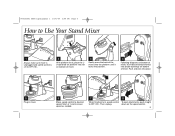
... down on the speed control. 5 Start at 1 and increase speed as needed. 7 When finished, turn speed control to OFF ( O ). Push and click into proper openings on bottom of mixer, insert desired attachment(s) into place. 5 Plug in mixer. 6 Move speed control to desired speed. 840163501 ENv03.qxd:Layout 1 10/6/09 3:44 PM Page 5 How to Use Your Stand Mixer 1 Always make sure mixer is unplugged and speed control is set to OFF ( O ). 2 With...
... down on the speed control. 5 Start at 1 and increase speed as needed. 7 When finished, turn speed control to OFF ( O ). Push and click into proper openings on bottom of mixer, insert desired attachment(s) into place. 5 Plug in mixer. 6 Move speed control to desired speed. 840163501 ENv03.qxd:Layout 1 10/6/09 3:44 PM Page 5 How to Use Your Stand Mixer 1 Always make sure mixer is unplugged and speed control is set to OFF ( O ). 2 With...
Use & Care
Page 6
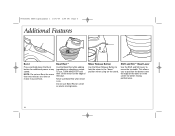
... use , TURN MIXER OFF and then set the mixer on . To use Burst for more than two minutes at any speed. Shift and Stir™ Bowl Lever Use the Shift and Stir Lever to lock the mixer in the center for additional power at a time or motor may overheat. This allows you to position the beaters near the edge of the bowl. Never use Bowl Rest on the stand. Mixer Release Button Use...
... use , TURN MIXER OFF and then set the mixer on . To use Burst for more than two minutes at any speed. Shift and Stir™ Bowl Lever Use the Shift and Stir Lever to lock the mixer in the center for additional power at a time or motor may overheat. This allows you to position the beaters near the edge of the bowl. Never use Bowl Rest on the stand. Mixer Release Button Use...
Use & Care
Page 7
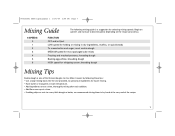
... speed, depending on speed 1 and increase to mix. kneading dough HIGH speed for most packaged cake mixes Frosting and mashed potatoes; Begin on the recipe consistency. 6 SPEEDS 0 1 2 3 4 5 6 FUNCTION OFF and/or Eject LOW speed for folding or mixing in by following these tips: • Use a large mixing bowl, like the one provided, to spread out ingredients for selecting mixing speeds. Make it easier by hand at a time, thoroughly mixing...
... speed, depending on speed 1 and increase to mix. kneading dough HIGH speed for most packaged cake mixes Frosting and mashed potatoes; Begin on the recipe consistency. 6 SPEEDS 0 1 2 3 4 5 6 FUNCTION OFF and/or Eject LOW speed for folding or mixing in by following these tips: • Use a large mixing bowl, like the one provided, to spread out ingredients for selecting mixing speeds. Make it easier by hand at a time, thoroughly mixing...
Use & Care
Page 8
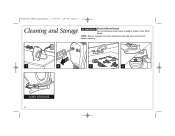
840163501 ENv03.qxd:Layout 1 10/6/09 3:44 PM Page 8 Cleaning and Storage w WARNING Electrical Shock Hazard. Do not immerse mixer, cord, or plug in water or any other liquid. NOTE: Always unplug mixer from electrical outlet and eject attachments before cleaning. 1 2 3 4 CORD STORAGE 8
840163501 ENv03.qxd:Layout 1 10/6/09 3:44 PM Page 8 Cleaning and Storage w WARNING Electrical Shock Hazard. Do not immerse mixer, cord, or plug in water or any other liquid. NOTE: Always unplug mixer from electrical outlet and eject attachments before cleaning. 1 2 3 4 CORD STORAGE 8
Use & Care
Page 9
... implied warranty. Keep the original sales receipt, as proof of this period, your appliance. 9 All liability is required to you . You may not apply to the duration of purchase is limited to the store. To make a warranty claim. Please call 1.800.851.8900 in Canada. For faster service, locate the model, type, and series numbers on where you specific legal...
... implied warranty. Keep the original sales receipt, as proof of this period, your appliance. 9 All liability is required to you . You may not apply to the duration of purchase is limited to the store. To make a warranty claim. Please call 1.800.851.8900 in Canada. For faster service, locate the model, type, and series numbers on where you specific legal...


