Use & Care
Page 2
... maximum stabilized power consumption of electric shock. Do not place on or taking off before cleaning. 5. Check that reduces the risk of the hand mixer at high speed under a loaded condition. If it still does not fit, have an electrician replace the outlet. BEFORE FIRST USE: Wash bowl and beaters...plug, or after the appliance malfunctions or is dropped or damaged in use outdoors. 11. Wattage/Peak Power Information The marked rating of the hand mixer is an average of table or counter, or touch hot surfaces, including stove. 8. 840162301 ENv02.qxd 12/11/07 2:17 PM Page 2...
... maximum stabilized power consumption of electric shock. Do not place on or taking off before cleaning. 5. Check that reduces the risk of the hand mixer at high speed under a loaded condition. If it still does not fit, have an electrician replace the outlet. BEFORE FIRST USE: Wash bowl and beaters...plug, or after the appliance malfunctions or is dropped or damaged in use outdoors. 11. Wattage/Peak Power Information The marked rating of the hand mixer is an average of table or counter, or touch hot surfaces, including stove. 8. 840162301 ENv02.qxd 12/11/07 2:17 PM Page 2...
Use & Care
Page 3
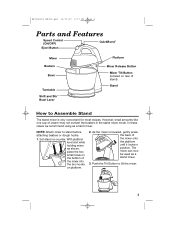
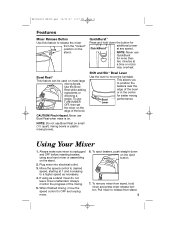
... recommend using as a stand mixer. 3. As the mixer is very convenient for most recipes. With platform level and while holding mixer as shown, place the two small holes on counter. The mixer can now be used as a hand mixer. Set stand on the bottom of the mixer onto the platform until it locks in the stand mixer mode. Push the Tilt...
... recommend using as a stand mixer. 3. As the mixer is very convenient for most recipes. With platform level and while holding mixer as shown, place the two small holes on counter. The mixer can now be used as a hand mixer. Set stand on the bottom of the mixer onto the platform until it locks in the stand mixer mode. Push the Tilt...
Use & Care
Page 4
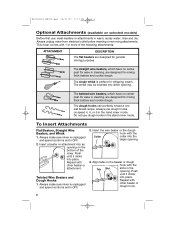
... and speed control is set to OFF. 2. The whisk may be inserted into either opening on the beater or dough hook with the Collar collar into place. Always use dough hooks on selected models) Before first use dough hooks in the stand mixer mode. Insert a beater or attachment into place. Always unplug mixer from... are designed for whipping cream. Push until it clicks into an opening . 840162301 ENv02.qxd 12/11/07 2:17 PM Page 4 Optional Attachments (available on speed 4, 5, or 6 in the hand mixer mode.
... and speed control is set to OFF. 2. The whisk may be inserted into either opening on the beater or dough hook with the Collar collar into place. Always use dough hooks on selected models) Before first use dough hooks in the stand mixer mode. Insert a beater or attachment into place. Always unplug mixer from... are designed for whipping cream. Push until it clicks into an opening . 840162301 ENv02.qxd 12/11/07 2:17 PM Page 4 Optional Attachments (available on speed 4, 5, or 6 in the hand mixer mode.
Use & Care
Page 5
... can be used on . Plug mixer into electrical outlet. 3. Move the speed control to a higher speed as necessary. 4. To remove mixer from stand. 5 QuickBurst™ Press and hold mixer and press mixer release button. Never use Bowl Rest... on the eject button. 7. NOTE: Do not use Bowl Rest when mixer is unplugged and OFF before inserting beaters, using as a hand mixer or assembling on the stand...
... can be used on . Plug mixer into electrical outlet. 3. Move the speed control to a higher speed as necessary. 4. To remove mixer from stand. 5 QuickBurst™ Press and hold mixer and press mixer release button. Never use Bowl Rest... on the eject button. 7. NOTE: Do not use Bowl Rest when mixer is unplugged and OFF before inserting beaters, using as a hand mixer or assembling on the stand...
Use & Care
Page 6
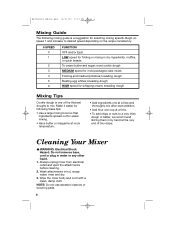
... of the recipe. Cleaning Your Mixer w WARNING: Electrical Shock Hazard. rinse and dry. 3. Wash attachments in water or any other liquid. 1. Make it easier by hand at the very end of the thickest doughs to desired speed depending on the recipe consistency. 6 SPEED 0 1 2 3 4 5 6 FUNCTION OFF and/or Eject LOW speed for folding or mixing in...
... of the recipe. Cleaning Your Mixer w WARNING: Electrical Shock Hazard. rinse and dry. 3. Wash attachments in water or any other liquid. 1. Make it easier by hand at the very end of the thickest doughs to desired speed depending on the recipe consistency. 6 SPEED 0 1 2 3 4 5 6 FUNCTION OFF and/or Eject LOW speed for folding or mixing in...

Use & Care
Page 7
...not allow limitations on implied warranties or special, incidental or consequential damages, so the foregoing limitations may be found on the bottom of your mixer. These numbers can be supplied with this product, including without limitation: glass parts, glass containers, cutter/strainers, blades, seals, gaskets, ... note the model, type, and series numbers and fill in that information below . During this period, we will help us answer your mixer, call our CUSTOMER SERVICE NUMBER. (For faster service please have a claim under this product at our option. There is warranted to be...
...not allow limitations on implied warranties or special, incidental or consequential damages, so the foregoing limitations may be found on the bottom of your mixer. These numbers can be supplied with this product, including without limitation: glass parts, glass containers, cutter/strainers, blades, seals, gaskets, ... note the model, type, and series numbers and fill in that information below . During this period, we will help us answer your mixer, call our CUSTOMER SERVICE NUMBER. (For faster service please have a claim under this product at our option. There is warranted to be...


