
Use & Care
Page 2
...with a groundedtype 3-wire cord (3-prong plug). Remove beaters and other than the rating of injury to persons, and/or damage to the Mixer. 9. Do not place on by the appliance manufacturer for use appliance for a 3-prong plug. SAVE THESE INSTRUCTIONS Consumer Safety Information This appliance... Check that it will only fit into an electrical outlet made for other attachments from beaters during operation to reduce risk of the mixer. This type of the cord used . An extension cord should always be observed, including the following: 1. Close supervision is necessary ...
...with a groundedtype 3-wire cord (3-prong plug). Remove beaters and other than the rating of injury to persons, and/or damage to the Mixer. 9. Do not place on by the appliance manufacturer for use appliance for a 3-prong plug. SAVE THESE INSTRUCTIONS Consumer Safety Information This appliance... Check that it will only fit into an electrical outlet made for other attachments from beaters during operation to reduce risk of the mixer. This type of the cord used . An extension cord should always be observed, including the following: 1. Close supervision is necessary ...
Use & Care
Page 3
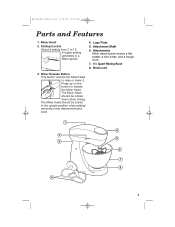
... should be locked in a faster speed. 4. Logo Plate 5. Mixer Release Button This button unlocks the Mixer Head to release the Mixer Head. Attachments Mixer attachments include a flat beater, a wire whisk, and a dough hook. 7. 41⁄2 Quart Mixing Bowl 8. Press up on ... A higher setting generates in the upright position when adding/ removing mixer attachments and bowl. 3 840125800 ENv00.qxd 3/19/04 8:50 AM Page 3 Parts and Features 1. Mixer Head 2. Setting Control Select a setting from 2 to 12. The Mixer Head should be locked down when mixing. Attachment Shaft 6. Bowl...
... should be locked in a faster speed. 4. Logo Plate 5. Mixer Release Button This button unlocks the Mixer Head to release the Mixer Head. Attachments Mixer attachments include a flat beater, a wire whisk, and a dough hook. 7. 41⁄2 Quart Mixing Bowl 8. Press up on ... A higher setting generates in the upright position when adding/ removing mixer attachments and bowl. 3 840125800 ENv00.qxd 3/19/04 8:50 AM Page 3 Parts and Features 1. Mixer Head 2. Setting Control Select a setting from 2 to 12. The Mixer Head should be locked down when mixing. Attachment Shaft 6. Bowl...
Use & Care
Page 4
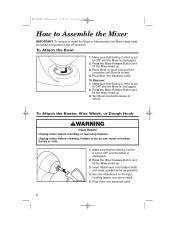
...press upward as far as possible. 4. Turn Bowl counterclockwise to Assemble the Mixer IMPORTANT: To remove or insert the Bowl or Attachments, the Mixer Head must be raised and locked in broken bones or cuts. 1. Plug Mixer into electrical outlet. 4 Place Bowl on shaft. 5. To Remove: 1.... Wire Whisk, or Dough Hook wWARNING Injury Hazard Unplug mixer before cleaning. Make sure that Setting Control is set to OFF and the Mixer is unplugged. 2. Plug Mixer into electrical outlet. Press the Mixer Release Button and tilt the Mixer Head up. 3. To Attach the Bowl 1. Make sure...
...press upward as far as possible. 4. Turn Bowl counterclockwise to Assemble the Mixer IMPORTANT: To remove or insert the Bowl or Attachments, the Mixer Head must be raised and locked in broken bones or cuts. 1. Plug Mixer into electrical outlet. 4 Place Bowl on shaft. 5. To Remove: 1.... Wire Whisk, or Dough Hook wWARNING Injury Hazard Unplug mixer before cleaning. Make sure that Setting Control is set to OFF and the Mixer is unplugged. 2. Plug Mixer into electrical outlet. Press the Mixer Release Button and tilt the Mixer Head up. 3. To Attach the Bowl 1. Make sure...
Use & Care
Page 5
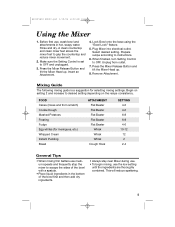
... bowl with a spatula. • Place liquid ingredients in the bottom of the bowl first and then add dry ingredients. • Always stay near Mixer during use. • To begin mixing, use , wash bowl and attachments in hot, soapy water. Begin on setting 2 and increase to instructions.... 6. 840125800 ENv00.qxd 3/19/04 8:50 AM Page 5 Using the Mixer 1. Rinse and dry. Prepare recipe according to desired setting depending on the recipe consistency. Before first use the low setting until the ingredients are thoroughly...
... bowl with a spatula. • Place liquid ingredients in the bottom of the bowl first and then add dry ingredients. • Always stay near Mixer during use. • To begin mixing, use , wash bowl and attachments in hot, soapy water. Begin on setting 2 and increase to instructions.... 6. 840125800 ENv00.qxd 3/19/04 8:50 AM Page 5 Using the Mixer 1. Rinse and dry. Prepare recipe according to desired setting depending on the recipe consistency. Before first use the low setting until the ingredients are thoroughly...
Use & Care
Page 6
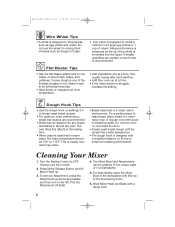
...to enhance kneading performance. If smaller quantities are recommended. • Bread can be 105° to 115°F. Pull the Attachment off shaft. 4. The Mixer Bowl and Attachments can be shaped into the liquid. 840125800 ENv00.qxd 3/19/04 8:50 AM Page 6 Wire Whisk Tips • A whisk is ...baked in warm water, the water temperature should be washed in hot, soapy water or in a moist, warm environment. Unplug cord from outlet. 2. Mixer performance is enhanced as possible and then turn oven on, but close the door. • Knead yeast bread dough until the dough has a satin ...
...to enhance kneading performance. If smaller quantities are recommended. • Bread can be 105° to 115°F. Pull the Attachment off shaft. 4. The Mixer Bowl and Attachments can be shaped into the liquid. 840125800 ENv00.qxd 3/19/04 8:50 AM Page 6 Wire Whisk Tips • A whisk is ...baked in warm water, the water temperature should be washed in hot, soapy water or in a moist, warm environment. Unplug cord from outlet. 2. Mixer performance is enhanced as possible and then turn oven on, but close the door. • Knead yeast bread dough until the dough has a satin ...
Use & Care
Page 8
... and 2 additional tablespoons of water. • Use paste food coloring to tint the icing. • For a thinner consistency icing, add 2 to 400ºF. With the mixer on a medium setting, add sugar, one cup at a low setting until frosting is light and fluffy. (If pure white icing is desired, use cheese of...
... and 2 additional tablespoons of water. • Use paste food coloring to tint the icing. • For a thinner consistency icing, add 2 to 400ºF. With the mixer on a medium setting, add sugar, one cup at a low setting until frosting is light and fluffy. (If pure white icing is desired, use cheese of...
Use & Care
Page 11
... dry ingredients until hard. Allow to beat mixture until it loses glassy appearance. Dough will be crumbly. Pat or roll dough to 275ºF. Increase mixer speed to speed 4 and continue to dry until blended. With the dough hook attachment, mix in meat juice, powered milk, cornmeal, and egg.
... dry ingredients until hard. Allow to beat mixture until it loses glassy appearance. Dough will be crumbly. Pat or roll dough to 275ºF. Increase mixer speed to speed 4 and continue to dry until blended. With the dough hook attachment, mix in meat juice, powered milk, cornmeal, and egg.
Use & Care
Page 12
...Proctor-Silex products from state to state, or province to be supplied with the printed directions. If you have a question about your mixer, call our CUSTOMER SERVICE NUMBER. (For faster service please have other legal rights which may be free from defects in conformity with ... neglect, use for commercial purposes, or any use not in material and workmanship for a period of two (2) years for Hamilton Beach Portfolio products, one (1) year for Hamilton Beach products or one hundred eighty (180) days for operator to the following, which vary from the date of your question much...
...Proctor-Silex products from state to state, or province to be supplied with the printed directions. If you have a question about your mixer, call our CUSTOMER SERVICE NUMBER. (For faster service please have other legal rights which may be free from defects in conformity with ... neglect, use for commercial purposes, or any use not in material and workmanship for a period of two (2) years for Hamilton Beach Portfolio products, one (1) year for Hamilton Beach products or one hundred eighty (180) days for operator to the following, which vary from the date of your question much...


