
User Guide
Page 2
... not fit fully into wall outlet. If it can be pulled on examination, repair, or electrical or mechanical adjustment. 10. Care must be used. Do not use appliance for use of table or counter. 8. If a longer cord is necessary, an approved extension cord may be equal to reduce the hazards of the appliance. CAUTION! Moving Parts Hazard. Call our toll-free customer service number...
... not fit fully into wall outlet. If it can be pulled on examination, repair, or electrical or mechanical adjustment. 10. Care must be used. Do not use appliance for use of table or counter. 8. If a longer cord is necessary, an approved extension cord may be equal to reduce the hazards of the appliance. CAUTION! Moving Parts Hazard. Call our toll-free customer service number...
User Guide
Page 3
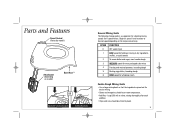
... 2 To cream butter and sugar; most packaged cake mixes 4 Frosting and mashed potatoes; kneading dough 6 HIGH speed for whipping cream Cookie Dough Mixing Guide • Use a large mixing bowl so that the ingredients spread out for 6-speed mixers. Parts and Features Speed Control (varies by hand. 3 Begin on speed 1 and increase to desired speed depending on model) Bowl Rest™ OR Speed Control Eject Eject Button General Mixing Guide The following mixing guide is a suggestion for selecting mixing speeds for easier mixing. •...
... 2 To cream butter and sugar; most packaged cake mixes 4 Frosting and mashed potatoes; kneading dough 6 HIGH speed for whipping cream Cookie Dough Mixing Guide • Use a large mixing bowl so that the ingredients spread out for 6-speed mixers. Parts and Features Speed Control (varies by hand. 3 Begin on speed 1 and increase to desired speed depending on model) Bowl Rest™ OR Speed Control Eject Eject Button General Mixing Guide The following mixing guide is a suggestion for selecting mixing speeds for easier mixing. •...
User Guide
Page 4
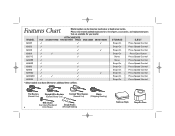
... Wire Beaters (General/Heavy Use) Twisted Wire Beaters Whisk (General Use) (Whipping/Aerating) Milk Shake (Ice Cream/Powdered Dough Hooks 4 Drink Mixes) (Mixing/Kneading) Suitcase Style Snap-On Case Features Chart Model number can be found on hand mixer or hand mixer carton. Please visit www.hamiltonbeach.com for a list of parts, accessories, and replacement parts that are available for your model. MODEL ATTACHMENTS FLAT STRAIGHT WIRE TWISTED WIRE WHISK MILK SHAKE DOUGH HOOKS STORAGE EJECT 62630 3 3 3 Snap-On Press Speed Control 62632 3 3 Snap-On Press Speed Control...
... Wire Beaters (General/Heavy Use) Twisted Wire Beaters Whisk (General Use) (Whipping/Aerating) Milk Shake (Ice Cream/Powdered Dough Hooks 4 Drink Mixes) (Mixing/Kneading) Suitcase Style Snap-On Case Features Chart Model number can be found on hand mixer or hand mixer carton. Please visit www.hamiltonbeach.com for a list of parts, accessories, and replacement parts that are available for your model. MODEL ATTACHMENTS FLAT STRAIGHT WIRE TWISTED WIRE WHISK MILK SHAKE DOUGH HOOKS STORAGE EJECT 62630 3 3 3 Snap-On Press Speed Control 62632 3 3 Snap-On Press Speed Control...

User Guide
Page 5
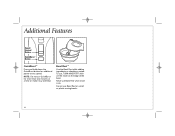
Eject Button Models Push eject button to O (OFF) and unplug mixer. Push and click into proper openings on bottom of mixer, insert desired attachment(s) into place. 4 OR 5 Move speed control to desired speed. attachments. How to Use Your Hand Mixer 1 Make sure mixer is unplugged and turned to O (OFF). 2 3 Following diagrams on bottom of mixer. Start at 1 and increase speed as needed. 6 Speed Control Models When finished, turn speed control Push speed control to eject to eject attachments. 5
Eject Button Models Push eject button to O (OFF) and unplug mixer. Push and click into proper openings on bottom of mixer, insert desired attachment(s) into place. 4 OR 5 Move speed control to desired speed. attachments. How to Use Your Hand Mixer 1 Make sure mixer is unplugged and turned to O (OFF). 2 3 Following diagrams on bottom of mixer. Start at 1 and increase speed as needed. 6 Speed Control Models When finished, turn speed control Push speed control to eject to eject attachments. 5
User Guide
Page 6
NOTE: Do not use , TURN MIXER OFF; then set the mixer on small or plastic mixing bowls. 6 Bowl Rest™ Use the Bowl Rest while adding ingredients or checking a recipe. Do not use Bowl Rest when mixer is on. Never use Bowl Rest on the edge of the bowl. To use QuickBurst for additional power at a time or motor may overheat. Additional Features Speed Control Button QuickBurst™ Button QuickBurst™ Press and hold down the QuickBurst button for more than two minutes at any speed.
NOTE: Do not use , TURN MIXER OFF; then set the mixer on small or plastic mixing bowls. 6 Bowl Rest™ Use the Bowl Rest while adding ingredients or checking a recipe. Do not use Bowl Rest when mixer is on. Never use Bowl Rest on the edge of the bowl. To use QuickBurst for additional power at a time or motor may overheat. Additional Features Speed Control Button QuickBurst™ Button QuickBurst™ Press and hold down the QuickBurst button for more than two minutes at any speed.
User Guide
Page 7
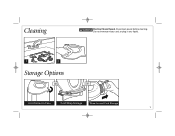
Disconnect power before cleaning. Cleaning w WARNING Electrical Shock Hazard. Do not immerse mixer, cord, or plug in any liquid. 1 2 Storage Options OR OR Cord Stored in Case Cord-Wrap Storage Wrap-Around Cord Storage 7
Disconnect power before cleaning. Cleaning w WARNING Electrical Shock Hazard. Do not immerse mixer, cord, or plug in any liquid. 1 2 Storage Options OR OR Cord Stored in Case Cord-Wrap Storage Wrap-Around Cord Storage 7

User Guide
Page 8
... not cover glass, filters, wear from accident, alteration, abuse, or misuse. and Canada. To make a warranty claim. Please call 1.800.851.8900 in material and workmanship for special, incidental, and consequential damages caused by law, in conformity with the printed directions, or damage to you are responsible for this written warranty. For faster service, locate the model, type, and series numbers...
... not cover glass, filters, wear from accident, alteration, abuse, or misuse. and Canada. To make a warranty claim. Please call 1.800.851.8900 in material and workmanship for special, incidental, and consequential damages caused by law, in conformity with the printed directions, or damage to you are responsible for this written warranty. For faster service, locate the model, type, and series numbers...


