

Use & Care
Page 2
... appliance malfunctions, or is not running. 11. The use a broken, chipped, or cracked blender jar. 13. Keep hands and utensils out of jar while blending to reduce the risk of attachments, including canning jars, not recommended or sold by Hamilton Beach/Proctor-Silex, Inc. Do not use of severe personal injury and/or damage to...
... appliance malfunctions, or is not running. 11. The use a broken, chipped, or cracked blender jar. 13. Keep hands and utensils out of jar while blending to reduce the risk of attachments, including canning jars, not recommended or sold by Hamilton Beach/Proctor-Silex, Inc. Do not use of severe personal injury and/or damage to...

Use & Care
Page 3
...to or greater than the rating of liquids from your unit, but are available as replacement parts. This is based on available cutting blades and jar combinations that it will not drape over the countertop or tabletop where it will freeze and can deliver when power is a better measure of ... the blender. Call the toll-free customer service number for household use . This will damage the motor. Do not use only. Do not place blender jar in , or tripping over . This is needed most power to reduce the hazards of the cord used . If a longer cord is intended for information....
...to or greater than the rating of liquids from your unit, but are available as replacement parts. This is based on available cutting blades and jar combinations that it will not drape over the countertop or tabletop where it will freeze and can deliver when power is a better measure of ... the blender. Call the toll-free customer service number for household use . This will damage the motor. Do not use only. Do not place blender jar in , or tripping over . This is needed most power to reduce the hazards of the cord used . If a longer cord is intended for information....
Use & Care
Page 4
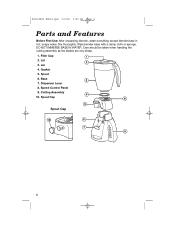
840143800 ENv03.qxd 1/6/06 9:05 AM Page 4 Parts and Features Before First Use: After unpacking blender, wash everything except blender base in hot, soapy water. Dry thoroughly. Care should be taken when handling the cutting assembly as the blades are very sharp. 1. Lid 3. Base 7. Speed Control Panel 9. Spout 6. Spout Cap Spout Cap 4 Filler Cap 2. Jar 4. Wipe blender base with a damp cloth or sponge. Gasket 5. Cutting Assembly 10. DO NOT IMMERSE BASE IN WATER. Dispenser Lever 8.
840143800 ENv03.qxd 1/6/06 9:05 AM Page 4 Parts and Features Before First Use: After unpacking blender, wash everything except blender base in hot, soapy water. Dry thoroughly. Care should be taken when handling the cutting assembly as the blades are very sharp. 1. Lid 3. Base 7. Speed Control Panel 9. Spout 6. Spout Cap Spout Cap 4 Filler Cap 2. Jar 4. Wipe blender base with a damp cloth or sponge. Gasket 5. Cutting Assembly 10. DO NOT IMMERSE BASE IN WATER. Dispenser Lever 8.
Use & Care
Page 5
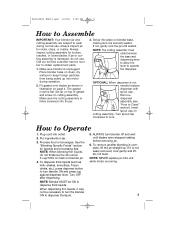
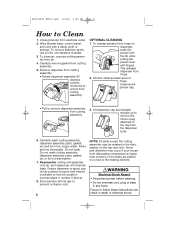
...replacement parts. 1. See the "Blending Specific Foods" section for broken, cracked, or loose blades. To dispense thick liquids (such as shown in jar. 3. Turn OFF after blending is securely seated. Call our toll-free customer service number to lock. The gasket must slide between the base and... If it is not needed replace dispenser with spout cap. Do not twist. Always inspect cutting assembly for speeds and processing tips. Set jar on top of gasket and screw on page 4. OPTIONAL: When dispenser is not easily removed, rock gently and lift. Put ingredients in ...
...replacement parts. 1. See the "Blending Specific Foods" section for broken, cracked, or loose blades. To dispense thick liquids (such as shown in jar. 3. Turn OFF after blending is securely seated. Call our toll-free customer service number to lock. The gasket must slide between the base and... If it is not needed replace dispenser with spout cap. Do not twist. Always inspect cutting assembly for speeds and processing tips. Set jar on top of gasket and screw on page 4. OPTIONAL: When dispenser is not easily removed, rock gently and lift. Put ingredients in ...
Use & Care
Page 6
... to ensure the long-life of your cutting assembly. • Processing hot foods or liquids in the blender jar. • For best performance, the minimum amount of the jar. This is not blending properly • If blending action stops during blending or ingredients stick to sides of ...blender may have 8 to perform these tasks. • If food being processed (solid food or ultra-thick beverages) will not dispense always pour from jar. • Avoid bumping or dropping the blender. 6 The blender is removed. Hints for General Use NOTE: After extended blending, especially dry food,...
... to ensure the long-life of your cutting assembly. • Processing hot foods or liquids in the blender jar. • For best performance, the minimum amount of the jar. This is not blending properly • If blending action stops during blending or ingredients stick to sides of ...blender may have 8 to perform these tasks. • If food being processed (solid food or ultra-thick beverages) will not dispense always pour from jar. • Avoid bumping or dropping the blender. 6 The blender is removed. Hints for General Use NOTE: After extended blending, especially dry food,...
Use & Care
Page 7
...at a time. Pulse a few more times. Pulse until desired consistency. For best results always crush ice immediately after Pulsing. Place jar on blender jar then Pulse. then dry ingredients. Parmesan Cheese Cut cheese into colander to redistribute pieces. Superfine Sugar Place 1 cup (250 ml)...or until smooth. For a finer consistency, press a desired speed control button for liquid then place the liquid in blender jar. Place in blender jar. Press a desired speed control button for 20 seconds or until thickened. Press a desired speed control button for 10 seconds....
...at a time. Pulse a few more times. Pulse until desired consistency. For best results always crush ice immediately after Pulsing. Place jar on blender jar then Pulse. then dry ingredients. Parmesan Cheese Cut cheese into colander to redistribute pieces. Superfine Sugar Place 1 cup (250 ml)...or until smooth. For a finer consistency, press a desired speed control button for liquid then place the liquid in blender jar. Place in blender jar. Press a desired speed control button for 20 seconds or until thickened. Press a desired speed control button for 10 seconds....
Use & Care
Page 8
...counterclockwise to the cap from cutting assembly. 5. Lift dispenser cap and actuator straight up to remove the interior plug attached to unlock from jar. 4. Some part distortion may be washed in the dishwasher on the top rack only. 840143800 ENv03.qxd 1/6/06 9:05 AM Page ...close to lock into position (reverse steps in hot, soapy water. Failure to Clean 1. Carefully wash cutting assembly, dispenser assembly parts, gasket, jar, and lid in number 5 above). 8. Unplug blender from hinge on spout and rotated clockwise to the heating element. To unsnap actuator from electrical...
...counterclockwise to the cap from cutting assembly. 5. Lift dispenser cap and actuator straight up to remove the interior plug attached to unlock from jar. 4. Some part distortion may be washed in the dishwasher on the top rack only. 840143800 ENv03.qxd 1/6/06 9:05 AM Page ...close to lock into position (reverse steps in hot, soapy water. Failure to Clean 1. Carefully wash cutting assembly, dispenser assembly parts, gasket, jar, and lid in number 5 above). 8. Unplug blender from hinge on spout and rotated clockwise to the heating element. To unsnap actuator from electrical...
Use & Care
Page 9
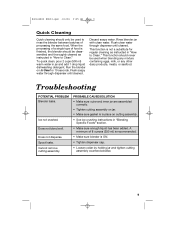
... on ICY DRINK for regular cleaning as instructed in "How to Clean." Rinse blender jar with clean water. Does not dispense. Run the blender on cutting assembly. • See ice crushing instructions in jar and add 1 drop liquid dishwashing detergent. Spout leaks. This function should never be... to rinse the blender between batches of processing the same food. PROBABLE CAUSE/SOLUTION • Make sure outer and inner jar are assembled correctly. • Tighten cutting assembly on jar. • Make sure gasket is ON. • Tighten dispenser cap. • Loosen collar by holding...
... on ICY DRINK for regular cleaning as instructed in "How to Clean." Rinse blender jar with clean water. Does not dispense. Run the blender on cutting assembly. • See ice crushing instructions in jar and add 1 drop liquid dishwashing detergent. Spout leaks. This function should never be... to rinse the blender between batches of processing the same food. PROBABLE CAUSE/SOLUTION • Make sure outer and inner jar are assembled correctly. • Tighten cutting assembly on jar. • Make sure gasket is ON. • Tighten dispenser cap. • Loosen collar by holding...

Use & Care
Page 10
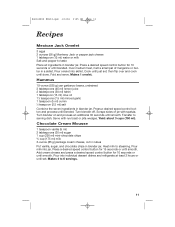
... ml) 16 ounces juice (500 ml) 24 ounces fruit (750 ml) Select desired fruit. cover. Place all ingredients in blender. Place all ingredients in blender jar; Blend for 45 seconds or until ice is crushed. Blend for 45 seconds or until smooth. Place all ingredients in blender. Blend until smooth. Margaritas...
... ml) 16 ounces juice (500 ml) 24 ounces fruit (750 ml) Select desired fruit. cover. Place all ingredients in blender. Place all ingredients in blender jar; Blend for 45 seconds or until ice is crushed. Blend for 45 seconds or until smooth. Place all ingredients in blender. Blend until smooth. Margaritas...
Use & Care
Page 11
... (15 ml) olive oil 11⁄2 teaspoons (7.5 ml) minced garlic 1 teaspoon (5 ml) cumin 1⁄2 teaspoon (2.5 ml) salt Combine the seven ingredients in blender jar. Chocolate Cream Mousse 1 teaspoon vanilla (5 ml) 2 tablespoons (30 ml) sugar 1 cup (250 ml) mini-chocolate chips 3⁄4 cup (175 ml) milk 3-ounce... (85 g) package cream cheese, cut in cubes Put vanilla, sugar, and chocolate chips in blender jar. Add cream cheese and press a desired speed control button for 10 seconds or until done. Makes 4 to steaming. Press a desired speed control...
... (15 ml) olive oil 11⁄2 teaspoons (7.5 ml) minced garlic 1 teaspoon (5 ml) cumin 1⁄2 teaspoon (2.5 ml) salt Combine the seven ingredients in blender jar. Chocolate Cream Mousse 1 teaspoon vanilla (5 ml) 2 tablespoons (30 ml) sugar 1 cup (250 ml) mini-chocolate chips 3⁄4 cup (175 ml) milk 3-ounce... (85 g) package cream cheese, cut in cubes Put vanilla, sugar, and chocolate chips in blender jar. Add cream cheese and press a desired speed control button for 10 seconds or until done. Makes 4 to steaming. Press a desired speed control...


