Use and Care Manual
Page 2
... by persons (including cutting blade, while blending or chopping food, to reduce the children) with reduced physical, sensory, or mental risk of severe personal injury and/or damage to the blender capabilities, or lack of injury to operate. therefore, with blades or moveable parts. Ensure collar on base of an oven mitt or thick towel, place one hand on base without blending jar or personal jar plug, base, or motor in...
... by persons (including cutting blade, while blending or chopping food, to reduce the children) with reduced physical, sensory, or mental risk of severe personal injury and/or damage to the blender capabilities, or lack of injury to operate. therefore, with blades or moveable parts. Ensure collar on base of an oven mitt or thick towel, place one hand on base without blending jar or personal jar plug, base, or motor in...

Use and Care Manual
Page 3
... or tabletop where it will damage the motor. Call the toll-free customer service number for food or liquid only. This is needed most power to reduce the hazards of what a blender motor can result in or tripping over . The length of operation. If a longer cord is provided with your unit, but are available as replacement parts. Care must be taken to or greater than...
... or tabletop where it will damage the motor. Call the toll-free customer service number for food or liquid only. This is needed most power to reduce the hazards of what a blender motor can result in or tripping over . The length of operation. If a longer cord is provided with your unit, but are available as replacement parts. Care must be taken to or greater than...
Use and Care Manual
Page 4
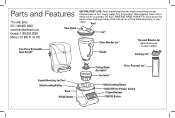
... unpacking blender, wash everything except blender base in hot, soapy water. Dry thoroughly. Vent Lid* Glass Blender Jar* Handle Personal Blender Jar (optional accessory on select models) Drinking Lid* Sound-Absorbing Jar Pad Shield Locking Button Base PULSE Button Cutting Blade Assembly* Jar Collar* 20-oz. DO NOT IMMERSE BASE IN WATER. Wipe blender base with a damp cloth or sponge. Care should be taken when cleaning inside of blender jar as cutting blade assembly is very sharp. Personal Jar* Shield Locking Button ON(I)/OFF( ) (Power) Switch 3 Speed Buttons CANCEL Button 4
... unpacking blender, wash everything except blender base in hot, soapy water. Dry thoroughly. Vent Lid* Glass Blender Jar* Handle Personal Blender Jar (optional accessory on select models) Drinking Lid* Sound-Absorbing Jar Pad Shield Locking Button Base PULSE Button Cutting Blade Assembly* Jar Collar* 20-oz. DO NOT IMMERSE BASE IN WATER. Wipe blender base with a damp cloth or sponge. Care should be taken when cleaning inside of blender jar as cutting blade assembly is very sharp. Personal Jar* Shield Locking Button ON(I)/OFF( ) (Power) Switch 3 Speed Buttons CANCEL Button 4
Use and Care Manual
Page 5
... IMMERSE BASE IN WATER. DO NOT IMMERSE BASE IN WATER. Do not touch. 5 Parts and Features (cont.) Lid: The lid is easy to put on, take on the go. This lighted switch controls power to obtain replacement parts. Metal parts under blending jar get hot after use lid when machine is in hot, soapy water. Dry thoroughly. CANCEL Button: Stops blender at high speed setting. Always inspect jar for broken, cracked, or loose blades...
... IMMERSE BASE IN WATER. DO NOT IMMERSE BASE IN WATER. Do not touch. 5 Parts and Features (cont.) Lid: The lid is easy to put on, take on the go. This lighted switch controls power to obtain replacement parts. Metal parts under blending jar get hot after use lid when machine is in hot, soapy water. Dry thoroughly. CANCEL Button: Stops blender at high speed setting. Always inspect jar for broken, cracked, or loose blades...
Use and Care Manual
Page 6
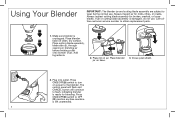
... control panel will flash and CANCEL button will continue to flash, indicating blender is left unattended. 6 Press ON(I )/OFF( ) switch to turn on jar. If jar or cutting blade assembly is unplugged. Add Ingredients. 2. Call tollfree customer service number to obtain replacement parts. 1. Place cutting blade assembly, blade side up, through opening in blending jar before twisting collar onto bottom of jar. Place lid on power to the blender. Using Your Blender IMPORTANT: The blender jar and cutting blade assembly are subject to wear...
... control panel will flash and CANCEL button will continue to flash, indicating blender is left unattended. 6 Press ON(I )/OFF( ) switch to turn on jar. If jar or cutting blade assembly is unplugged. Add Ingredients. 2. Call tollfree customer service number to obtain replacement parts. 1. Place cutting blade assembly, blade side up, through opening in blending jar before twisting collar onto bottom of jar. Place lid on power to the blender. Using Your Blender IMPORTANT: The blender jar and cutting blade assembly are subject to wear...
Use and Care Manual
Page 7
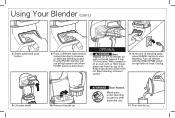
... blending speed. Using Your Blender (cont.) 5. w WARNING Burn Hazard. At the end of an oven mitt or thick towel, place one hand on . 7 Remove blender jar. Metal parts under blending jar get hot after extended use. 11. Do not fill blender jar with the ON(I)/OFF( ) switch on right side of lid. Turn off blender with hot liquid beyond 3-cup (710-ml) level. Start blending at high speed only when PULSE button...
... blending speed. Using Your Blender (cont.) 5. w WARNING Burn Hazard. At the end of an oven mitt or thick towel, place one hand on . 7 Remove blender jar. Metal parts under blending jar get hot after extended use. 11. Do not fill blender jar with the ON(I)/OFF( ) switch on right side of lid. Turn off blender with hot liquid beyond 3-cup (710-ml) level. Start blending at high speed only when PULSE button...

Use and Care Manual
Page 8
...jar to stop blending. 4. Press CANCEL button to hold while blending. remove collar and cutting blade assembly from base. Handle blade carefully; Turn bottom up; Hand-tighten drinking lid onto personal jar. Pressure may build, causing jar to pop off and hot ingredients to erupt. Turn personal jar upside down . When using PULSE button, blender will only run when the PULSE button is held down and shake. Unplug. Carefully place cutting blade assembly and collar onto personal jar. 2. Push desired speed button. Do not blend hot ingredients. Remove personal jar from jar...
...jar to stop blending. 4. Press CANCEL button to hold while blending. remove collar and cutting blade assembly from base. Handle blade carefully; Turn bottom up; Hand-tighten drinking lid onto personal jar. Pressure may build, causing jar to pop off and hot ingredients to erupt. Turn personal jar upside down . When using PULSE button, blender will only run when the PULSE button is held down and shake. Unplug. Carefully place cutting blade assembly and collar onto personal jar. 2. Push desired speed button. Do not blend hot ingredients. Remove personal jar from jar...

Use and Care Manual
Page 9
... not chop or process hard foods such as cheese, crackers, or meat. • Avoid bumping or dropping blender. • Do not blend hot liquids in jar. • Keep lid on other ingredients required for easy pouring. When turned upside down to blend, frozen items will vary based on for blending. • If blending action stops during blending, or ingredients stick to sides of liquid needed per recipe is 1 cup...
... not chop or process hard foods such as cheese, crackers, or meat. • Avoid bumping or dropping blender. • Do not blend hot liquids in jar. • Keep lid on other ingredients required for easy pouring. When turned upside down to blend, frozen items will vary based on for blending. • If blending action stops during blending, or ingredients stick to sides of liquid needed per recipe is 1 cup...
Use and Care Manual
Page 10
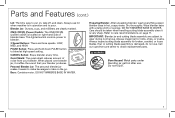
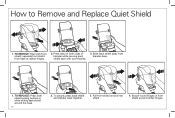
To secure, press back shield and blender base together. 3. How to Remove and Replace Quiet Shield 1. Slide back shield away from back at rubber hinges. 2. Secure round hinges of blender while moving back shield back with front shield; TO REMOVE: Start with your thumbs. 3. separate front shield from blender base. 1. TO REPLACE: Press both sides of front shield around the base. 10 2. Pull front shield around rear shield. 4. Press tabs on both shield locking buttons in while sliding back shield around rubber hinges.
To secure, press back shield and blender base together. 3. How to Remove and Replace Quiet Shield 1. Slide back shield away from back at rubber hinges. 2. Secure round hinges of blender while moving back shield back with front shield; TO REMOVE: Start with your thumbs. 3. separate front shield from blender base. 1. TO REPLACE: Press both sides of front shield around the base. 10 2. Pull front shield around rear shield. 4. Press tabs on both shield locking buttons in while sliding back shield around rubber hinges.
Use and Care Manual
Page 11
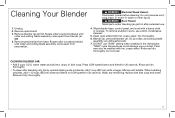
Disconnect power before cleaning. Blender jar, personal blender jar, lid, jar collar, and cutting blade assembly are dishwasher-safe. 7. Rinse and dry thoroughly. • To clean after extended use. 4. Add 1 cup (237 ml) white vinegar. Cleaning Your Blender 1. Rotate collar counterclockwise until collar and cutting blade assembly come apart from base. w WARNING Electrical Shock Hazard. Wipe blender base, control panel, and cord with hot, soapy water. Parts may also be washed with a damp cloth or sponge. Press LOW speed button and blend for 30...
Disconnect power before cleaning. Blender jar, personal blender jar, lid, jar collar, and cutting blade assembly are dishwasher-safe. 7. Rinse and dry thoroughly. • To clean after extended use. 4. Add 1 cup (237 ml) white vinegar. Cleaning Your Blender 1. Rotate collar counterclockwise until collar and cutting blade assembly come apart from base. w WARNING Electrical Shock Hazard. Wipe blender base, control panel, and cord with hot, soapy water. Parts may also be washed with a damp cloth or sponge. Press LOW speed button and blend for 30...
Use and Care Manual
Page 12
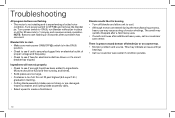
... pieces are damaged. This may quickly dissipate after a few heavy uses. • If smell continues after a problem has occurred. Turn power switch to ingredients. Blender fails to start flashing 2-3 seconds after additional heavy uses, call our customer care center. Inspect container and cutting blade assembly daily. • Select speed to see if unit is experiencing a locked rotor condition. Blender smells like it is grease around bottom of blender jar...
... pieces are damaged. This may quickly dissipate after a few heavy uses. • If smell continues after a problem has occurred. Turn power switch to ingredients. Blender fails to start flashing 2-3 seconds after additional heavy uses, call our customer care center. Inspect container and cutting blade assembly daily. • Select speed to see if unit is experiencing a locked rotor condition. Blender smells like it is grease around bottom of blender jar...
Use and Care Manual
Page 14
... this written warranty. For faster service, locate the model, type, and series numbers on implied warranties or special, incidental, or consequential damages, so the foregoing limitations may have other than single-family household use not in the U.S. and Canada. Limited Warranty This warranty applies to products purchased and used for other than as proof of purchase is no longer available, we will replace with...
... this written warranty. For faster service, locate the model, type, and series numbers on implied warranties or special, incidental, or consequential damages, so the foregoing limitations may have other than single-family household use not in the U.S. and Canada. Limited Warranty This warranty applies to products purchased and used for other than as proof of purchase is no longer available, we will replace with...


