Use & Care
Page 2
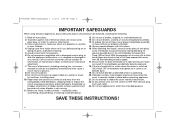
... toll-free customer service number for other liquid. 3. Do not use a broken, chipped, or cracked blender jar. 13. Always operate blender with lid in water or other than intended purpose. To prevent possible burns: Do not fill blender jar beyond the 3-cup (750-ml) level. Ensure collar on blender base. 19. If the jar should always be followed, including the following: 1. To disconnect cord, turn the control to defeat the cover...
... toll-free customer service number for other liquid. 3. Do not use a broken, chipped, or cracked blender jar. 13. Always operate blender with lid in water or other than intended purpose. To prevent possible burns: Do not fill blender jar beyond the 3-cup (750-ml) level. Ensure collar on blender base. 19. If the jar should always be followed, including the following: 1. To disconnect cord, turn the control to defeat the cover...
Use & Care
Page 3
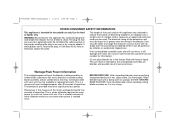
... the toll-free customer service number for food or liquids only. Do not place blender jar in hot, soapy water. This can consume when power is when a blender requires the most . The blender as it still does not fit, have an electrician replace the outlet. Dry thoroughly. DO NOT IMMERSE BASE IN WATER. The length of the cord used . The plug fits only one wide blade) that may...
... the toll-free customer service number for food or liquids only. Do not place blender jar in hot, soapy water. This can consume when power is when a blender requires the most . The blender as it still does not fit, have an electrician replace the outlet. Dry thoroughly. DO NOT IMMERSE BASE IN WATER. The length of the cord used . The plug fits only one wide blade) that may...
Use & Care
Page 4
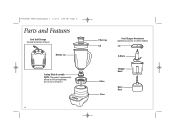
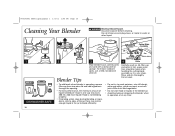
Do not try to remove it. 4 Filler-Cap Lid Food Chopper Attachment (optional accessory on bottom of base) Blender Jar Cutting Blade Assembly NOTE: The gasket is permanently affixed to the cutting blades. 840193001 ENv02.qxd:Layout 1 1/3/11 1:44 PM Page 4 Parts and Features Cord Stuff Storage (located on select models) Lid S-Blade Collar Base Chopper Bowl Bowl Base
Do not try to remove it. 4 Filler-Cap Lid Food Chopper Attachment (optional accessory on bottom of base) Blender Jar Cutting Blade Assembly NOTE: The gasket is permanently affixed to the cutting blades. 840193001 ENv02.qxd:Layout 1 1/3/11 1:44 PM Page 4 Parts and Features Cord Stuff Storage (located on select models) Lid S-Blade Collar Base Chopper Bowl Bowl Base
Use & Care
Page 5
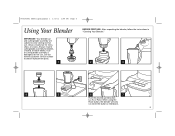
Call our toll-free customer service number to wear during normal use . If jar or cutting blade assembly is held down. 5 When using the Pulse button, the blender will only run when the button is damaged, do not use . Always inspect cutting blade assembly for nicks, chips, or cracks. 840193001 ENv02.qxd:Layout 1 1/3/11 1:44 PM Page 5 Using Your Blender IMPORTANT: Your blender jar and cutting blade assembly are subject to obtain replacement parts. 1 BEFORE FIRST USE: After unpacking...
Call our toll-free customer service number to wear during normal use . If jar or cutting blade assembly is held down. 5 When using the Pulse button, the blender will only run when the button is damaged, do not use . Always inspect cutting blade assembly for nicks, chips, or cracks. 840193001 ENv02.qxd:Layout 1 1/3/11 1:44 PM Page 5 Using Your Blender IMPORTANT: Your blender jar and cutting blade assembly are subject to obtain replacement parts. 1 BEFORE FIRST USE: After unpacking...

Use & Care
Page 7
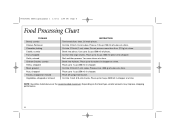
... g) 2 oz. (50 g) 1 cup (250 ml) 2 cups (500 ml) 1 cup (250 ml) 1 cup (250 ml) PREPARATION None 1/2-in. (1-cm) chunks Coarsely chop squares None Cut into 1-in. (2.5-cm) pieces, cover with water Break cookies or crackers into pieces None TIPS FOR BEST RESULTS: • Use Pulse button with guidelines outlined in chart. • Remove jar from base and shake to redistribute pieces. • Place jar on base and Pulse a few more...
... g) 2 oz. (50 g) 1 cup (250 ml) 2 cups (500 ml) 1 cup (250 ml) 1 cup (250 ml) PREPARATION None 1/2-in. (1-cm) chunks Coarsely chop squares None Cut into 1-in. (2.5-cm) pieces, cover with water Break cookies or crackers into pieces None TIPS FOR BEST RESULTS: • Use Pulse button with guidelines outlined in chart. • Remove jar from base and shake to redistribute pieces. • Place jar on base and Pulse a few more...
Use & Care
Page 8
....qxd:Layout 1 1/3/11 1:44 PM Page 8 Food Processing Chart TO MAKE Bread, crumbs Cheese, Parmesan Chocolate, baking Cookie, crumbs Fruit, chopped Garlic, minced Graham Cracker, crumbs Herbs, chopped Meat, ground Nuts, chopped Parsley, chopped or minced Vegetables, chopped or minced INSTRUCTION Tear bread slices (max. 3) into 6 pieces. Place up to 2 cups (500 ml) pieces into large chunks. Use up to 6 crackers in chopper.
....qxd:Layout 1 1/3/11 1:44 PM Page 8 Food Processing Chart TO MAKE Bread, crumbs Cheese, Parmesan Chocolate, baking Cookie, crumbs Fruit, chopped Garlic, minced Graham Cracker, crumbs Herbs, chopped Meat, ground Nuts, chopped Parsley, chopped or minced Vegetables, chopped or minced INSTRUCTION Tear bread slices (max. 3) into 6 pieces. Place up to 2 cups (500 ml) pieces into large chunks. Use up to 6 crackers in chopper.
Use & Care
Page 9
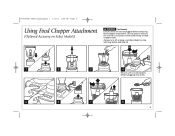
840193001 ENv02.qxd:Layout 1 1/3/11 1:48 PM Page 9 Using Food Chopper Attachment (Optional Accessory on top of food chopper bowl. Do not plug in and turn off and unplugged before plugging into outlet. 5 6 7 8 9 Always turn on until lid is in position and locked on Select Models) w WARNING Cut Hazard. Ensure unit is off , unplug, and allow blade to stop spinning before opening lid. 1 2 3 4 Ensure unit is in off position before attaching food chopper attachment.
840193001 ENv02.qxd:Layout 1 1/3/11 1:48 PM Page 9 Using Food Chopper Attachment (Optional Accessory on top of food chopper bowl. Do not plug in and turn off and unplugged before plugging into outlet. 5 6 7 8 9 Always turn on until lid is in position and locked on Select Models) w WARNING Cut Hazard. Ensure unit is off , unplug, and allow blade to stop spinning before opening lid. 1 2 3 4 Ensure unit is in off position before attaching food chopper attachment.
Use & Care
Page 10
... add foods when blender is operating, remove filler-cap from two-piece lid and add ingredients through the opening. • For best performance, the minimum amount of the jar, there may not be taken when handling the cutting blade assembly as it is one cup (8 ounces/ 250 ml). Rinse and dry thoroughly. Add more liquid if food is not blending properly. • If blending action stops during blending or ingredients stick to...
... add foods when blender is operating, remove filler-cap from two-piece lid and add ingredients through the opening. • For best performance, the minimum amount of the jar, there may not be taken when handling the cutting blade assembly as it is one cup (8 ounces/ 250 ml). Rinse and dry thoroughly. Add more liquid if food is not blending properly. • If blending action stops during blending or ingredients stick to...
Use & Care
Page 12
...law, in the U.S. This warranty does not cover glass, filters, wear from the date of express or implied warranty. This warranty is void if the product is used for a particular purpose, is...warranty claim. or 1.800.267.2826 in Canada or visit hamiltonbeach.com in Canada. For faster service, locate the model, type, and series numbers on where you specific legal rights. and Canada. This product is no longer available, we will replace with a similar one of this period, your appliance. 12 We exclude all costs associated with the printed directions, or damage to be free...
...law, in the U.S. This warranty does not cover glass, filters, wear from the date of express or implied warranty. This warranty is void if the product is used for a particular purpose, is...warranty claim. or 1.800.267.2826 in Canada or visit hamiltonbeach.com in Canada. For faster service, locate the model, type, and series numbers on where you specific legal rights. and Canada. This product is no longer available, we will replace with a similar one of this period, your appliance. 12 We exclude all costs associated with the printed directions, or damage to be free...


