Use & Care
Page 1
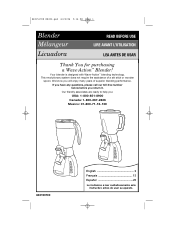
.../06 5:16 PM Page 1 Blender Mélangeur Licuadora READ BEFORE USE LIRE AVANT L'UTILISATION LEA ANTES DE USAR Thank You for purchasing a Wave˜Action™ Blender! Our friendly associates are ready to help you return it. If you have any questions, please call our toll-free number below before you : USA: 1-800-851-8900 Canada: 1-800-267-2826 Mexico...
.../06 5:16 PM Page 1 Blender Mélangeur Licuadora READ BEFORE USE LIRE AVANT L'UTILISATION LEA ANTES DE USAR Thank You for purchasing a Wave˜Action™ Blender! Our friendly associates are ready to help you return it. If you have any questions, please call our toll-free number below before you : USA: 1-800-851-8900 Canada: 1-800-267-2826 Mexico...
Use & Care
Page 2
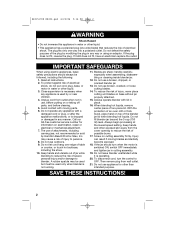
... not use of the plug by Hamilton Beach/Proctor-Silex, Inc. Do not fill blender jar beyond the 3-cup (750 ml) level. The use outdoors. 9. Do not defeat the safety purpose of attachments, including canning jars, not recommended or sold by modifying the plug in cutting assembly. 19. Call our toll-free customer service number for other than intended purpose. Keep hands and utensils out of jar while blending to...
... not use of the plug by Hamilton Beach/Proctor-Silex, Inc. Do not fill blender jar beyond the 3-cup (750 ml) level. The use outdoors. 9. Do not defeat the safety purpose of attachments, including canning jars, not recommended or sold by modifying the plug in cutting assembly. 19. Call our toll-free customer service number for other than intended purpose. Keep hands and utensils out of jar while blending to...
Use & Care
Page 3
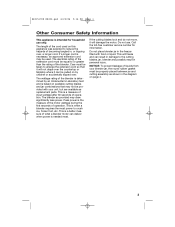
... can be provided with food or liquid. Call the toll-free customer service number for household use . Care must be used on this appliance was selected to the cutting blades, jar, blender and possibly result in the freezer filled with your blender jar, the round rubber gasket must be properly placed between jar and cutting assembly as replacement parts. This is a better measure of operation. Do not place blender jar in personal injury. This will...
... can be provided with food or liquid. Call the toll-free customer service number for household use . Care must be used on this appliance was selected to the cutting blades, jar, blender and possibly result in the freezer filled with your blender jar, the round rubber gasket must be properly placed between jar and cutting assembly as replacement parts. This is a better measure of operation. Do not place blender jar in personal injury. This will...
Use & Care
Page 4
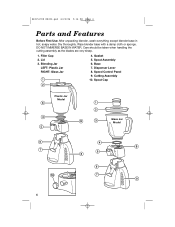
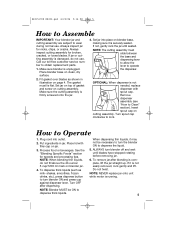
Wipe blender base with a damp cloth or sponge. DO NOT IMMERSE BASE IN WATER. Lid 3. Base 7. Speed Control Panel 9. Care should be taken when handling the cutting assembly as the blades are very sharp. 1. Spout Cap Plastic Jar Model Glass Jar Model 4 Gasket 5. Dry thoroughly. Filler Cap 2. Blending Jar LEFT: Plastic Jar RIGHT: Glass Jar 4. Spout Assembly 6. Dispenser Lever 8. Cutting Assembly 10. 840153700 ENv02.qxd 6/22/06 5:16 PM Page 4 Parts and Features Before First Use: After unpacking blender, wash everything except blender base in hot, soapy water.
Wipe blender base with a damp cloth or sponge. DO NOT IMMERSE BASE IN WATER. Lid 3. Base 7. Speed Control Panel 9. Care should be taken when handling the cutting assembly as the blades are very sharp. 1. Spout Cap Plastic Jar Model Glass Jar Model 4 Gasket 5. Dry thoroughly. Filler Cap 2. Blending Jar LEFT: Plastic Jar RIGHT: Glass Jar 4. Spout Assembly 6. Dispenser Lever 8. Cutting Assembly 10. 840153700 ENv02.qxd 6/22/06 5:16 PM Page 4 Parts and Features Before First Use: After unpacking blender, wash everything except blender base in hot, soapy water.
Use & Care
Page 5
... cutting assembly is running. 5 NOTE: When blending thin liquids, do not use . ALWAYS turn blender ON and press cup against dispenser lever. Do not twist. Always inspect cutting assembly for speeds and processing tips. If jar or cutting assembly is complete, lift the jar straight up. Place blender base on cutting assembly. Remove dispenser assembly (see "How to obtain replacement parts. 1. Place lid with spout cap. Turn spout cap clockwise to Operate 1. Put ingredients in illustration on blender jar. 4. Process food or beverages. NOTE: Blender...
... cutting assembly is running. 5 NOTE: When blending thin liquids, do not use . ALWAYS turn blender ON and press cup against dispenser lever. Do not twist. Always inspect cutting assembly for speeds and processing tips. If jar or cutting assembly is complete, lift the jar straight up. Place blender base on cutting assembly. Remove dispenser assembly (see "How to obtain replacement parts. 1. Place lid with spout cap. Turn spout cap clockwise to Operate 1. Put ingredients in illustration on blender jar. 4. Process food or beverages. NOTE: Blender...
Use & Care
Page 6
... liquid needed per recipe is operating, remove filler cap from container lid and add ingredients through the opening. • Do not store food or liquids in the jar to blend effectively. • Do not try to mash potatoes, mix stiff dough, whip egg whites, grind raw meat, or extract juices from fruits and vegetables. Do not fill blender jar beyond the 3-cup (750 ml) level. Remove filler cap and...
... liquid needed per recipe is operating, remove filler cap from container lid and add ingredients through the opening. • Do not store food or liquids in the jar to blend effectively. • Do not try to mash potatoes, mix stiff dough, whip egg whites, grind raw meat, or extract juices from fruits and vegetables. Do not fill blender jar beyond the 3-cup (750 ml) level. Remove filler cap and...
Use & Care
Page 7
.... Remove filler cap from cover to allow steam to make superfine sugar which dissolves instantly in blender jar with water. Press a desired speed control button for 30 seconds to escape. Crushing Ice For best performance, when a recipe calls for a few seconds after removing from base and shake to jar. When only crushed ice is reached. Continue until ice is reached. Pulse about 10 times. Grated Baking Chocolate On a cutting board, cut...
.... Remove filler cap from cover to allow steam to make superfine sugar which dissolves instantly in blender jar with water. Press a desired speed control button for 30 seconds to escape. Crushing Ice For best performance, when a recipe calls for a few seconds after removing from base and shake to jar. When only crushed ice is reached. Continue until ice is reached. Pulse about 10 times. Grated Baking Chocolate On a cutting board, cut...
Use & Care
Page 8
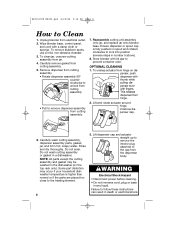
...assembly, dispenser assembly parts, gasket, jar, and lid in a dishwasher. Rinse and dry thoroughly. Carefully remove gasket from electrical outlet. 2. Remove dispenser from cutting assembly. • Rotate dispenser assembly 90º counterclockwise to unlock from cutting assembly • Pull to the cap from the dispenser body. Lift dispenser cap and actuator straight up to remove the interior plug attached to remove dispenser assembly from hinge on spout and rotated clockwise to prevent container odor. Reassemble cutting unit assembly onto jar, and replace jar onto blender base...
...assembly, dispenser assembly parts, gasket, jar, and lid in a dishwasher. Rinse and dry thoroughly. Carefully remove gasket from electrical outlet. 2. Remove dispenser from cutting assembly. • Rotate dispenser assembly 90º counterclockwise to unlock from cutting assembly • Pull to the cap from the dispenser body. Lift dispenser cap and actuator straight up to remove the interior plug attached to remove dispenser assembly from hinge on spout and rotated clockwise to prevent container odor. Reassemble cutting unit assembly onto jar, and replace jar onto blender base...
Use & Care
Page 9
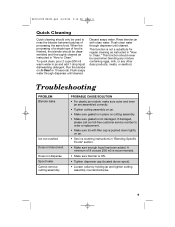
... never be used to Clean." Ice not crushed. Spout leaks. When the processing of a single type of food is finished, the blender should be disassembled and thoroughly cleaned as instructed in "How to order a replacement. • Make sure lid with clean water. Cannot remove cutting assembly. Run the blender on jar. • See ice crushing instructions in jar and add 1 drop liquid dishwashing detergent. Does not blend well. If damaged, please call our toll-free customer service number to Clean." Discard...
... never be used to Clean." Ice not crushed. Spout leaks. When the processing of a single type of food is finished, the blender should be disassembled and thoroughly cleaned as instructed in "How to order a replacement. • Make sure lid with clean water. Cannot remove cutting assembly. Run the blender on jar. • See ice crushing instructions in jar and add 1 drop liquid dishwashing detergent. Does not blend well. If damaged, please call our toll-free customer service number to Clean." Discard...
Use & Care
Page 10
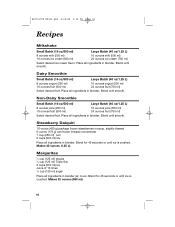
...ml) 24 ounces fruit (750 ml) Select desired fruit. Makes 40 ounces (1.25 L). Blend until smooth. Place all ingredients in blender jar; Makes 32 ounces (950 ml). 10 Blend for 45 seconds or until ice is crushed. cover. Dairy Smoothie Small Batch (16 oz/500 ml) Large Batch (40 oz/1.25 L)...500 ml) 24 ounces fruit (750 ml) Select desired fruit. Place all ingredients in blender. Blend until ice is crushed. Blend for 45 seconds or until smooth. 840153700 ENv02.qxd 6/22/06 5:16 PM Page 10 Recipes Milkshake Small Batch (16 oz/500 ml) Large Batch (40 oz/1.25 L) 8 ...
...ml) 24 ounces fruit (750 ml) Select desired fruit. Makes 40 ounces (1.25 L). Blend until smooth. Place all ingredients in blender jar; Makes 32 ounces (950 ml). 10 Blend for 45 seconds or until ice is crushed. cover. Dairy Smoothie Small Batch (16 oz/500 ml) Large Batch (40 oz/1.25 L)...500 ml) 24 ounces fruit (750 ml) Select desired fruit. Place all ingredients in blender. Blend until ice is crushed. Blend for 45 seconds or until smooth. 840153700 ENv02.qxd 6/22/06 5:16 PM Page 10 Recipes Milkshake Small Batch (16 oz/500 ml) Large Batch (40 oz/1.25 L) 8 ...
Use & Care
Page 11
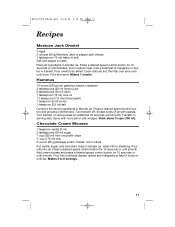
... 15 seconds or until blended. Makes 4 to serving dish. Press a desired speed control button for 10 seconds or until smooth. Turn blender on and process an additional 30 seconds until just set . Cook until smooth. Pour milk into skillet. Add cream cheese and press a desired speed control button for 10 seconds or until set ; Pour omelet into jar. Hummus 19-ounce...
... 15 seconds or until blended. Makes 4 to serving dish. Press a desired speed control button for 10 seconds or until smooth. Turn blender on and process an additional 30 seconds until just set . Cook until smooth. Pour milk into skillet. Add cream cheese and press a desired speed control button for 10 seconds or until set ; Pour omelet into jar. Hummus 19-ounce...
Use & Care
Page 12
... call our toll-free customer service number. Before calling, please note the model, type, and series numbers and fill in conformity with manufacturer's instructions, use for operator to province. MODEL TYPE SERIES This warranty applies to be supplied with this product, including without limitation: glass parts, glass containers, cutter/strainers, blades, seals, gaskets, clutches, motor brushes, and/or agitators, etc. THE FOREGOING WARRANTY IS IN LIEU OF ANY OTHER WARRANTY OR CONDITION, WHETHER EXPRESS OR IMPLIED, WRITTEN...
... call our toll-free customer service number. Before calling, please note the model, type, and series numbers and fill in conformity with manufacturer's instructions, use for operator to province. MODEL TYPE SERIES This warranty applies to be supplied with this product, including without limitation: glass parts, glass containers, cutter/strainers, blades, seals, gaskets, clutches, motor brushes, and/or agitators, etc. THE FOREGOING WARRANTY IS IN LIEU OF ANY OTHER WARRANTY OR CONDITION, WHETHER EXPRESS OR IMPLIED, WRITTEN...


