Use & Care
Page 2
... instructions. 2. Do not use appliance for information on top of table or counter, or touch hot surfaces, including the stove. 10. Do not use a broken, chipped, or cracked blender jar. 13. Do not use outdoors. 9. Do not let cord hang over edge of lid. With the protection of an ...contacting moving parts. 6. A rubber spatula may push lid off parts, and before putting on base without jar properly attached. 15. Start blending at lowest speed. 17. To protect against risk of injury, never place cutting assembly blades on or taking off jar during blending.
... instructions. 2. Do not use appliance for information on top of table or counter, or touch hot surfaces, including the stove. 10. Do not use a broken, chipped, or cracked blender jar. 13. Do not use outdoors. 9. Do not let cord hang over edge of lid. With the protection of an ...contacting moving parts. 6. A rubber spatula may push lid off parts, and before putting on base without jar properly attached. 15. Start blending at lowest speed. 17. To protect against risk of injury, never place cutting assembly blades on or taking off jar during blending.
Use & Care
Page 3
... test. These tests are based on this plug is intended to arrange the extension cord so that may be provided with food or liquid. The blender as provided may result in personal injury. Shock Hazard: This appliance has a polarized plug (one way. If a longer cord is necessary, an approved ... or liquids only. If it will not drape over . If the plug does not fit fully into a polarized outlet only one blade is when a blender requires the most . If cutting blades lock and do not move, it still does not fit, contact a qualified electrician. This is the measure of ...
... test. These tests are based on this plug is intended to arrange the extension cord so that may be provided with food or liquid. The blender as provided may result in personal injury. Shock Hazard: This appliance has a polarized plug (one way. If a longer cord is necessary, an approved ... or liquids only. If it will not drape over . If the plug does not fit fully into a polarized outlet only one blade is when a blender requires the most . If cutting blades lock and do not move, it still does not fit, contact a qualified electrician. This is the measure of ...
Use & Care
Page 4
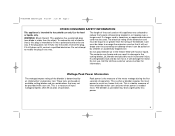
840164500 ENnv09.qxd 8/23/07 3:25 PM Page 4 Choose Your Blender Types: B46 with glass jar, B20, B23, B30, Type: B46 with plastic jar Type: B33 with plastic jar Types: B33 with glass jar, B12, B29, B45, B49 Blender type can be found on the bottom of the blender carton or on the bottom of the blender base. 4
840164500 ENnv09.qxd 8/23/07 3:25 PM Page 4 Choose Your Blender Types: B46 with glass jar, B20, B23, B30, Type: B46 with plastic jar Type: B33 with plastic jar Types: B33 with glass jar, B12, B29, B45, B49 Blender type can be found on the bottom of the blender carton or on the bottom of the blender base. 4
Use & Care
Page 5
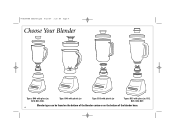
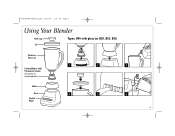
840164500 ENnv09.qxd 8/23/07 3:25 PM Page 5 Using Your Blender Filler Cap Types: B46 with glass jar, B20, B23, B30, Lid Plastic or Glass Jar 1 2 3 Cutting Blades with Permanent Gasket (Do not try to remove gasket.) Collar Base Control Panel 4 5 6 5
840164500 ENnv09.qxd 8/23/07 3:25 PM Page 5 Using Your Blender Filler Cap Types: B46 with glass jar, B20, B23, B30, Lid Plastic or Glass Jar 1 2 3 Cutting Blades with Permanent Gasket (Do not try to remove gasket.) Collar Base Control Panel 4 5 6 5

Use & Care
Page 6
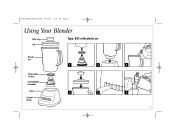
840164500 ENnv09.qxd 8/23/07 3:25 PM Page 6 Using Your Blender Filler Cap Type: B46 with plastic jar Lid Plastic Jar with Non-Removable Cutting Blades Dishwasher Drain Holes Base Control Panel 6 1 2 3 4 5
840164500 ENnv09.qxd 8/23/07 3:25 PM Page 6 Using Your Blender Filler Cap Type: B46 with plastic jar Lid Plastic Jar with Non-Removable Cutting Blades Dishwasher Drain Holes Base Control Panel 6 1 2 3 4 5
Use & Care
Page 7
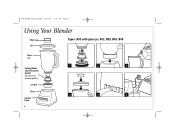
840164500 ENnv09.qxd 8/23/07 3:25 PM Page 7 Using Your Blender Filler Cap Lid Type: B33 with plastic jar Plastic Jar Removable Gasket Cutting Blade Assembly Base Control Panel 1 2 4 5 3 6 7
840164500 ENnv09.qxd 8/23/07 3:25 PM Page 7 Using Your Blender Filler Cap Lid Type: B33 with plastic jar Plastic Jar Removable Gasket Cutting Blade Assembly Base Control Panel 1 2 4 5 3 6 7
Use & Care
Page 8
840164500 ENnv09.qxd 8/23/07 3:25 PM Page 8 Using Your Blender Filler Cap Lid Types: B33 with glass jar, B12, B29, B45, B49 Glass Jar Cutting Blades with Permanent Gasket (Do not try to remove gasket.) Jar Nut Base Control Panel 8 1 2 3 4 4 5
840164500 ENnv09.qxd 8/23/07 3:25 PM Page 8 Using Your Blender Filler Cap Lid Types: B33 with glass jar, B12, B29, B45, B49 Glass Jar Cutting Blades with Permanent Gasket (Do not try to remove gasket.) Jar Nut Base Control Panel 8 1 2 3 4 4 5
Use & Care
Page 9
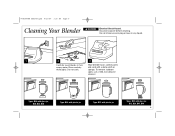
Disconnect power before cleaning. Do not soak. To remove stubborn spots, use a mild, non-abrasive cleanser. Rinse and dry thoroughly. Types: B46 with glass jar, B20, B23, B30 Type: B46 with plastic jar Type: B33 with plastic jar Types: B33 with a damp cloth or sponge. Wipe blender base, control panel, and cord with glass jar, B12, B29, B45, B49 9 840164500 ENnv09.qxd 8/23/07 3:25 PM Page 9 Cleaning Your Blender w WARNING Electrical Shock Hazard. Do not immerse cord, plug or base in any liquid. 1 2 3 Carefully wash blades in hot, soapy water.
Disconnect power before cleaning. Do not soak. To remove stubborn spots, use a mild, non-abrasive cleanser. Rinse and dry thoroughly. Types: B46 with glass jar, B20, B23, B30 Type: B46 with plastic jar Type: B33 with plastic jar Types: B33 with a damp cloth or sponge. Wipe blender base, control panel, and cord with glass jar, B12, B29, B45, B49 9 840164500 ENnv09.qxd 8/23/07 3:25 PM Page 9 Cleaning Your Blender w WARNING Electrical Shock Hazard. Do not immerse cord, plug or base in any liquid. 1 2 3 Carefully wash blades in hot, soapy water.
Use & Care
Page 10
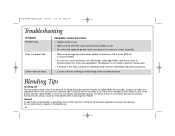
...until mixture is in the blender jar. 10 Place lid on blender jar then Pulse on cutter assembly. • Make sure enough liquid has been added. A minimum of the 5 pulse speeds. 840164500 ENnv09.qxd 8/23/07 3:25 PM Page 10 Troubleshooting PROBLEM Blender leaks. Blending Tips Crushing Ice... For best performance, when a recipe calls for liquid, place the liquid in blender jar followed by holding jar and turning collar ...
...until mixture is in the blender jar. 10 Place lid on blender jar then Pulse on cutter assembly. • Make sure enough liquid has been added. A minimum of the 5 pulse speeds. 840164500 ENnv09.qxd 8/23/07 3:25 PM Page 10 Troubleshooting PROBLEM Blender leaks. Blending Tips Crushing Ice... For best performance, when a recipe calls for liquid, place the liquid in blender jar followed by holding jar and turning collar ...

Use & Care
Page 2
...blades accidentally become exposed. 10. handle carefully. 5. Do not use with the following : 1. Always operate blender with cutting assembly in the jars. Never place cutting blades on jar nut firmly. The contents may freeze and may be followed, including the following Hamilton Beach blender types. NOTE: This ... use broken, cracked, or loose blades. 8. SAVE THESE INSTRUCTIONS! TYPE OF BLENDING JAR PROVIDED WITH YOUR BLENDER Plastic Jar Glass Jar BLENDERS THAT CAN BE USED WITH STAY OR GO™ PERSONAL BLENDING JAR B40, B48 B29, B36, B39, B42, B46, B49 Either Plastic or Glass...
...blades accidentally become exposed. 10. handle carefully. 5. Do not use with the following : 1. Always operate blender with cutting assembly in the jars. Never place cutting blades on jar nut firmly. The contents may freeze and may be followed, including the following Hamilton Beach blender types. NOTE: This ... use broken, cracked, or loose blades. 8. SAVE THESE INSTRUCTIONS! TYPE OF BLENDING JAR PROVIDED WITH YOUR BLENDER Plastic Jar Glass Jar BLENDERS THAT CAN BE USED WITH STAY OR GO™ PERSONAL BLENDING JAR B40, B48 B29, B36, B39, B42, B46, B49 Either Plastic or Glass...

Use & Care
Page 4
Dry thoroughly. 1 2 3 4 Cutting assembly may be removed from what is shown above. 840168601 ENv05.qxd 1/23/08 8:38 AM Page 4 Using the Personal Blending Jar Before First Use: Wash all parts in place while blending. 4 for operating instructions. ON 5 6 7 8 See your blender jar. Cutting assemblies are included with your blender and may vary from your blender's Use and Care Hold jar in hot, soapy water.
Dry thoroughly. 1 2 3 4 Cutting assembly may be removed from what is shown above. 840168601 ENv05.qxd 1/23/08 8:38 AM Page 4 Using the Personal Blending Jar Before First Use: Wash all parts in place while blending. 4 for operating instructions. ON 5 6 7 8 See your blender jar. Cutting assemblies are included with your blender and may vary from your blender's Use and Care Hold jar in hot, soapy water.


