
Use & Care
Page 2
... on base without jar properly attached. 9. Do not use . Injury can result if moving parts. 4. Remove cutting assembly and wash after each use a broken, chipped, or cracked blender jar. 6. 840168601 ENv05.qxd 1/23/08 8:38 AM Page 2 IMPORTANT SAFEGUARDS When using this appliance accessory, the blender may be followed, including the following Hamilton Beach blender types. handle carefully. 5. NOTE: This appliance is intended for use broken, cracked, or loose blades. 8. Do not use with cutting assembly...
... on base without jar properly attached. 9. Do not use . Injury can result if moving parts. 4. Remove cutting assembly and wash after each use a broken, chipped, or cracked blender jar. 6. 840168601 ENv05.qxd 1/23/08 8:38 AM Page 2 IMPORTANT SAFEGUARDS When using this appliance accessory, the blender may be followed, including the following Hamilton Beach blender types. handle carefully. 5. NOTE: This appliance is intended for use broken, cracked, or loose blades. 8. Do not use with cutting assembly...

Use & Care
Page 3
840168601 ENv05.qxd 1/23/08 8:38 AM Page 3 Parts and Features Top Lid Jar Bottom Lid 3
840168601 ENv05.qxd 1/23/08 8:38 AM Page 3 Parts and Features Top Lid Jar Bottom Lid 3

Use & Care
Page 4
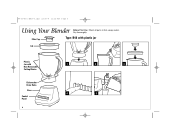
Dry thoroughly. 1 2 3 4 Cutting assembly may be removed from what is shown above. ON 5 6 7 8 See your blender jar. 840168601 ENv05.qxd 1/23/08 8:38 AM Page 4 Using the Personal Blending Jar Before First Use: Wash all parts in place while blending. 4 for operating instructions. Cutting assemblies are included with your blender and may vary from your blender's Use and Care Hold jar in hot, soapy water.
Dry thoroughly. 1 2 3 4 Cutting assembly may be removed from what is shown above. ON 5 6 7 8 See your blender jar. 840168601 ENv05.qxd 1/23/08 8:38 AM Page 4 Using the Personal Blending Jar Before First Use: Wash all parts in place while blending. 4 for operating instructions. Cutting assemblies are included with your blender and may vary from your blender's Use and Care Hold jar in hot, soapy water.

Use & Care
Page 5
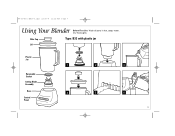
840168601 ENv05.qxd 1/23/08 8:38 AM Page 5 Using the Personal Blending Jar (cont.) 9 10 11 Care and Cleaning DISHWASHER SAFE 5
840168601 ENv05.qxd 1/23/08 8:38 AM Page 5 Using the Personal Blending Jar (cont.) 9 10 11 Care and Cleaning DISHWASHER SAFE 5

Use & Care
Page 6
...CUSTOMER SERVICE NUMBER. (For faster service please have model, series, and type numbers ready for operator to province. This product is no warranty with manufacturer's instructions, use for a period of original purchase, except as noted below. or Canada. During this period, we will repair or replace this warranty...the printed directions. If you have other legal rights which may not apply to products purchased in conformity with this product, including without limitation: glass parts, glass containers, cutter/strainers, blades, seals, gaskets, clutches, motor brushes, and...
...CUSTOMER SERVICE NUMBER. (For faster service please have model, series, and type numbers ready for operator to province. This product is no warranty with manufacturer's instructions, use for a period of original purchase, except as noted below. or Canada. During this period, we will repair or replace this warranty...the printed directions. If you have other legal rights which may not apply to products purchased in conformity with this product, including without limitation: glass parts, glass containers, cutter/strainers, blades, seals, gaskets, clutches, motor brushes, and...
Use & Care
Page 2
Avoid contacting moving parts. 6. Do not use broken, cracked, or loose cutting blades. 14. Keep hands and utensils out of jar while blending to reduce the risk of severe injury to persons or damage to OFF ( O ) then remove plug from wall outlet. 19. handle carefully-especially when assembling, disassembling or cleaning inside blender jar. 12. To prevent possible burns: do not put cord, plug, or base in use appliance for...
Avoid contacting moving parts. 6. Do not use broken, cracked, or loose cutting blades. 14. Keep hands and utensils out of jar while blending to reduce the risk of severe injury to persons or damage to OFF ( O ) then remove plug from wall outlet. 19. handle carefully-especially when assembling, disassembling or cleaning inside blender jar. 12. To prevent possible burns: do not put cord, plug, or base in use appliance for...

Use & Care
Page 3
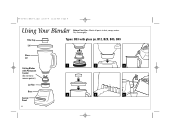
... to arrange the extension cord so that may draw significantly less power. The blender as provided may not be pulled on available cutting blades and jar combinations that it will damage the motor. TYPE OF BLENDING JAR PROVIDED WITH YOUR BLENDER Plastic Jar Glass Jar BLENDERS THAT CAN BE USED WITH STAY OR GO™ PERSONAL BLENDING JAR B40, B48 B29, B36, B39, B42, B46, B49 Either Plastic or Glass B12, B20, B23, B30...
... to arrange the extension cord so that may draw significantly less power. The blender as provided may not be pulled on available cutting blades and jar combinations that it will damage the motor. TYPE OF BLENDING JAR PROVIDED WITH YOUR BLENDER Plastic Jar Glass Jar BLENDERS THAT CAN BE USED WITH STAY OR GO™ PERSONAL BLENDING JAR B40, B48 B29, B36, B39, B42, B46, B49 Either Plastic or Glass B12, B20, B23, B30...
Use & Care
Page 4
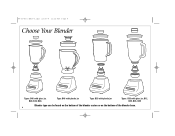
840164501 ENnv03.qxd 2/29/08 11:25 AM Page 4 Choose Your Blender Types: B46 with glass jar, B20, B23, B30, Type: B46 with plastic jar Type: B33 with plastic jar Types: B33 with glass jar, B12, B29, B45, B49 Blender type can be found on the bottom of the blender carton or on the bottom of the blender base. 4
840164501 ENnv03.qxd 2/29/08 11:25 AM Page 4 Choose Your Blender Types: B46 with glass jar, B20, B23, B30, Type: B46 with plastic jar Type: B33 with plastic jar Types: B33 with glass jar, B12, B29, B45, B49 Blender type can be found on the bottom of the blender carton or on the bottom of the blender base. 4
Use & Care
Page 5
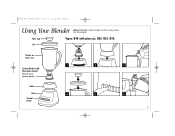
Filler Cap Types: B46 with glass jar, B20, B23, B30, Lid Plastic or Glass Jar 1 2 3 Cutting Blades with Permanent Gasket (Do not try to remove gasket.) Collar Base Control Panel 4 5 6 5 Dry thoroughly. 840164501 ENnv03.qxd 2/29/08 11:25 AM Page 5 Using Your Blender Before First Use: Wash all parts in hot, soapy water.
Filler Cap Types: B46 with glass jar, B20, B23, B30, Lid Plastic or Glass Jar 1 2 3 Cutting Blades with Permanent Gasket (Do not try to remove gasket.) Collar Base Control Panel 4 5 6 5 Dry thoroughly. 840164501 ENnv03.qxd 2/29/08 11:25 AM Page 5 Using Your Blender Before First Use: Wash all parts in hot, soapy water.
Use & Care
Page 6
840164501 ENnv03.qxd 2/29/08 11:25 AM Page 6 Using Your Blender Before First Use: Wash all parts in hot, soapy water. Dry thoroughly. Filler Cap Type: B46 with plastic jar Lid Plastic Jar with Non-Removable Cutting Blades Dishwasher Drain Holes Base Control Panel 6 1 2 3 4 5
840164501 ENnv03.qxd 2/29/08 11:25 AM Page 6 Using Your Blender Before First Use: Wash all parts in hot, soapy water. Dry thoroughly. Filler Cap Type: B46 with plastic jar Lid Plastic Jar with Non-Removable Cutting Blades Dishwasher Drain Holes Base Control Panel 6 1 2 3 4 5
Use & Care
Page 7
Dry thoroughly. Filler Cap Type: B33 with plastic jar Lid Plastic Jar Removable Gasket Cutting Blade Assembly Base Control Panel 1 2 3 4 5 6 7 840164501 ENnv03.qxd 2/29/08 11:25 AM Page 7 Using Your Blender Before First Use: Wash all parts in hot, soapy water.
Dry thoroughly. Filler Cap Type: B33 with plastic jar Lid Plastic Jar Removable Gasket Cutting Blade Assembly Base Control Panel 1 2 3 4 5 6 7 840164501 ENnv03.qxd 2/29/08 11:25 AM Page 7 Using Your Blender Before First Use: Wash all parts in hot, soapy water.
Use & Care
Page 8
Filler Cap Lid Types: B33 with glass jar, B12, B29, B45, B49 Glass Jar Cutting Blades with Permanent Gasket (Do not try to remove gasket.) Jar Nut Base Control Panel 8 1 2 3 4 5 6 840164501 ENnv03.qxd 2/29/08 11:25 AM Page 8 Using Your Blender Before First Use: Wash all parts in hot, soapy water. Dry thoroughly.
Filler Cap Lid Types: B33 with glass jar, B12, B29, B45, B49 Glass Jar Cutting Blades with Permanent Gasket (Do not try to remove gasket.) Jar Nut Base Control Panel 8 1 2 3 4 5 6 840164501 ENnv03.qxd 2/29/08 11:25 AM Page 8 Using Your Blender Before First Use: Wash all parts in hot, soapy water. Dry thoroughly.
Use & Care
Page 9
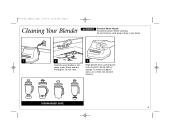
Disconnect power before cleaning. Rinse and dry thoroughly. 840164501 ENnv03.qxd 2/29/08 11:25 AM Page 9 Cleaning Your Blender w WARNING Electrical Shock Hazard. Wipe blender base, control panel, and cord with a damp cloth or sponge. Do not soak. Do not immerse cord, plug or base in any liquid. 1 2 3 Carefully wash blades in hot, soapy water. To remove stubborn spots, use a mild, non-abrasive cleanser. DISHWASHER SAFE 9
Disconnect power before cleaning. Rinse and dry thoroughly. 840164501 ENnv03.qxd 2/29/08 11:25 AM Page 9 Cleaning Your Blender w WARNING Electrical Shock Hazard. Wipe blender base, control panel, and cord with a damp cloth or sponge. Do not soak. Do not immerse cord, plug or base in any liquid. 1 2 3 Carefully wash blades in hot, soapy water. To remove stubborn spots, use a mild, non-abrasive cleanser. DISHWASHER SAFE 9
Use & Care
Page 10
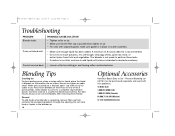
... enough liquid has been added. Blending Tips Crushing Ice For best performance, when a recipe calls for liquid, place the liquid in the blender jar. 10 Optional Accessories Hamilton Beach Stay or Go™ Personal Blending Jar (AC16) may be purchased separately and used with separate gasket, make sure gasket is recommended. • Do not try to desired consistency. For best results always crush ice immediately after removing from container lid and add ingredients through the...
... enough liquid has been added. Blending Tips Crushing Ice For best performance, when a recipe calls for liquid, place the liquid in the blender jar. 10 Optional Accessories Hamilton Beach Stay or Go™ Personal Blending Jar (AC16) may be purchased separately and used with separate gasket, make sure gasket is recommended. • Do not try to desired consistency. For best results always crush ice immediately after removing from container lid and add ingredients through the...

Use & Care
Page 11
line. line. CUPS 48 6 40 5 2 32 4 24 3 16 2 8 oz. 81 OZ. 840164501 ENnv03.qxd 2/29/08 11:25 AM Page 11 Single Serving Smoothie Recipe NOTE: Recipe can be doubled. 1 OZ. CUPS 48 6 40 5 32 4 24 3 16 oz. 16 2 4 81 Then add fresh or frozen fruit up to 12 oz. line. 12 oz. 16 2 3 81 Add yogurt up to 8 oz. CUPS 48 6 40 5 32 4 Begin by adding juice or 24 3 milk to 16 oz. OZ. Blend until smooth. 11
line. line. CUPS 48 6 40 5 2 32 4 24 3 16 2 8 oz. 81 OZ. 840164501 ENnv03.qxd 2/29/08 11:25 AM Page 11 Single Serving Smoothie Recipe NOTE: Recipe can be doubled. 1 OZ. CUPS 48 6 40 5 32 4 24 3 16 oz. 16 2 4 81 Then add fresh or frozen fruit up to 12 oz. line. 12 oz. 16 2 3 81 Add yogurt up to 8 oz. CUPS 48 6 40 5 32 4 Begin by adding juice or 24 3 milk to 16 oz. OZ. Blend until smooth. 11
Use & Care
Page 12
... a period of three (3) years from state to state, or province to clean product regularly in accordance with this product, including without limitation: glass parts, glass containers, cutter/strainers, blades, seals, gaskets, clutches, motor brushes, and/or agitators, etc. This product is no warranty with respect to be supplied with manufacturer's instructions, use not in the U.S. There is warranted to the following, which vary...
... a period of three (3) years from state to state, or province to clean product regularly in accordance with this product, including without limitation: glass parts, glass containers, cutter/strainers, blades, seals, gaskets, clutches, motor brushes, and/or agitators, etc. This product is no warranty with respect to be supplied with manufacturer's instructions, use not in the U.S. There is warranted to the following, which vary...


