Use & Care
Page 3
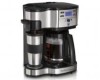
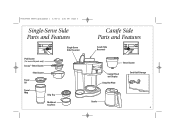
840199600 ENv05.qxd:Layout 1 2/18/11 2:01 PM Page 3 Single-Serve Side Parts and Features Pod Basket (for use with pods only) Scoop™ Brew Basket Filter Basket Travel Lid Travel Mug Drip Tray Multilevel Cup Rest Single-Serve Side Reservoir Carafe Side Parts and Features Carafe Side Reservoir Brew Basket Control Panel and Display Keep-Hot Plate Cord-Stuff Storage Carafe 3
840199600 ENv05.qxd:Layout 1 2/18/11 2:01 PM Page 3 Single-Serve Side Parts and Features Pod Basket (for use with pods only) Scoop™ Brew Basket Filter Basket Travel Lid Travel Mug Drip Tray Multilevel Cup Rest Single-Serve Side Reservoir Carafe Side Parts and Features Carafe Side Reservoir Brew Basket Control Panel and Display Keep-Hot Plate Cord-Stuff Storage Carafe 3

Use & Care
Page 4
...Hotter Coffee: Rinse the travel mug with travel mug lid in the coffee aisle of water. • Fill single-serve reservoir with mug or cup into the travel mug lid. w WARNING Burn Hazard. Brew directly into which the coffee will automatically shut off after brew cycle is complete. ...1 before brewing; OR 2 3 Push lever left to Use Single-Serve Side AUTOMATIC SHUTOFF: The coffeemaker will be brewed. • Fully insert mug or cup under filter basket. • This unit can be used with Senseo® Pods, available in place. 840199600 ENv05.qxd:Layout 1 2/18/11 2:01 PM...
...Hotter Coffee: Rinse the travel mug with travel mug lid in the coffee aisle of water. • Fill single-serve reservoir with mug or cup into the travel mug lid. w WARNING Burn Hazard. Brew directly into which the coffee will automatically shut off after brew cycle is complete. ...1 before brewing; OR 2 3 Push lever left to Use Single-Serve Side AUTOMATIC SHUTOFF: The coffeemaker will be brewed. • Fully insert mug or cup under filter basket. • This unit can be used with Senseo® Pods, available in place. 840199600 ENv05.qxd:Layout 1 2/18/11 2:01 PM...
Use & Care
Page 7
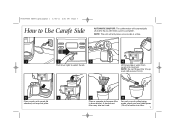
840199600 ENv05.qxd:Layout 1 2/18/11 2:01 PM Page 7 How to select Carafe. NOTE: Do not fill past the 12-cup mark (60 ounces [1.8 L]). 5 6 Place carafe, with carafe lid attached, on one level tablespoon (15 ml) of coffee being made, place one side at a time. 1 2 3 4 ...Use Carafe Side AUTOMATIC SHUTOFF: The coffeemaker will automatically shut off 2 hours after brew cycle is complete. A permanent filter may also be used. 8 For each cup of coffee into reservoir. Lift lid and pour water from carafe into filter. 7 NOTE: The unit will only brew on keep-hot plate. 7 Place a ...
840199600 ENv05.qxd:Layout 1 2/18/11 2:01 PM Page 7 How to select Carafe. NOTE: Do not fill past the 12-cup mark (60 ounces [1.8 L]). 5 6 Place carafe, with carafe lid attached, on one level tablespoon (15 ml) of coffee being made, place one side at a time. 1 2 3 4 ...Use Carafe Side AUTOMATIC SHUTOFF: The coffeemaker will automatically shut off 2 hours after brew cycle is complete. A permanent filter may also be used. 8 For each cup of coffee into reservoir. Lift lid and pour water from carafe into filter. 7 NOTE: The unit will only brew on keep-hot plate. 7 Place a ...
Use & Care
Page 9
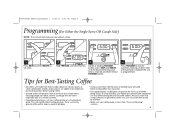
.... • Make sure your coffee grinder on one side at a time. 1 Press HOUR and then MINUTE to set your coffeemaker is programmed. Tips for each cup of coffee being made from either arabica beans or robusta beans, or some combination of both. A green LED will yield the best-tasting grounds. To...
.... • Make sure your coffee grinder on one side at a time. 1 Press HOUR and then MINUTE to set your coffeemaker is programmed. Tips for each cup of coffee being made from either arabica beans or robusta beans, or some combination of both. A green LED will yield the best-tasting grounds. To...

Use & Care
Page 10
Press O (OFF) button after 30 seconds and wait 30 minutes. Press O (OFF) button when finished. 5 6 Run 2-3 more brew cycles with hard water). 1 2 3 Pour 1/2 cup (125 ml) of plain white vinegar and 1/2 cup (125 ml) of cold water into single-serve side reservoir. 4 Press I (ON) button. Single-Serve Side All coffeemakers should be cleaned at least once a month (once a week for areas with CLEAN WATER only. Press I (ON) button. Allow to cool between cycles. 10 DISHWASHER-SAFE 840199600 ENv05.qxd:Layout 1 2/18/11 2:01 PM Page 10 Care and Cleaning -
Press O (OFF) button after 30 seconds and wait 30 minutes. Press O (OFF) button when finished. 5 6 Run 2-3 more brew cycles with hard water). 1 2 3 Pour 1/2 cup (125 ml) of plain white vinegar and 1/2 cup (125 ml) of cold water into single-serve side reservoir. 4 Press I (ON) button. Single-Serve Side All coffeemakers should be cleaned at least once a month (once a week for areas with CLEAN WATER only. Press I (ON) button. Allow to cool between cycles. 10 DISHWASHER-SAFE 840199600 ENv05.qxd:Layout 1 2/18/11 2:01 PM Page 10 Care and Cleaning -

Use & Care
Page 11
840199600 ENv05.qxd:Layout 1 2/18/11 2:01 PM Page 11 Care and Cleaning - Press I (ON) button. Carafe Side All coffeemakers should be cleaned at least once a month (once a week for areas with hard water). 1 2 Pour 1 pint (2 cups/500 ml) vinegar into carafe side reservoir. 5 6 Run 2-3 more brew cycles with CLEAN WATER only. Press O (OFF) button after 30 seconds and wait 30 minutes. DISHWASHER-SAFE 11 Press O (OFF) button when finished. Allow to cool between cycles. 3 4 Press I (ON) button.
840199600 ENv05.qxd:Layout 1 2/18/11 2:01 PM Page 11 Care and Cleaning - Press I (ON) button. Carafe Side All coffeemakers should be cleaned at least once a month (once a week for areas with hard water). 1 2 Pour 1 pint (2 cups/500 ml) vinegar into carafe side reservoir. 5 6 Run 2-3 more brew cycles with CLEAN WATER only. Press O (OFF) button after 30 seconds and wait 30 minutes. DISHWASHER-SAFE 11 Press O (OFF) button when finished. Allow to cool between cycles. 3 4 Press I (ON) button.
Use & Care
Page 14
... the hardness of your water. then plug the unit back in. • Clock requires reset after power outage. • Mineral deposits can build up in cup. More frequent cleaning may be necessary, depending on . NOTE: Do not disassemble the unit. 14 840199600 ENv05.qxd:Layout 1 2/18/11 2:01 PM Page 14...
... the hardness of your water. then plug the unit back in. • Clock requires reset after power outage. • Mineral deposits can build up in cup. More frequent cleaning may be necessary, depending on . NOTE: Do not disassemble the unit. 14 840199600 ENv05.qxd:Layout 1 2/18/11 2:01 PM Page 14...


