Use & Care
Page 2
... user-serviceable parts inside. If a longer cord is necessary, an approved extension cord may cause injuries. 9. Repair should always be taken to the OFF position and then remove plug from spilled, hot liquid. 3. Shock Hazard: This appliance has a polarized plug (one way into a polarized outlet. Do not clean carafe with this appliance was selected to or greater than intended use...
... user-serviceable parts inside. If a longer cord is necessary, an approved extension cord may cause injuries. 9. Repair should always be taken to the OFF position and then remove plug from spilled, hot liquid. 3. Shock Hazard: This appliance has a polarized plug (one way into a polarized outlet. Do not clean carafe with this appliance was selected to or greater than intended use...
Use & Care
Page 3
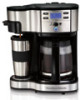
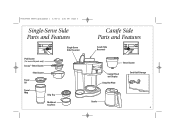
840199600 ENv05.qxd:Layout 1 2/18/11 2:01 PM Page 3 Single-Serve Side Parts and Features Pod Basket (for use with pods only) Scoop™ Brew Basket Filter Basket Travel Lid Travel Mug Drip Tray Multilevel Cup Rest Single-Serve Side Reservoir Carafe Side Parts and Features Carafe Side Reservoir Brew Basket Control Panel and Display Keep-Hot Plate Cord-Stuff Storage Carafe 3
840199600 ENv05.qxd:Layout 1 2/18/11 2:01 PM Page 3 Single-Serve Side Parts and Features Pod Basket (for use with pods only) Scoop™ Brew Basket Filter Basket Travel Lid Travel Mug Drip Tray Multilevel Cup Rest Single-Serve Side Reservoir Carafe Side Parts and Features Carafe Side Reservoir Brew Basket Control Panel and Display Keep-Hot Plate Cord-Stuff Storage Carafe 3

Use & Care
Page 4
... to Use Single-Serve Side AUTOMATIC SHUTOFF: The coffeemaker will be brewed. • Fully insert mug or cup under filter basket. • This unit can be used with Senseo® Pods, available in place. To avoid contact with hot coffee or water: • Do not use slightly less grounds when brewing decaf or flavored coffees. • For Hotter Coffee: Rinse the travel mug lid in the coffee aisle of water. • Fill single-serve reservoir...
... to Use Single-Serve Side AUTOMATIC SHUTOFF: The coffeemaker will be brewed. • Fully insert mug or cup under filter basket. • This unit can be used with Senseo® Pods, available in place. To avoid contact with hot coffee or water: • Do not use slightly less grounds when brewing decaf or flavored coffees. • For Hotter Coffee: Rinse the travel mug lid in the coffee aisle of water. • Fill single-serve reservoir...

Use & Care
Page 5
... assemble pod holder: Grasp single-serve brew basket firmly. Insert left tab of coffee-OR if stronger coffee is desired. INCORRECT 7A-2 - WARNING! Keep ground coffee below MAX fill line to Scoop™ brew basket. Two pods are recommended for up to 14 ounces (410 ml) of the pod holder first; GROUNDS For regular coffee, use a maximum of two level tablespoons of coffee. DO NOT brew loose grounds with pod basket attached to prevent overflow...
... assemble pod holder: Grasp single-serve brew basket firmly. Insert left tab of coffee-OR if stronger coffee is desired. INCORRECT 7A-2 - WARNING! Keep ground coffee below MAX fill line to Scoop™ brew basket. Two pods are recommended for up to 14 ounces (410 ml) of the pod holder first; GROUNDS For regular coffee, use a maximum of two level tablespoons of coffee. DO NOT brew loose grounds with pod basket attached to prevent overflow...
Use & Care
Page 6
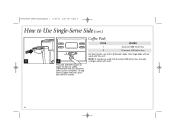
Coffeemaker will not work with this unit. Very large pods will shut off when brew cycle is complete. Press I /O (ON/OFF) button. 6 To stop flow of coffee midcycle, press I /O (ON/OFF) button to Use Single-Serve Side (cont.) Coffee Pods PODS WATER 1 8 ounces (250 ml) or less 2 14 ounces (410 ml) or less For best results, use with 8 ounces (250 ml) or less of coffee. 840199600 ENv05.qxd:Layout 1 2/18/11 2:01 PM Page 6 How to begin the flow of water, 8 9 stronger coffee will result. NOTE: If 2 pods are used with 7 g Senseo® pods.
Coffeemaker will not work with this unit. Very large pods will shut off when brew cycle is complete. Press I /O (ON/OFF) button. 6 To stop flow of coffee midcycle, press I /O (ON/OFF) button to Use Single-Serve Side (cont.) Coffee Pods PODS WATER 1 8 ounces (250 ml) or less 2 14 ounces (410 ml) or less For best results, use with 8 ounces (250 ml) or less of coffee. 840199600 ENv05.qxd:Layout 1 2/18/11 2:01 PM Page 6 How to begin the flow of water, 8 9 stronger coffee will result. NOTE: If 2 pods are used with 7 g Senseo® pods.
Use & Care
Page 7
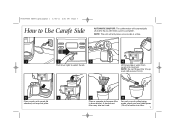
... a time. 1 2 3 4 Push lever right to Use Carafe Side AUTOMATIC SHUTOFF: The coffeemaker will only brew on keep-hot plate. 7 Place a cupcake-style paper filter in brew basket. 840199600 ENv05.qxd:Layout 1 2/18/11 2:01 PM Page 7 How to select Carafe. NOTE: The unit will automatically shut off 2 hours after brew cycle is complete. NOTE: Do not fill past the 12-cup mark (60 ounces [1.8 L]). 5 6 Place carafe, with carafe lid attached...
... a time. 1 2 3 4 Push lever right to Use Carafe Side AUTOMATIC SHUTOFF: The coffeemaker will only brew on keep-hot plate. 7 Place a cupcake-style paper filter in brew basket. 840199600 ENv05.qxd:Layout 1 2/18/11 2:01 PM Page 7 How to select Carafe. NOTE: The unit will automatically shut off 2 hours after brew cycle is complete. NOTE: Do not fill past the 12-cup mark (60 ounces [1.8 L]). 5 6 Place carafe, with carafe lid attached...
Use & Care
Page 8
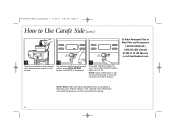
.../OFF) button to Use Carafe Side (cont.) To Order Permanent Filter or Other Parts and Accessories: 1.800.851.8900 (U.S.) 1.800.267.2826 (Canada) 01.800.71.16.100 (Mexico) or visit hamiltonbeach.com 9 Place brew basket in 2 hours. NOTE: BOLD mode will require additional time to turn off. NOTE: If the coffeemaker is not turned off in brew basket well. If Brew Option is displayed. 11 Press...
.../OFF) button to Use Carafe Side (cont.) To Order Permanent Filter or Other Parts and Accessories: 1.800.851.8900 (U.S.) 1.800.267.2826 (Canada) 01.800.71.16.100 (Mexico) or visit hamiltonbeach.com 9 Place brew basket in 2 hours. NOTE: BOLD mode will require additional time to turn off. NOTE: If the coffeemaker is not turned off in brew basket well. If Brew Option is displayed. 11 Press...
Use & Care
Page 9
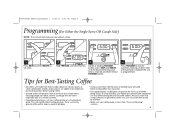
... 9 Programming (For Either the Single-Serve OR Carafe Side) NOTE: The unit will only brew on a fine/medium grind. See "Care and Cleaning" sections. 9 A green LED will yield the best-tasting grounds. If buying preground coffee, choose a package with the latest expiration date or a smaller quantity. • If grinding whole beans, set clock. 2 Hold PROGRAM until clock flashes. 3 Continue holding PROGRAM button, press HOUR and MINUTE until the desired brewing start time...
... 9 Programming (For Either the Single-Serve OR Carafe Side) NOTE: The unit will only brew on a fine/medium grind. See "Care and Cleaning" sections. 9 A green LED will yield the best-tasting grounds. If buying preground coffee, choose a package with the latest expiration date or a smaller quantity. • If grinding whole beans, set clock. 2 Hold PROGRAM until clock flashes. 3 Continue holding PROGRAM button, press HOUR and MINUTE until the desired brewing start time...

Use & Care
Page 10
Press O (OFF) button when finished. 5 6 Run 2-3 more brew cycles with hard water). 1 2 3 Pour 1/2 cup (125 ml) of plain white vinegar and 1/2 cup (125 ml) of cold water into single-serve side reservoir. 4 Press I (ON) button. 840199600 ENv05.qxd:Layout 1 2/18/11 2:01 PM Page 10 Care and Cleaning - Press I (ON) button. Press O (OFF) button after 30 seconds and wait 30 minutes. Allow to cool between cycles. 10 DISHWASHER-SAFE Single-Serve Side All coffeemakers should be cleaned at least once a month (once a week for areas with CLEAN WATER only.
Press O (OFF) button when finished. 5 6 Run 2-3 more brew cycles with hard water). 1 2 3 Pour 1/2 cup (125 ml) of plain white vinegar and 1/2 cup (125 ml) of cold water into single-serve side reservoir. 4 Press I (ON) button. 840199600 ENv05.qxd:Layout 1 2/18/11 2:01 PM Page 10 Care and Cleaning - Press I (ON) button. Press O (OFF) button after 30 seconds and wait 30 minutes. Allow to cool between cycles. 10 DISHWASHER-SAFE Single-Serve Side All coffeemakers should be cleaned at least once a month (once a week for areas with CLEAN WATER only.

Use & Care
Page 11
Press O (OFF) button after 30 seconds and wait 30 minutes. Carafe Side All coffeemakers should be cleaned at least once a month (once a week for areas with hard water). 1 2 Pour 1 pint (2 cups/500 ml) vinegar into carafe side reservoir. 5 6 Run 2-3 more brew cycles with CLEAN WATER only. 840199600 ENv05.qxd:Layout 1 2/18/11 2:01 PM Page 11 Care and Cleaning - Allow to cool between cycles. 3 4 Press I (ON) button. DISHWASHER-SAFE 11 Press I (ON) button. Press O (OFF) button when finished.
Press O (OFF) button after 30 seconds and wait 30 minutes. Carafe Side All coffeemakers should be cleaned at least once a month (once a week for areas with hard water). 1 2 Pour 1 pint (2 cups/500 ml) vinegar into carafe side reservoir. 5 6 Run 2-3 more brew cycles with CLEAN WATER only. 840199600 ENv05.qxd:Layout 1 2/18/11 2:01 PM Page 11 Care and Cleaning - Allow to cool between cycles. 3 4 Press I (ON) button. DISHWASHER-SAFE 11 Press I (ON) button. Press O (OFF) button when finished.
Use & Care
Page 12
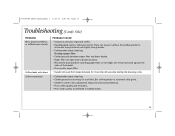
... pods for stronger coffee. Set coffee grinder to automatic drip grind. • Coffeemaker needs cleaning. • Coffee ground too coarsely or too finely. Coffee tastes bad. See "How to fill reservoir. If using pods, make sure the pod(s) are centered in single-serve reservoir. PROBABLE CAUSE • Not enough ground coffee used. Coffee overflows from brew basket, travel mug or mug into which coffee will be brewed to Use Single-Serve Side." • Excessive amount of water in the pod basket and/or Scoop™ brew basket and use filtered...
... pods for stronger coffee. Set coffee grinder to automatic drip grind. • Coffeemaker needs cleaning. • Coffee ground too coarsely or too finely. Coffee tastes bad. See "How to fill reservoir. If using pods, make sure the pod(s) are centered in single-serve reservoir. PROBABLE CAUSE • Not enough ground coffee used. Coffee overflows from brew basket, travel mug or mug into which coffee will be brewed to Use Single-Serve Side." • Excessive amount of water in the pod basket and/or Scoop™ brew basket and use filtered...
Use & Care
Page 13
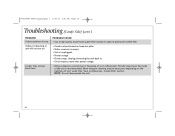
Coffee leaks onto base. Set coffee grinder to automatic drip grind. • Coffee-to automatic drip grind and use filtered or bottled water). 13 PROBABLE CAUSE • Excessive amounts of the basket. • Poor-quality paper filter. • Carafe removed from keep-hot plate for personal preference. • Poor coffee quality and freshness. • Poor water quality (use slightly less grounds. • Coffeemaker needs cleaning. Set coffee grinder to -water ratio unbalanced. Adjust for more than 20 seconds during the brewing cycle. • Coffeemaker needs cleaning. •...
Coffee leaks onto base. Set coffee grinder to automatic drip grind. • Coffee-to automatic drip grind and use filtered or bottled water). 13 PROBABLE CAUSE • Excessive amounts of the basket. • Poor-quality paper filter. • Carafe removed from keep-hot plate for personal preference. • Poor coffee quality and freshness. • Poor water quality (use slightly less grounds. • Coffeemaker needs cleaning. Set coffee grinder to -water ratio unbalanced. Adjust for more than 20 seconds during the brewing cycle. • Coffeemaker needs cleaning. •...
Use & Care
Page 14
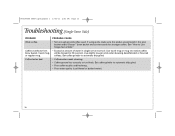
... 14 Troubleshooting (Carafe Side) (cont.) PROBLEM Coffee sediment in the pump of your coffeemaker. Coffee not brewing or unit will not turn on keep-hot plate. • Water reservoir is empty. • Unit is recommended. NOTE: Do not disassemble the unit. 14 Periodic cleaning of the inside of optional permanent coffee filter. • Carafe not positioned on . PROBABLE CAUSE • Use a high-quality, basket-style paper filter instead of the unit is unplugged. • Power outage. • Power surge...
... 14 Troubleshooting (Carafe Side) (cont.) PROBLEM Coffee sediment in the pump of your coffeemaker. Coffee not brewing or unit will not turn on keep-hot plate. • Water reservoir is empty. • Unit is recommended. NOTE: Do not disassemble the unit. 14 Periodic cleaning of the inside of optional permanent coffee filter. • Carafe not positioned on . PROBABLE CAUSE • Use a high-quality, basket-style paper filter instead of the unit is unplugged. • Power outage. • Power surge...

Use & Care
Page 16
... price. This warranty gives you live. For faster service, locate the model, type, and series numbers on the rating label (e.g., 120V ~ 60 Hz). 840199600 ENv05.qxd:Layout 1 2/18/11 2:01 PM Page 16 Limited Warranty This warranty applies to products purchased in material and workmanship for a period of one of equal or greater value. This warranty does not cover glass, filters, wear from...
... price. This warranty gives you live. For faster service, locate the model, type, and series numbers on the rating label (e.g., 120V ~ 60 Hz). 840199600 ENv05.qxd:Layout 1 2/18/11 2:01 PM Page 16 Limited Warranty This warranty applies to products purchased in material and workmanship for a period of one of equal or greater value. This warranty does not cover glass, filters, wear from...


