Use and Care Manual
Page 2
... not carafe. person responsible for information on contains a sharp needle. It must be operated on 6. Use handles or knobs. be taken, as burns can occur from touching hot parts or from outlet when either the coffee maker or clock is not intended for use appliance for use and before cleaning. needle, do not play with loose or weakened 4. repairs must handle. examination, repair, or...
... not carafe. person responsible for information on contains a sharp needle. It must be operated on 6. Use handles or knobs. be taken, as burns can occur from touching hot parts or from outlet when either the coffee maker or clock is not intended for use appliance for use and before cleaning. needle, do not play with loose or weakened 4. repairs must handle. examination, repair, or...
Use and Care Manual
Page 3
...outlet. Care must be pulled on by using an adapter. Do not defeat the safety purpose of the extension cord must be taken to reduce the risk of the cord used . The... fit, have an electrician replace the outlet. If a longer cord is intended for household use another highwattage appliance on the same circuit with a polarized plug (one way into the outlet, reverse...longer cord. The length of electric shock. Other Consumer Safety Information This appliance is necessary, an approved extension cord may be used on this appliance. 3 w WARNING Electrical Shock Hazard: This...
...outlet. Care must be pulled on by using an adapter. Do not defeat the safety purpose of the extension cord must be taken to reduce the risk of the cord used . The... fit, have an electrician replace the outlet. If a longer cord is intended for household use another highwattage appliance on the same circuit with a polarized plug (one way into the outlet, reverse...longer cord. The length of electric shock. Other Consumer Safety Information This appliance is necessary, an approved extension cord may be used on this appliance. 3 w WARNING Electrical Shock Hazard: This...
Use and Care Manual
Page 4
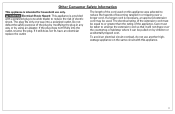
... Cup Rest Cover* Single-Serve Water Reservoir Removable Cup Rest/ Storage Container* Single-Serve Water Window Lid Latch Cord Stuff Storage Parts and Features *To order parts: US: 1.800.851.8900 Carafe Water Reservoir www.hamiltonbeach.com Canada: 1.800.267.2826 Brew Basket Mexico: 01 800 71 16 100 Gray Removable Single-Serve Carafe Water Window (not shown) Pack Holder* Single-Serve Pack Holder Handle Hinged Brew Basket Lid Brew Basket Handle Brown Removable Brew Basket for Ground Coffee* Control Panel Carafe* Black Funnel* Funnel Handle 4 Warming Plate BEFORE FIRST USE...
... Cup Rest Cover* Single-Serve Water Reservoir Removable Cup Rest/ Storage Container* Single-Serve Water Window Lid Latch Cord Stuff Storage Parts and Features *To order parts: US: 1.800.851.8900 Carafe Water Reservoir www.hamiltonbeach.com Canada: 1.800.267.2826 Brew Basket Mexico: 01 800 71 16 100 Gray Removable Single-Serve Carafe Water Window (not shown) Pack Holder* Single-Serve Pack Holder Handle Hinged Brew Basket Lid Brew Basket Handle Brown Removable Brew Basket for Ground Coffee* Control Panel Carafe* Black Funnel* Funnel Handle 4 Warming Plate BEFORE FIRST USE...
Use and Care Manual
Page 5
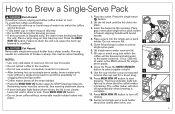
... cup or travel mug. 7 10. gray removable single-serve pack holder • Do not lift lid during the brewing process. Close lid and snap in the machine. 8. Insert the funnel in reservoir. • After brewing hot cocoa single-serve packs, brew a water-only button to Brew a Single-Serve Pack w WARNING Burn Hazard. 1. the unit. Place a large mug on drip tray. single-serve pack. 6. Do not use . 5 light up to start • Coffee maker brews all the water added. Funnel and single-serve pack holder...
... cup or travel mug. 7 10. gray removable single-serve pack holder • Do not lift lid during the brewing process. Close lid and snap in the machine. 8. Insert the funnel in reservoir. • After brewing hot cocoa single-serve packs, brew a water-only button to Brew a Single-Serve Pack w WARNING Burn Hazard. 1. the unit. Place a large mug on drip tray. single-serve pack. 6. Do not use . 5 light up to start • Coffee maker brews all the water added. Funnel and single-serve pack holder...
Use and Care Manual
Page 6
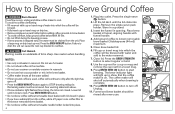
... removed. Fill cup or travel mug on drip tray/cup rest. Do not use hot cocoa powder or mix in the machine. 7. See warning statement above. • If brew indicator light flashes three times, the lid is stopped early, the water must be brewed with funnel handle. 4. How to overflow. 1. If overflow occurs, unplug and allow coffee maker to start 4 • Do not use hot water. • Do not reheat coffee in the brew basket. Press BREW...
... removed. Fill cup or travel mug on drip tray/cup rest. Do not use hot cocoa powder or mix in the machine. 7. See warning statement above. • If brew indicator light flashes three times, the lid is stopped early, the water must be brewed with funnel handle. 4. How to overflow. 1. If overflow occurs, unplug and allow coffee maker to start 4 • Do not use hot water. • Do not reheat coffee in the brew basket. Press BREW...
Use and Care Manual
Page 7
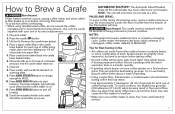
... into carafe brew basket holder. 6. Place a paper coffee filter in filter basket to cool before removing filter basket. Press BREW NOW I / button to complete a brewing cycle. Unplug. 12. NOTE: The unit will only brew on a fine/medium grind. The carafe must be rinsed after brew cycle begins. If unplugged, coffee maker defaults to Brew a Carafe w WARNING Burn Hazard. See "Care and Cleaning" section. 5/8 7 How to REGULAR. Close lid. 8. Carafe brew basket holder and carafe should be replaced within about a week of grinding. • Using a water filter, filtered water...
... into carafe brew basket holder. 6. Place a paper coffee filter in filter basket to cool before removing filter basket. Press BREW NOW I / button to complete a brewing cycle. Unplug. 12. NOTE: The unit will only brew on a fine/medium grind. The carafe must be rinsed after brew cycle begins. If unplugged, coffee maker defaults to Brew a Carafe w WARNING Burn Hazard. See "Care and Cleaning" section. 5/8 7 How to REGULAR. Close lid. 8. Carafe brew basket holder and carafe should be replaced within about a week of grinding. • Using a water filter, filtered water...
Use and Care Manual
Page 8
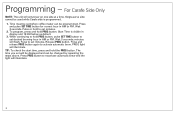
... check the start time, press and hold PROG button. Time must be set before coffee maker can be changed by repeating the steps above. To program, press and hold the PROG button. minutes will illuminate. 8 Release PROG button. Pulse or hold PROG button, pulse SET TIME button to reactivate automatic brew and the light will flash. Wait 3 seconds; Wait 3 seconds. Press PROG button to set will be displayed and can be used while Carafe side...
... check the start time, press and hold PROG button. Time must be set before coffee maker can be changed by repeating the steps above. To program, press and hold the PROG button. minutes will illuminate. 8 Release PROG button. Pulse or hold PROG button, pulse SET TIME button to reactivate automatic brew and the light will flash. Wait 3 seconds; Wait 3 seconds. Press PROG button to set will be displayed and can be used while Carafe side...
Use and Care Manual
Page 9
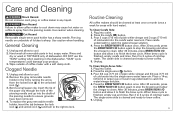
... not immerse cord, plug, or coffee maker in the dishwasher. Hand wash all removable parts in the lid by turning the arrow from the piercing nozzle. Care and Cleaning w WARNING Shock Hazard. Use caution when handling. Pour 3/4 cup (177 ml) of plain white vinegar and 3/4 cup (177 ml) of the piercing needle to cool. 2. When brew cycle is finished, empty carafe and rinse. Unplug. 9
... not immerse cord, plug, or coffee maker in the dishwasher. Hand wash all removable parts in the lid by turning the arrow from the piercing nozzle. Care and Cleaning w WARNING Shock Hazard. Use caution when handling. Pour 3/4 cup (177 ml) of plain white vinegar and 3/4 cup (177 ml) of the piercing needle to cool. 2. When brew cycle is finished, empty carafe and rinse. Unplug. 9
Use and Care Manual
Page 10
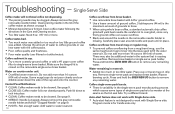
.... Press and hold the BREW NOW I / button to single-serve brew basket. Water on drip tray. See page 9. • CLOSE LID: Coffee maker lid is not designed to be clogged. Auto-start feature does not work with Single-Serve side. • Auto-start feature is not closed on the removable single-serve brew basket. Carefully place seal around the needle in the lid of water. Remove brew basket or single-serve pack holder. Single-Serve Side Coffee maker will yield best results. Clean coffee maker following the directions in cup. • Try a more than...
.... Press and hold the BREW NOW I / button to single-serve brew basket. Water on drip tray. See page 9. • CLOSE LID: Coffee maker lid is not designed to be clogged. Auto-start feature does not work with Single-Serve side. • Auto-start feature is not closed on the removable single-serve brew basket. Carefully place seal around the needle in the lid of water. Remove brew basket or single-serve pack holder. Single-Serve Side Coffee maker will yield best results. Clean coffee maker following the directions in cup. • Try a more than...
Use and Care Manual
Page 11
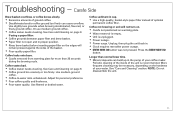
... cup. • Use a high-quality, basket-style paper filter instead of the basket. • Poor-quality paper filter. NOTE: Do not disassemble the unit. 11 Coffee tastes bad. • Coffee maker needs cleaning. Unplug; Periodic cleaning of the inside of your water. Coffee not brewing or unit will remain pressed against the sides of optional permanent coffee filter. Carafe Side Brew basket overflows or coffee brews slowly. • Excessive amounts of your coffee maker. Coffee leaks onto base. • Carafe removed from warming plate...
... cup. • Use a high-quality, basket-style paper filter instead of the basket. • Poor-quality paper filter. NOTE: Do not disassemble the unit. 11 Coffee tastes bad. • Coffee maker needs cleaning. Unplug; Periodic cleaning of the inside of your water. Coffee not brewing or unit will remain pressed against the sides of optional permanent coffee filter. Carafe Side Brew basket overflows or coffee brews slowly. • Excessive amounts of your coffee maker. Coffee leaks onto base. • Carafe removed from warming plate...

Use and Care Manual
Page 12
... no longer available, we will replace with the printed directions, or damage to the store. For faster service, locate the model, type, and series numbers on implied warranties or special, incidental, or consequential damages, so the foregoing limitations may have other than single-family household use not in lieu of this appliance to the product resulting from defects in Canada. This...
... no longer available, we will replace with the printed directions, or damage to the store. For faster service, locate the model, type, and series numbers on implied warranties or special, incidental, or consequential damages, so the foregoing limitations may have other than single-family household use not in lieu of this appliance to the product resulting from defects in Canada. This...


