
Use & Care
Page 1
... are ready to Make Coffee 4 Optional Features 5 Cleaning Instructions 7 Troubleshooting 9 Customer Service 10 In USA: 1-800-851-8900 In Canada: 1-800-267-2826 840123000 ENv01.qxd 12/17/03 3:16 PM Page 1 BrewStation™ Thank You! Thank you . We hope you enjoy your product to the store. 840123000 BrewStation Safety 2 Parts and Features 3 How to help you for purchasing a Hamilton Beach BrewStation. Call us first...
... are ready to Make Coffee 4 Optional Features 5 Cleaning Instructions 7 Troubleshooting 9 Customer Service 10 In USA: 1-800-851-8900 In Canada: 1-800-267-2826 840123000 ENv01.qxd 12/17/03 3:16 PM Page 1 BrewStation™ Thank You! Thank you . We hope you enjoy your product to the store. 840123000 BrewStation Safety 2 Parts and Features 3 How to help you for purchasing a Hamilton Beach BrewStation. Call us first...

Use & Care
Page 2
...then remove plug from wall outlet. 14. The length of the cord used . Do not let cord hang over . No user serviceable parts are unable to or greater than intended use appliance for information on or taking off parts and before cleaning. Read all instructions. 2. Use handles or knobs. Warning: To reduce the risk of table or counter or touch hot surfaces...be equal to insert the plug into an electrical outlet only one blade wider than the other than the rating of plug has one way. Care must be taken, as burns can be done by Hamilton Beach/ Proctor-Silex, Inc.
...then remove plug from wall outlet. 14. The length of the cord used . Do not let cord hang over . No user serviceable parts are unable to or greater than intended use appliance for information on or taking off parts and before cleaning. Read all instructions. 2. Use handles or knobs. Warning: To reduce the risk of table or counter or touch hot surfaces...be equal to insert the plug into an electrical outlet only one blade wider than the other than the rating of plug has one way. Care must be taken, as burns can be done by Hamilton Beach/ Proctor-Silex, Inc.
Use & Care
Page 3
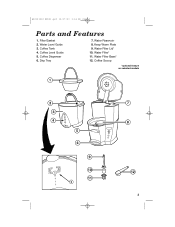
Coffee Level Guide 5. Water Filter Base* 12. Coffee Scoop *optional feature on selected models 3 Water Level Guide 3. 840123000 ENv01.qxd 12/17/03 3:16 PM Page 3 Parts and Features 1. Filter Basket 2. Drip Tray 7. Water Filter Lid* 10. Coffee Dispenser 6. Water Reservoir 8. Coffee Tank 4. Keep Warm Plate 9. Water Filter* 11.
Coffee Level Guide 5. Water Filter Base* 12. Coffee Scoop *optional feature on selected models 3 Water Level Guide 3. 840123000 ENv01.qxd 12/17/03 3:16 PM Page 3 Parts and Features 1. Filter Basket 2. Drip Tray 7. Water Filter Lid* 10. Coffee Dispenser 6. Water Reservoir 8. Coffee Tank 4. Keep Warm Plate 9. Water Filter* 11.
Use & Care
Page 4
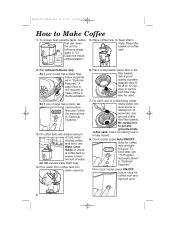
Place filter basket on Keep Warm Plate. Holding coffee tank level, use clean the unit by following steps listed in "Optional Features." 3. Use a good quality cupcake (basket) style filter (8 to Make Coffee 1. Close lid making sure it is not required to ensure correct amount of cold water. Clock model: press Auto/ON/OFF twice for coffee now and light will glow. 840123000 ENv01.qxd 12/17/03 3:16 PM Page 4 How to 12 cup size). For...
Place filter basket on Keep Warm Plate. Holding coffee tank level, use clean the unit by following steps listed in "Optional Features." 3. Use a good quality cupcake (basket) style filter (8 to Make Coffee 1. Close lid making sure it is not required to ensure correct amount of cold water. Clock model: press Auto/ON/OFF twice for coffee now and light will glow. 840123000 ENv01.qxd 12/17/03 3:16 PM Page 4 How to 12 cup size). For...
Use & Care
Page 5
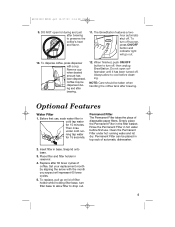
.... Remove cup when desired amount has been dispensed. When finished, push ON/OFF button to cool before first use , soak water filter in hot water before cleaning. Simply place the Permanent Filter in reservoir. 4. DO NOT open coffeemaker until it has been turned off sooner, press ON/OFF button and indicator light will represent 60 brew cycles. 5. Place filter and filter holder in the filter basket. NOTE: Care should be placed in base. Replace...
.... Remove cup when desired amount has been dispensed. When finished, push ON/OFF button to cool before first use , soak water filter in hot water before cleaning. Simply place the Permanent Filter in reservoir. 4. DO NOT open coffeemaker until it has been turned off sooner, press ON/OFF button and indicator light will represent 60 brew cycles. 5. Place filter and filter holder in the filter basket. NOTE: Care should be placed in base. Replace...
Use & Care
Page 6
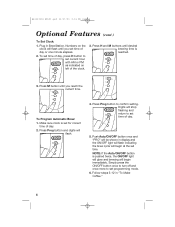
... at the set programming mode. 6. Press H and M buttons until desired brewing time is set time of day. 2. To Program Automatic Brew: 1. Simply press the ON/OFF button once to turn off and once more to confirm setting. Make sure clock is reached. 3. Push Auto/ON/OFF button once and "PRO" will be shown in display and the ON/OFF light will flash indicating the brew cycle will flash until you set for correct time of...
... at the set programming mode. 6. Press H and M buttons until desired brewing time is set time of day. 2. To Program Automatic Brew: 1. Simply press the ON/OFF button once to turn off and once more to confirm setting. Make sure clock is reached. 3. Push Auto/ON/OFF button once and "PRO" will be shown in display and the ON/OFF light will flash indicating the brew cycle will flash until you set for correct time of...

Use & Care
Page 7
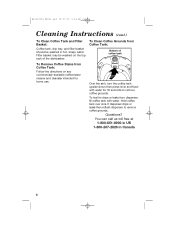
... coffee tank and brew basket. Remove water filter and water filter holder (optional feature). 2. NOTE: You may also use any commercially-available coffeemaker cleaner and descaler intended for BrewStation to cool, then repeat this process with two or more coffee tanks of plain white vinegar into filter basket. 4. Turn OFF when complete. 10. Your BrewStation is now ready to clean. Cleaning the BrewStation removes mineral deposits that slow down brew time and result in BrewStation and set the clock (on Keep Warm Plate...
... coffee tank and brew basket. Remove water filter and water filter holder (optional feature). 2. NOTE: You may also use any commercially-available coffeemaker cleaner and descaler intended for BrewStation to cool, then repeat this process with two or more coffee tanks of plain white vinegar into filter basket. 4. Turn OFF when complete. 10. Your BrewStation is now ready to clean. Cleaning the BrewStation removes mineral deposits that slow down brew time and result in BrewStation and set the clock (on Keep Warm Plate...
Use & Care
Page 8
... commercially-available coffeemaker cleaner and descaler intended for 30 seconds to remove coffee grounds. To Clean Coffee Grounds from Coffee Tank: Bottom of the dishwasher. If dispenser drips or leaks then reflush dispenser to remove coffee grounds. Filter basket may be washed in Canada 8 You can call us toll free at 1-800-851-8900 in US 1-800-267-2826 in hot, soapy water. Questions? Over the sink, turn the coffee tank...
... commercially-available coffeemaker cleaner and descaler intended for 30 seconds to remove coffee grounds. To Clean Coffee Grounds from Coffee Tank: Bottom of the dishwasher. If dispenser drips or leaks then reflush dispenser to remove coffee grounds. Filter basket may be washed in Canada 8 You can call us toll free at 1-800-851-8900 in US 1-800-267-2826 in hot, soapy water. Questions? Over the sink, turn the coffee tank...
Use & Care
Page 9
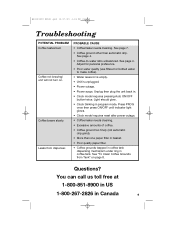
... Clock model requires pressing Auto ON/OFF button twice. Press PROG once then press ON/OFF until indicator light glows. • Clock model requires reset after power outage. • Coffeemaker needs cleaning. • Excessive amounts of coffee. • Coffee ground too finely (not automatic drip grind). • More than automatic drip. Coffee not brewing/ unit will not turn on page 8. Light should glow. • Clock blinking in coffee tank. Coffee brews slowly. PROBABLE CAUSE • Coffeemaker needs cleaning. See page 4. • Coffee-to make coffee). • Water...
... Clock model requires pressing Auto ON/OFF button twice. Press PROG once then press ON/OFF until indicator light glows. • Clock model requires reset after power outage. • Coffeemaker needs cleaning. • Excessive amounts of coffee. • Coffee ground too finely (not automatic drip grind). • More than automatic drip. Coffee not brewing/ unit will not turn on page 8. Light should glow. • Clock blinking in coffee tank. Coffee brews slowly. PROBABLE CAUSE • Coffeemaker needs cleaning. See page 4. • Coffee-to make coffee). • Water...
Use & Care
Page 10
.... Please call our toll-free customer service number. This warranty extends only to assist you.) CUSTOMER SERVICE NUMBERS In the U.S. 1-800-851-8900 In Canada 1-800-267-2826 hamiltonbeach.com KEEP THESE NUMBERS FOR FUTURE REFERENCE! HAMILTON BEACH PROCTOR-SILEX, INC. If you have a question about your BrewStation, call our CUSTOMER SERVICE NUMBER. (For faster service please have model, series, and type numbers ready for commercial purposes, or any use for operator to the original consumer purchaser...
.... Please call our toll-free customer service number. This warranty extends only to assist you.) CUSTOMER SERVICE NUMBERS In the U.S. 1-800-851-8900 In Canada 1-800-267-2826 hamiltonbeach.com KEEP THESE NUMBERS FOR FUTURE REFERENCE! HAMILTON BEACH PROCTOR-SILEX, INC. If you have a question about your BrewStation, call our CUSTOMER SERVICE NUMBER. (For faster service please have model, series, and type numbers ready for commercial purposes, or any use for operator to the original consumer purchaser...


