Use & Care
Page 2
... coffeemaker or clock is dropped or damaged in place during brew cycle and when pouring coffee. The carafe is used on or near children. 5. Do not use carafe with a damaged cord or plug, or after the appliance malfunctions or is not in use with this coffeemaker. No user serviceable parts are inside. SAVE THESE INSTRUCTIONS! 2 Do not touch hot surfaces. To disconnect coffeemaker, turn controls to OFF, then remove...
... coffeemaker or clock is dropped or damaged in place during brew cycle and when pouring coffee. The carafe is used on or near children. 5. Do not use carafe with a damaged cord or plug, or after the appliance malfunctions or is not in use with this coffeemaker. No user serviceable parts are inside. SAVE THESE INSTRUCTIONS! 2 Do not touch hot surfaces. To disconnect coffeemaker, turn controls to OFF, then remove...
Use & Care
Page 3
... way into a polarized outlet. The electrical rating of the extension cord must be pulled on this appliance. 3 Care must be used on by modifying the plug in or tripping over a longer cord. The length of the cord used . If a longer cord is intended for household use another...INFORMATION This appliance is necessary an approved extension cord may be equal to or greater than the rating of the appliance. Do not defeat the safety purpose of the plug by children or accidentally tripped over the countertop or tabletop where it still does not fit, have an electrician replace...
... way into a polarized outlet. The electrical rating of the extension cord must be pulled on this appliance. 3 Care must be used on by modifying the plug in or tripping over a longer cord. The length of the cord used . If a longer cord is intended for household use another...INFORMATION This appliance is necessary an approved extension cord may be equal to or greater than the rating of the appliance. Do not defeat the safety purpose of the plug by children or accidentally tripped over the countertop or tabletop where it still does not fit, have an electrician replace...
Use & Care
Page 4
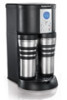
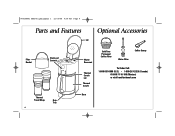
840168001 ENnv05.qxd:Layout 1 12/16/08 9:06 AM Page 4 Parts and Features Optional Accessories Lid Filter Basket Clock and Controls Thermal Travel Mugs Drip Tray 4 Water Reservoir Thermal Carafe Lid Thermal Carafe Gold Tone Permanent Coffee Filter Water Filter Coffee Scoop To Order Call: 1-800-851-8900 (U.S.) • 1-800-267-2826 (Canada) 01-800-71-16-100 (Mexico) or visit hamiltonbeach.com Base
840168001 ENnv05.qxd:Layout 1 12/16/08 9:06 AM Page 4 Parts and Features Optional Accessories Lid Filter Basket Clock and Controls Thermal Travel Mugs Drip Tray 4 Water Reservoir Thermal Carafe Lid Thermal Carafe Gold Tone Permanent Coffee Filter Water Filter Coffee Scoop To Order Call: 1-800-851-8900 (U.S.) • 1-800-267-2826 (Canada) 01-800-71-16-100 (Mexico) or visit hamiltonbeach.com Base
Use & Care
Page 5
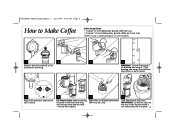
... to lock in place. 6 7 For Hotter Coffee: Before brewing, Paper filter or optional permanent fill carafe or thermal travel mug filter may be used. Hot overflowing coffee is a burn hazard. 5 Align with hot tap water and let stand 1 minute then replace. 8 Lock filter basket into place. 5 IMPORTANT: Lid will not close all the way if filter basket handle is optional feature on select models. 1 2 Remove thermal carafe lid or lid of thermal travel mug. 3 4 WARNING: Do not...
... to lock in place. 6 7 For Hotter Coffee: Before brewing, Paper filter or optional permanent fill carafe or thermal travel mug filter may be used. Hot overflowing coffee is a burn hazard. 5 Align with hot tap water and let stand 1 minute then replace. 8 Lock filter basket into place. 5 IMPORTANT: Lid will not close all the way if filter basket handle is optional feature on select models. 1 2 Remove thermal carafe lid or lid of thermal travel mug. 3 4 WARNING: Do not...
Use & Care
Page 6
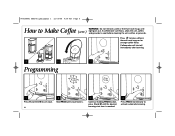
... after brewing. 9 10 11 Programming 1 Press H and then M to set clock. 2 Hold PROG until clock flashes. 6 3 Continue holding PROG button, press H and M until (cont.) light goes out. 840168001 ENnv05.qxd:Layout 1 12/16/08 9:06 AM Page 6 How to Make Coffee WARNING: Do not remove carafe or thermal travel mugs or for stronger coffee flavor. Press to brew coffee in thermal travel mugs until the desired brewing start time is...
... after brewing. 9 10 11 Programming 1 Press H and then M to set clock. 2 Hold PROG until clock flashes. 6 3 Continue holding PROG button, press H and M until (cont.) light goes out. 840168001 ENnv05.qxd:Layout 1 12/16/08 9:06 AM Page 6 How to Make Coffee WARNING: Do not remove carafe or thermal travel mugs or for stronger coffee flavor. Press to brew coffee in thermal travel mugs until the desired brewing start time is...
Use & Care
Page 7
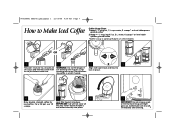
water, 6 scoops* or level table- Hot overflowing coffee is optional feature on select models. Lock filter basket into place. 7 IMPORTANT: Do not remove carafe or thermal travel mugs until light goes out. OR 1 2 3 Fill water reservoir to a maximum of 5 cups and thermal carafe with open lock and twist to lock in place. 4 5 6 Brew double strength coffee for brewing two mugs. For a full pot, use 10 scoops. IMPORTANT: Lid will shut off immediately after brewing. 7 WARNING: Do...
water, 6 scoops* or level table- Hot overflowing coffee is optional feature on select models. Lock filter basket into place. 7 IMPORTANT: Do not remove carafe or thermal travel mugs until light goes out. OR 1 2 3 Fill water reservoir to a maximum of 5 cups and thermal carafe with open lock and twist to lock in place. 4 5 6 Brew double strength coffee for brewing two mugs. For a full pot, use 10 scoops. IMPORTANT: Lid will shut off immediately after brewing. 7 WARNING: Do...
Use & Care
Page 8
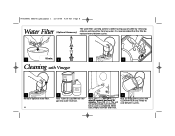
... brew cycles with Vinegar 1 Remove optional water filter. 8 2 Pour 1 pint (2 cups/500 ml) vinegar into water reservoir. 3 Press ON ( ). The unit will automatically turn off when brew cycle is recommended that this filter be replaced every 60 brew cycles. 1 15 min. 2 3 4 Cleaning with CLEAN WATER only. Press ON ( ). It is completed. 840168001 ENnv05.qxd:Layout 1 12/16/08 9:06 AM Page 8 Water Filter The water filter can help achieve a better tasting cup of coffee by removing...
... brew cycles with Vinegar 1 Remove optional water filter. 8 2 Pour 1 pint (2 cups/500 ml) vinegar into water reservoir. 3 Press ON ( ). The unit will automatically turn off when brew cycle is recommended that this filter be replaced every 60 brew cycles. 1 15 min. 2 3 4 Cleaning with CLEAN WATER only. Press ON ( ). It is completed. 840168001 ENnv05.qxd:Layout 1 12/16/08 9:06 AM Page 8 Water Filter The water filter can help achieve a better tasting cup of coffee by removing...
Use & Care
Page 9
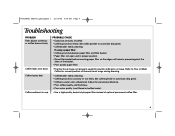
... AM Page 9 Troubleshooting PROBLEM Filter basket overflows or coffee brews slowly. PROBABLE CAUSE • Excessive amounts of thermal travel mugs not properly seated in position indicators on base. Set coffee grinder to automatic drip grind. • Coffee-to automatic drip grind. • Coffeemaker needs cleaning. Coffee leaks onto base. Coffee tastes bad. Coffee sediment in proper position. • Rinse filter basket before inserting paper filter so the edges will remain pressed against the sides of optional permanent coffee filter. 9 Set coffee grinder to -water ratio...
... AM Page 9 Troubleshooting PROBLEM Filter basket overflows or coffee brews slowly. PROBABLE CAUSE • Excessive amounts of thermal travel mugs not properly seated in position indicators on base. Set coffee grinder to automatic drip grind. • Coffee-to automatic drip grind. • Coffeemaker needs cleaning. Coffee leaks onto base. Coffee tastes bad. Coffee sediment in proper position. • Rinse filter basket before inserting paper filter so the edges will remain pressed against the sides of optional permanent coffee filter. 9 Set coffee grinder to -water ratio...
Use & Care
Page 10
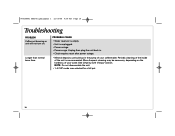
... disassemble the unit. • 1-4 CUP mode was selected for a full pot. 10 See Cleaning with Vinegar section. Longer than normal brew time. PROBABLE CAUSE • Water reservoir is empty. • Unit is recommended. More frequent cleaning may be necessary, depending on . 840168001 ENnv05.qxd:Layout 1 12/16/08 9:06 AM Page 10 Troubleshooting PROBLEM Coffee not brewing or unit will not turn on the hardness of your coffeemaker...
... disassemble the unit. • 1-4 CUP mode was selected for a full pot. 10 See Cleaning with Vinegar section. Longer than normal brew time. PROBABLE CAUSE • Water reservoir is empty. • Unit is recommended. More frequent cleaning may be necessary, depending on . 840168001 ENnv05.qxd:Layout 1 12/16/08 9:06 AM Page 10 Troubleshooting PROBLEM Coffee not brewing or unit will not turn on the hardness of your coffeemaker...
Use & Care
Page 11
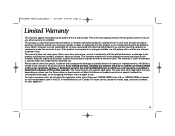
...we will replace with the printed directions, or damage to the product resulting from normal use, use . Keep the original sales receipt, as proof of the purchase price. This warranty is void if the product is required to make a warranty claim,...hamiltonbeach.ca in the U.S. This warranty does not cover glass, filters, wear from accident, alteration, abuse or misuse. All liability is limited to the amount of purchase is used for all claims for a period of one of express or implied warranty. For faster service, locate the model, type, and series numbers on implied warranties...
...we will replace with the printed directions, or damage to the product resulting from normal use, use . Keep the original sales receipt, as proof of the purchase price. This warranty is void if the product is required to make a warranty claim,...hamiltonbeach.ca in the U.S. This warranty does not cover glass, filters, wear from accident, alteration, abuse or misuse. All liability is limited to the amount of purchase is used for all claims for a period of one of express or implied warranty. For faster service, locate the model, type, and series numbers on implied warranties...


