Use And Care
Page 1
840112600 Ev00.qxd 7/16/03 1:55 PM Page 1 Cappuccino Plus™ Espresso and Cappuccino Maker Thank you enjoy it! 840112600 Important Safeguards 2 Parts & Features 3 Using Your Espresso Maker ........ 4 To Steam and Froth Milk 7 Recipes 7 Cleaning Your Espresso Maker.... 8 Troubleshooting 8 Customer Service 10 In USA: 1-800-851-8900 In Canada: 1-800-267-2826 We hope you for buying the Hamilton Beach Cappuccino Plus™. All of our products are manufactured to the highest level of quality and performance specifications. You have made an excellent choice!
840112600 Ev00.qxd 7/16/03 1:55 PM Page 1 Cappuccino Plus™ Espresso and Cappuccino Maker Thank you enjoy it! 840112600 Important Safeguards 2 Parts & Features 3 Using Your Espresso Maker ........ 4 To Steam and Froth Milk 7 Recipes 7 Cleaning Your Espresso Maker.... 8 Troubleshooting 8 Customer Service 10 In USA: 1-800-851-8900 In Canada: 1-800-267-2826 We hope you for buying the Hamilton Beach Cappuccino Plus™. All of our products are manufactured to the highest level of quality and performance specifications. You have made an excellent choice!

Use And Care
Page 2
...wall outlet before cleaning the appliance. 6. Do not use appliance for other . SAVE THESE INSTRUCTIONS! This type of accessory attachments not recommended by Hamilton Beach/Proctor-Silex, Inc. This is dropped or damaged in water or other liquid. 4. Care must be taken, as burns can be pulled on... and/or injury to persons, including the following: 1. Do not place appliance on this appliance was selected to reduce the hazards of the espresso maker. WARNING: To reduce the risk of electrical shock. Repair should be used. If you are inside. The length of the cord used by ...
...wall outlet before cleaning the appliance. 6. Do not use appliance for other . SAVE THESE INSTRUCTIONS! This type of accessory attachments not recommended by Hamilton Beach/Proctor-Silex, Inc. This is dropped or damaged in water or other liquid. 4. Care must be taken, as burns can be pulled on... and/or injury to persons, including the following: 1. Do not place appliance on this appliance was selected to reduce the hazards of the espresso maker. WARNING: To reduce the risk of electrical shock. Repair should be used. If you are inside. The length of the cord used by ...
Use And Care
Page 3
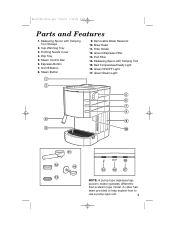
...Measuring Spoon with Tamping Tool 15. Filter Holder 12. Green Steam Light NOTE: A pump-type espresso/cap- Frothing Nozzle Cover 4. On/Off Button 8. Pod Filter 14. Steam Button 9. Green ON/OFF Light 17. Espresso Button 7. Removable Water Reservoir 10. Cup Warming Tray 3. Steam Control Dial 6. A video ...has been provided to help explain how to use a pump-type unit. 3 Red Temperature/Ready Light 16. Brew Head 11. Ground Espresso Filter 13. 840112600 Ev00.qxd 7/16/03 1:55 PM Page 3 Parts and Features 1. puccino maker operates differently than a steam-type model.
...Measuring Spoon with Tamping Tool 15. Filter Holder 12. Green Steam Light NOTE: A pump-type espresso/cap- Frothing Nozzle Cover 4. On/Off Button 8. Pod Filter 14. Steam Button 9. Green ON/OFF Light 17. Espresso Button 7. Removable Water Reservoir 10. Cup Warming Tray 3. Steam Control Dial 6. A video ...has been provided to help explain how to use a pump-type unit. 3 Red Temperature/Ready Light 16. Brew Head 11. Ground Espresso Filter 13. 840112600 Ev00.qxd 7/16/03 1:55 PM Page 3 Parts and Features 1. puccino maker operates differently than a steam-type model.
Use And Care
Page 4
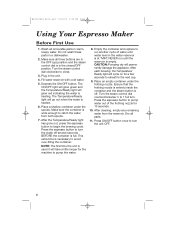
... time is at "MIN". Place an empty container under the spouts. 840112600 Ev00.qxd 7/16/03 1:55 PM Page 4 Using Your Espresso Maker Before First Use 1. Place a shallow container under the frothing nozzle. Empty the container and replace to run until water level in the OFF...is empty. Turn the steam control dial counterclockwise 3⁄4 to begin the brewing cycle. After the Temperature/Ready light has gone out, press the espresso button to 1 full turn. CAUTION: Pumping dry will take a little longer for the next cup. 9. After each brewing, the Temperature/ Ready...
... time is at "MIN". Place an empty container under the spouts. 840112600 Ev00.qxd 7/16/03 1:55 PM Page 4 Using Your Espresso Maker Before First Use 1. Place a shallow container under the frothing nozzle. Empty the container and replace to run until water level in the OFF...is empty. Turn the steam control dial counterclockwise 3⁄4 to begin the brewing cycle. After the Temperature/Ready light has gone out, press the espresso button to 1 full turn. CAUTION: Pumping dry will take a little longer for the next cup. 9. After each brewing, the Temperature/ Ready...
Use And Care
Page 5
...• If you have time to warm the cappuccino maker for 5 to 10 minutes before brewing, you with desired amount of cold water. 4. If the grind is too coarse, water will flow too fast through the coffee. • Espresso pods make coffee. If the grind is too ... for Making Good Espresso • For best results, use fresh-ground, dark, espresso roast coffee. • If espresso preground coffee is used pod. Pods can invert 1 to two notches coarser than the espresso setting. • Grind your beverage warmer after brewing. • Always use the Hamilton Beach Custom Grind™...
...• If you have time to warm the cappuccino maker for 5 to 10 minutes before brewing, you with desired amount of cold water. 4. If the grind is too coarse, water will flow too fast through the coffee. • Espresso pods make coffee. If the grind is too ... for Making Good Espresso • For best results, use fresh-ground, dark, espresso roast coffee. • If espresso preground coffee is used pod. Pods can invert 1 to two notches coarser than the espresso setting. • Grind your beverage warmer after brewing. • Always use the Hamilton Beach Custom Grind™...
Use And Care
Page 6
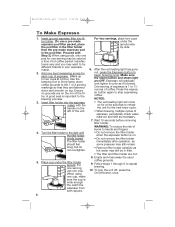
... two cups at a time. NOTES: • The red heating light will gradually look lighter in your espresso maker. 2. After the red heating light has gone out, press the Espresso button to stop expressing coffee. To turn the unit off, press the On/Off button once. Turn the... so that they are hot. 8. Press the espresso button again to begin brewing cycle. 840112600 Ev00.qxd 7/16/03 1:55 PM Page 6 To Make Espresso 1. Insert ground espresso filter into the espresso maker with Step 3.) When using one serving, use a pre-made espresso pod filter packet, place the pod filter in...
... two cups at a time. NOTES: • The red heating light will gradually look lighter in your espresso maker. 2. After the red heating light has gone out, press the Espresso button to stop expressing coffee. To turn the unit off, press the On/Off button once. Turn the... so that they are hot. 8. Press the espresso button again to begin brewing cycle. 840112600 Ev00.qxd 7/16/03 1:55 PM Page 6 To Make Espresso 1. Insert ground espresso filter into the espresso maker with Step 3.) When using one serving, use a pre-made espresso pod filter packet, place the pod filter in...
Use And Care
Page 7
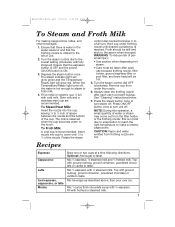
... of water or steam may come out from frothing nozzle are recommended. See "Cleaning" instructions below. 7. Recipes Espresso Cappuccino Latte Iced espresso, cappuccino, or latte Mocha Brew one or two cups at a time following directions. Mix 1⁄3 espresso, 1⁄3 steamed milk and 1⁄3 frothed milk. Turn the steam control dial OFF (clockwise). Always clean the...
... of water or steam may come out from frothing nozzle are recommended. See "Cleaning" instructions below. 7. Recipes Espresso Cappuccino Latte Iced espresso, cappuccino, or latte Mocha Brew one or two cups at a time following directions. Mix 1⁄3 espresso, 1⁄3 steamed milk and 1⁄3 frothed milk. Turn the steam control dial OFF (clockwise). Always clean the...
Use And Care
Page 8
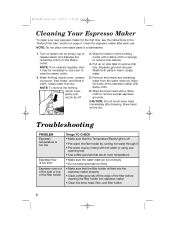
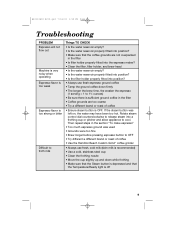
... Ev00.qxd 7/16/03 1:55 PM Page 8 Cleaning Your Espresso Maker To clean your new espresso maker for the first time, see the instructions in warm, soapy water. 5. Troubleshooting PROBLEM Espresso temperature is too low Espresso flow is too slow Espresso runs out of the side or top of the filter holder ...Things TO CHECK • Make sure that the filter holder is fitted into the espresso maker properly • Clean coffee grounds off the edge of the espresso maker with hot water or using cup warming tray • Use coffee grounds that are at room temperature •...
... Ev00.qxd 7/16/03 1:55 PM Page 8 Cleaning Your Espresso Maker To clean your new espresso maker for the first time, see the instructions in warm, soapy water. 5. Troubleshooting PROBLEM Espresso temperature is too low Espresso flow is too slow Espresso runs out of the side or top of the filter holder ...Things TO CHECK • Make sure that the filter holder is fitted into the espresso maker properly • Clean coffee grounds off the edge of the espresso maker with hot water or using cup warming tray • Use coffee grounds that are at room temperature •...
Use And Care
Page 9
... 1 to 11⁄2 ounces) • Be sure there is sufficient ground coffee in the filter • Is filter holder properly fitted into the espresso maker? • Clean the filter, filter holder, and brew head • Is the water reservoir empty? • Is the water reservoir properly fitted ... fitted into a frothing cup or pitcher and allow appliance to OFF • Try different a different brand or roast of coffee • Use the Hamilton Beach Custom Grind™ coffee grinder • Always use fresh, cold milk (skim milk is recommended) • Use a cold, stainless steel cup •...
... 1 to 11⁄2 ounces) • Be sure there is sufficient ground coffee in the filter • Is filter holder properly fitted into the espresso maker? • Clean the filter, filter holder, and brew head • Is the water reservoir empty? • Is the water reservoir properly fitted ... fitted into a frothing cup or pitcher and allow appliance to OFF • Try different a different brand or roast of coffee • Use the Hamilton Beach Custom Grind™ coffee grinder • Always use fresh, cold milk (skim milk is recommended) • Use a cold, stainless steel cup •...
Use And Care
Page 10
... note the model, type, and series numbers and fill in material and workmanship for a period of two (2) years for Hamilton Beach Portfolio products or one (1) year for Hamilton Beach products from state to state, or province to the following, which vary from the date of your question much more quickly...claim under this product, at our option, at no warranty with respect to province. During this period, we will help us answer your espresso maker. This information will repair or replace this warranty, DO NOT RETURN THE APPLIANCE TO THE STORE! Some states or provinces do not allow ...
... note the model, type, and series numbers and fill in material and workmanship for a period of two (2) years for Hamilton Beach Portfolio products or one (1) year for Hamilton Beach products from state to state, or province to the following, which vary from the date of your question much more quickly...claim under this product, at our option, at no warranty with respect to province. During this period, we will help us answer your espresso maker. This information will repair or replace this warranty, DO NOT RETURN THE APPLIANCE TO THE STORE! Some states or provinces do not allow ...


