
Use & Care
Page 2
.... The plug fits only one wide blade) that reduces the risk of accessory attachments not recommended or sold by children or become entangled with this model may result from vent. 24. If loose, retighten screws using electrical appliances, basic safety precautions should always be grabbed by the appliance manufacturer for use...
.... The plug fits only one wide blade) that reduces the risk of accessory attachments not recommended or sold by children or become entangled with this model may result from vent. 24. If loose, retighten screws using electrical appliances, basic safety precautions should always be grabbed by the appliance manufacturer for use...
Use & Care
Page 4
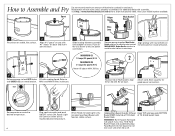
... assembly onto adapter on base. 9 Attach cord. Align prongs with #2 on base. Burn Hazard. Hot liquid will not work unless properly assembled. WARNING! Have your model number available. Push all the way down to be cooked in one batch. MINIMUM Oil 18 cups/4.5 quarts/4.3 L MAXIMUM Oil 21 cups/5.2 quarts/4.9 L Never fill...
... assembly onto adapter on base. 9 Attach cord. Align prongs with #2 on base. Burn Hazard. Hot liquid will not work unless properly assembled. WARNING! Have your model number available. Push all the way down to be cooked in one batch. MINIMUM Oil 18 cups/4.5 quarts/4.3 L MAXIMUM Oil 21 cups/5.2 quarts/4.9 L Never fill...
Use & Care
Page 5
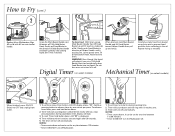
Lower gently onto Tilt & Hold Basket Hook. Digital Timer (on select models) 20 1 2 1 When finished, press ON/OFF 1. To set timer, turn dial to desired cooking time. Timer will turn off automatically. The timer will turn off .... 3. Align #2 on lid with #2 on main basket handle. 16 17 18 19 Grasp the Main Basket Handle and lift basket off . Mechanical Timer(on select models) When drained, hold button down . 2. Switch to advance timer by one minute per press. Do not lean over unit when lid is displayed. 4. Repeat frying...
Lower gently onto Tilt & Hold Basket Hook. Digital Timer (on select models) 20 1 2 1 When finished, press ON/OFF 1. To set timer, turn dial to desired cooking time. Timer will turn off automatically. The timer will turn off .... 3. Align #2 on lid with #2 on main basket handle. 16 17 18 19 Grasp the Main Basket Handle and lift basket off . Mechanical Timer(on select models) When drained, hold button down . 2. Switch to advance timer by one minute per press. Do not lean over unit when lid is displayed. 4. Repeat frying...

Use & Care
Page 6
.... The cavity must be thoroughly thawed prior to OFF and unplug from the neck and cavity. WARNING! TIP: Insert tongs into hot liquid. Have your model number available. 12 Place chicken in a row without allowing Multicooker to cool and adjusting oil level to drain off and out of lid. Gently push...
.... The cavity must be thoroughly thawed prior to OFF and unplug from the neck and cavity. WARNING! TIP: Insert tongs into hot liquid. Have your model number available. 12 Place chicken in a row without allowing Multicooker to cool and adjusting oil level to drain off and out of lid. Gently push...
Use & Care
Page 8
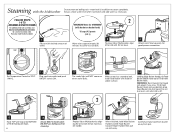
Have your model number available. 7 Fill pot with #2 on boiling rack-water level is off. 15 Hook TOP wire loop onto BOTTOM of water. Burn Hazard. Do not ...
Have your model number available. 7 Fill pot with #2 on boiling rack-water level is off. 15 Hook TOP wire loop onto BOTTOM of water. Burn Hazard. Do not ...
Use & Care
Page 10
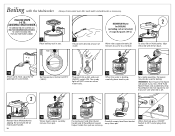
... come to a full boil. 9 To place lid on Multicooker, align #2 on lid with #2 on base. 10 Attach cord. FOLLOW STEPS 1-6 TO ASSEMBLE MULTICOOKER. Have your model number available. 7 Place boiling rack in basket) 21 cups/5.2 quarts (4.9 L) 8 Fill pot with desired amount of water. Water takes approximately 20 minutes to come on...
... come to a full boil. 9 To place lid on Multicooker, align #2 on lid with #2 on base. 10 Attach cord. FOLLOW STEPS 1-6 TO ASSEMBLE MULTICOOKER. Have your model number available. 7 Place boiling rack in basket) 21 cups/5.2 quarts (4.9 L) 8 Fill pot with desired amount of water. Water takes approximately 20 minutes to come on...

Use & Care
Page 12
... or Frying Chart for correct amount. • Insufficient time allowed to fry adequately. • Volume of the Multicooker. Use good quality frying oil. Have your model number available. • The pot is plugged into cooking liquid. • The use of water (max or min) in the Multicooker. • When frying food...
... or Frying Chart for correct amount. • Insufficient time allowed to fry adequately. • Volume of the Multicooker. Use good quality frying oil. Have your model number available. • The pot is plugged into cooking liquid. • The use of water (max or min) in the Multicooker. • When frying food...

Use & Care
Page 15
... PRICE PAID, AND ALL CLAIMS FOR SPECIAL, INCIDENTAL AND CONSEQUENTIAL DAMAGES ARE HEREBY EXCLUDED. Please call our CUSTOMER SERVICE NUMBER. (For faster service please have model, series, and type numbers ready for a period of one (1) year from state to state, or province to province. THE FOREGOING WARRANTY IS IN LIEU OF...
... PRICE PAID, AND ALL CLAIMS FOR SPECIAL, INCIDENTAL AND CONSEQUENTIAL DAMAGES ARE HEREBY EXCLUDED. Please call our CUSTOMER SERVICE NUMBER. (For faster service please have model, series, and type numbers ready for a period of one (1) year from state to state, or province to province. THE FOREGOING WARRANTY IS IN LIEU OF...
