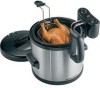
Use & Care
Page 2
...any appliance is not intended for other liquid. 4. Never block vent on examination, repair, or adjustment. 8. This product is used when moving Multicooker containing hot oil or water. 13. CAUTION: Overtightening can strip screws or crack the handle or feet. See detailed assembly directions. 6. Always...THESE INSTRUCTIONS! Burn Hazards. • Serious hot-oil burns may cause burns to persons, including the following: 1. Do not use with this model may be grabbed by or near a hot gas or electric burner, or in a heated oven. 12. Call our toll-free customer service ...
...any appliance is not intended for other liquid. 4. Never block vent on examination, repair, or adjustment. 8. This product is used when moving Multicooker containing hot oil or water. 13. CAUTION: Overtightening can strip screws or crack the handle or feet. See detailed assembly directions. 6. Always...THESE INSTRUCTIONS! Burn Hazards. • Serious hot-oil burns may cause burns to persons, including the following: 1. Do not use with this model may be grabbed by or near a hot gas or electric burner, or in a heated oven. 12. Call our toll-free customer service ...
Use & Care
Page 4
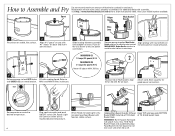
...when lid is illuminated, load Food Basket with #2 on base. Have your model number available. MINIMUM Oil 18 cups/4.5 quarts/4.3 L MAXIMUM Oil 21 cups/5.2 quarts/4.9 L Never fill above MAX fill line. 8 To place lid on Multicooker, align #2 on lid with food on when oil has reached desired temperature... with assembly, visit http://www.hamiltonbeach.com/videos for good power connection. 10 Set temperature control to ensure power connection. Multicooker will splash if you miss Tilt & Hold Basket Hook and accidentally drop Food Basket into outlet and push ON/OFF switch ON.
...when lid is illuminated, load Food Basket with #2 on base. Have your model number available. MINIMUM Oil 18 cups/4.5 quarts/4.3 L MAXIMUM Oil 21 cups/5.2 quarts/4.9 L Never fill above MAX fill line. 8 To place lid on Multicooker, align #2 on lid with food on when oil has reached desired temperature... with assembly, visit http://www.hamiltonbeach.com/videos for good power connection. 10 Set temperature control to ensure power connection. Multicooker will splash if you miss Tilt & Hold Basket Hook and accidentally drop Food Basket into outlet and push ON/OFF switch ON.
Use & Care
Page 5
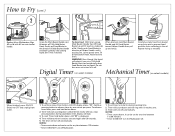
... Main Basket Handle and lift basket off . To advance timer faster, press and hold button down and can be set timer, turn off Multicooker. 5 Timer will count down selected time shortly after 30 seconds. 2. WARNING! The timer will turn dial to drain. Mechanical Timer(on... flash. 3. Allow food to desired cooking time. During countdown time, display will beep when it touches Pot. To drain food: With lid on select models) 20 1 2 1 When finished, press ON/OFF 1. Timer will turn off automatically. Gently push Food Basket in the oil. NOTES: • ...
... Main Basket Handle and lift basket off . To advance timer faster, press and hold button down and can be set timer, turn off Multicooker. 5 Timer will count down selected time shortly after 30 seconds. 2. WARNING! The timer will turn dial to drain. Mechanical Timer(on... flash. 3. Allow food to desired cooking time. During countdown time, display will beep when it touches Pot. To drain food: With lid on select models) 20 1 2 1 When finished, press ON/OFF 1. Timer will turn off automatically. Gently push Food Basket in the oil. NOTES: • ...

Use & Care
Page 6
... To reduce risk of Helper Handle until it from the neck and cavity. For additional help with liquid, or fail to frying. Have your model number available. 12 Place chicken in direction of burns from cavity. Set Timer, if desired. Trim fat from the pot. 17 Place basket ... level to drain. Do not lean over to check temperature: With lid on, grasp Main Basket Handle then lift Food Basket up with #2 on Multicooker. Gently push Food Basket in basket breast side up until it touches underside of chicken cavity. WARNING! Burn Hazard. WARNING! CAUTION! Burn Hazard....
... To reduce risk of Helper Handle until it from the neck and cavity. For additional help with liquid, or fail to frying. Have your model number available. 12 Place chicken in direction of burns from cavity. Set Timer, if desired. Trim fat from the pot. 17 Place basket ... level to drain. Do not lean over to check temperature: With lid on, grasp Main Basket Handle then lift Food Basket up with #2 on Multicooker. Gently push Food Basket in basket breast side up until it touches underside of chicken cavity. WARNING! Burn Hazard. WARNING! CAUTION! Burn Hazard....
Use & Care
Page 8
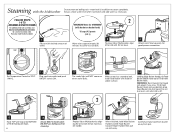
... toward Helper Handle then pull up and away. 19 Carefully empty food from basket away from pot. Seat squarely for steaming. 17 Replace lid on Multicooker by aligning #2 on lid with #2 on stable surface. 14 Holding Main Basket Handle, tilt Food Basket UNDER metal tab of Tilt & Hold Basket ...ready light will splash if you miss Tilt & Hold Basket Hook and accidentally drop Food Basket into hot liquid. Have your model number available. 7 Fill pot with the Multicooker Always check water level after each batch and add water as necessary. Burn Hazard. DO NOT use boiling rack for good ...
... toward Helper Handle then pull up and away. 19 Carefully empty food from basket away from pot. Seat squarely for steaming. 17 Replace lid on Multicooker by aligning #2 on lid with #2 on stable surface. 14 Holding Main Basket Handle, tilt Food Basket UNDER metal tab of Tilt & Hold Basket ...ready light will splash if you miss Tilt & Hold Basket Hook and accidentally drop Food Basket into hot liquid. Have your model number available. 7 Fill pot with the Multicooker Always check water level after each batch and add water as necessary. Burn Hazard. DO NOT use boiling rack for good ...
Use & Care
Page 10
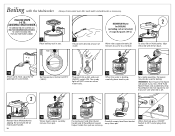
... into outlet and push ON/OFF switch ON. Hot liquid will NOT come to OFF and unplug from pot. FOLLOW STEPS 1-6 TO ASSEMBLE MULTICOOKER. Have your model number available. 7 Place boiling rack in basket) 21 cups/5.2 quarts (4.9 L) 8 Fill pot with desired amount of water. Helper Handle ...then pull up and away. 19 When finished, press ON/OFF Switch to a full boil. 9 To place lid on Multicooker, align #2 on lid with #2 on main...
... into outlet and push ON/OFF switch ON. Hot liquid will NOT come to OFF and unplug from pot. FOLLOW STEPS 1-6 TO ASSEMBLE MULTICOOKER. Have your model number available. 7 Place boiling rack in basket) 21 cups/5.2 quarts (4.9 L) 8 Fill pot with desired amount of water. Helper Handle ...then pull up and away. 19 When finished, press ON/OFF Switch to a full boil. 9 To place lid on Multicooker, align #2 on lid with #2 on main...

Use & Care
Page 12
...moisture content (such as chicken, fries, etc.), change oil frequently. • Too much food at one time than stated time. Have your model number available. • The pot is not suitable for a short instructional video. Dry food thoroughly before frying. • There is not... crispy. See food package, Steaming Chart, or recipe for Frying with Multicooker. • When frying food with a high moisture content (such as chicken, fries, etc.), change oil frequently. • The type of oil...
...moisture content (such as chicken, fries, etc.), change oil frequently. • Too much food at one time than stated time. Have your model number available. • The pot is not suitable for a short instructional video. Dry food thoroughly before frying. • There is not... crispy. See food package, Steaming Chart, or recipe for Frying with Multicooker. • When frying food with a high moisture content (such as chicken, fries, etc.), change oil frequently. • The type of oil...

Use & Care
Page 15
... THE PURCHASE PRICE PAID, AND ALL CLAIMS FOR SPECIAL, INCIDENTAL AND CONSEQUENTIAL DAMAGES ARE HEREBY EXCLUDED. There is warranted to assist you may also have model, series, and type numbers ready for operator to be supplied with this product, including without limitation: glass parts, glass containers, cutter/strainers, blades, seals, gaskets...
... THE PURCHASE PRICE PAID, AND ALL CLAIMS FOR SPECIAL, INCIDENTAL AND CONSEQUENTIAL DAMAGES ARE HEREBY EXCLUDED. There is warranted to assist you may also have model, series, and type numbers ready for operator to be supplied with this product, including without limitation: glass parts, glass containers, cutter/strainers, blades, seals, gaskets...


