
Use and Care Manual
Page 2
... on lid. Do not place on or taking off parts and before cleaning the appliance. 8. Never move deep fryer containing hot oil. 14. Never leave appliance unattended while in a 2-hour period. Always dry deep fryer components thoroughly after the appliance malfunctions or has been damaged in a heated oven. 13. Open the lid...
... on lid. Do not place on or taking off parts and before cleaning the appliance. 8. Never move deep fryer containing hot oil. 14. Never leave appliance unattended while in a 2-hour period. Always dry deep fryer components thoroughly after the appliance malfunctions or has been damaged in a heated oven. 13. Open the lid...
Use and Care Manual
Page 3
... products. Burn Hazards. • Serious hot-oil burns may be grabbed by using an adapter. Do not allow the cord to hang over the deep fryer when the lid is off a countertop. Do not use with the user. WARNING! WARNING! Do not lean over the edge of the counter where it... household use only. Shock Hazard: This appliance has a polarized plug (one way into the outlet, reverse the plug. If it may result from a deep-fat fryer being pulled off . 840242902 ENv01.indd 3 3 7/31/14 6:10 PM If the plug does not fit fully into a polarized outlet. The plug fits only one...
... products. Burn Hazards. • Serious hot-oil burns may be grabbed by using an adapter. Do not allow the cord to hang over the deep fryer when the lid is off a countertop. Do not use with the user. WARNING! WARNING! Do not lean over the edge of the counter where it... household use only. Shock Hazard: This appliance has a polarized plug (one way into the outlet, reverse the plug. If it may result from a deep-fat fryer being pulled off . 840242902 ENv01.indd 3 3 7/31/14 6:10 PM If the plug does not fit fully into a polarized outlet. The plug fits only one...
Use and Care Manual
Page 5
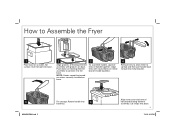
How to Assemble the Fryer 1 Place base on heating element assembly to connect it to lock into metal bracket. 5 840242902 ENv01.indd 5 For storage: Rotate handle into place. 5 7/31/14 6:...
How to Assemble the Fryer 1 Place base on heating element assembly to connect it to lock into metal bracket. 5 840242902 ENv01.indd 5 For storage: Rotate handle into place. 5 7/31/14 6:...
Use and Care Manual
Page 6
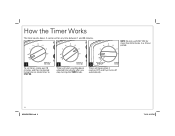
How the Timer Works The timer counts down selected time shortly after you stop turning the TIMER knob. 3 "BEEP" Timer will beep when it reaches OFF and fryer turns off automatically. 6 840242902 ENv01.indd 6 7/31/14 6:10 PM NOTE: Do not use STAY ON for more than 60 minutes in a 2-hour period. 1 To set for any time between 1 and 30 minutes. It can be set timer, rotate past 10 minutes and then to desired frying time or rotate timer to STAY ON. 2 Timer will start counting down .
How the Timer Works The timer counts down selected time shortly after you stop turning the TIMER knob. 3 "BEEP" Timer will beep when it reaches OFF and fryer turns off automatically. 6 840242902 ENv01.indd 6 7/31/14 6:10 PM NOTE: Do not use STAY ON for more than 60 minutes in a 2-hour period. 1 To set for any time between 1 and 30 minutes. It can be set timer, rotate past 10 minutes and then to desired frying time or rotate timer to STAY ON. 2 Timer will start counting down .
Use and Care Manual
Page 7
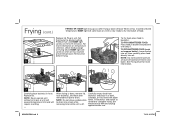
...to Reset" section for details. 1 2 Place assembled fryer on removable oil pot. 4 Make sure fryer is in operation or when fryer contains hot oil. • Never leave fryer unattended while in one way. BEFORE FIRST USE: Thoroughly clean and dry fryer. See "How to hands or fingers. level, ... Open lid carefully. Attach magnetic end of oil to top indicator mark on a stable, Remove basket(s) from fryer. See "Cleaning Your Fryer" section. Lift lid to open. 840242902 ENv01.indd 7 3 Fill fryer with about 15 cups (3.5 L) but no more than about 19 cups (4.5 L) of cord assembly to "...
...to Reset" section for details. 1 2 Place assembled fryer on removable oil pot. 4 Make sure fryer is in operation or when fryer contains hot oil. • Never leave fryer unattended while in one way. BEFORE FIRST USE: Thoroughly clean and dry fryer. See "How to hands or fingers. level, ... Open lid carefully. Attach magnetic end of oil to top indicator mark on a stable, Remove basket(s) from fryer. See "Cleaning Your Fryer" section. Lift lid to open. 840242902 ENv01.indd 7 3 Fill fryer with about 15 cups (3.5 L) but no more than about 19 cups (4.5 L) of cord assembly to "...
Use and Care Manual
Page 8
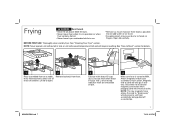
... basket(s) and repeat as tempura batter): Lower basket into oil; Set thermostat to 15 minutes). towel. Unit is off. Replace lid. Preheat fryer until READY light comes on temperature selection, check food package or Frying Chart. TO FRY UNBATTERED FOOD: Place food in pot or unit will exceed...basket(s). colander, or tray lined with Step 7. Set thermostat to drain into oil. TO FRY BATTERED FOOD (such as needed to be fried in fryer. When oil has reached selected temperature, READY light will come on . Frying (cont.) FRYING TIP: READY light may go out after use. ...
... basket(s) and repeat as tempura batter): Lower basket into oil; Set thermostat to 15 minutes). towel. Unit is off. Replace lid. Preheat fryer until READY light comes on temperature selection, check food package or Frying Chart. TO FRY UNBATTERED FOOD: Place food in pot or unit will exceed...basket(s). colander, or tray lined with Step 7. Set thermostat to drain into oil. TO FRY BATTERED FOOD (such as needed to be fried in fryer. When oil has reached selected temperature, READY light will come on . Frying (cont.) FRYING TIP: READY light may go out after use. ...
Use and Care Manual
Page 10
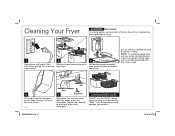
... temperatures could damage your product. 840242902 ENv01.indd 10 7/31/14 6:10 PM This can take several hours. 2 Remove lid and remove basket(s) from fryer. 3 Lift heating element assembly from base and pour out oil. Gently wipe with soft cloth dampened with hot, soapy water. DISHWASHER-SAFE DO NOT use... avoid eruptions and/or spatter of hot oil, dry all excess oil or oil film from wall outlet. Wait until oil has cooled. Wipe all fryer components thoroughly before using. 1 Unplug from oil pot. 10 Lid Base 5 Vent Cover Clean base, lid, and vent cover with hot, soapy water. 4 ...
... temperatures could damage your product. 840242902 ENv01.indd 10 7/31/14 6:10 PM This can take several hours. 2 Remove lid and remove basket(s) from fryer. 3 Lift heating element assembly from base and pour out oil. Gently wipe with soft cloth dampened with hot, soapy water. DISHWASHER-SAFE DO NOT use... avoid eruptions and/or spatter of hot oil, dry all excess oil or oil film from wall outlet. Wait until oil has cooled. Wipe all fryer components thoroughly before using. 1 Unplug from oil pot. 10 Lid Base 5 Vent Cover Clean base, lid, and vent cover with hot, soapy water. 4 ...
Use and Care Manual
Page 12
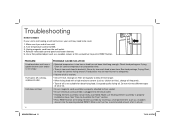
... may need to be too thick to push in oil pot. 12 840242902 ENv01.indd 12 7/31/14 6:10 PM Turn temperature control to fryer socket. • Ensure electrical cord assembly is properly installed on heating element assembly by inserting a small pointed item (such as a wooden skewer... or thin screwdriver to fry adequately. • Volume of oil is too low. • Oil isn't fresh. Make sure fryer has recommended amount of oil or fat. • Ensure magnetic cord assembly is properly attached to MIN. 3. Unit does not heat. Use a thin pointed...
... may need to be too thick to push in oil pot. 12 840242902 ENv01.indd 12 7/31/14 6:10 PM Turn temperature control to fryer socket. • Ensure electrical cord assembly is properly installed on heating element assembly by inserting a small pointed item (such as a wooden skewer... or thin screwdriver to fry adequately. • Volume of oil is too low. • Oil isn't fresh. Make sure fryer has recommended amount of oil or fat. • Ensure magnetic cord assembly is properly attached to MIN. 3. Unit does not heat. Use a thin pointed...
Use and Care Manual
Page 13
...During frying, the oil spills over the edge of refrigerated oil may cause excessive splattering. PROBABLE CAUSE/SOLUTION • There is too much oil in fryer. Carefully raise basket(s) out of the oil. • The use a household degreaser. • Food contains too much during frying. Make sure that... than quantities indicated on food package or Frying Chart. • Water vapor from oil pot, use of the fryer. Dry food thoroughly before placing it in the "Cleaning Your Fryer" section. 840242902 ENv01.indd 13 13 7/31/14 6:10 PM When unit is not suitable for deep-frying ...
...During frying, the oil spills over the edge of refrigerated oil may cause excessive splattering. PROBABLE CAUSE/SOLUTION • There is too much oil in fryer. Carefully raise basket(s) out of the oil. • The use a household degreaser. • Food contains too much during frying. Make sure that... than quantities indicated on food package or Frying Chart. • Water vapor from oil pot, use of the fryer. Dry food thoroughly before placing it in the "Cleaning Your Fryer" section. 840242902 ENv01.indd 13 13 7/31/14 6:10 PM When unit is not suitable for deep-frying ...
Use and Care Manual
Page 14
... wet, so this way you will have a few bags of seasoned flour. x 9-inch (33 x 23 cm) glass baking dish. Place chicken and thyme in deep fryer. Recipes Buttermilk Fried Chicken 1 (3 to 3 1/2 pound [1.4 to 1.6 kg]) whole chicken, cut into 8 pieces 1 sprig fresh thyme 2 cups (473 ml) buttermilk 4 cups (946 ml) all the...
... wet, so this way you will have a few bags of seasoned flour. x 9-inch (33 x 23 cm) glass baking dish. Place chicken and thyme in deep fryer. Recipes Buttermilk Fried Chicken 1 (3 to 3 1/2 pound [1.4 to 1.6 kg]) whole chicken, cut into 8 pieces 1 sprig fresh thyme 2 cups (473 ml) buttermilk 4 cups (946 ml) all the...
Use and Care Manual
Page 15
... into the preheated oil at a time into flour mixture until golden brown. 4. Remove food from basket(s) with powdered sugar. Place basket(s) in deep fryer. Serves: 24 840242902 ENv01.indd 15 15 7/31/14 6:10 PM Recipes (cont.) Tempura Batter 1/2 cup (118 ml) all -purpose flour 1/4..., salt, water, oil, and egg yolks in apples. 3. Stir milk mixture into the preheated oil. Heat oil to 375°F (191°C) in deep fryer. 2. Turn for dusting Directions 1. Using a small scoop (about 2 Tablespoons [30 ml]), carefully drop about 6 fritters at a time. Serve warm. In a...
... into the preheated oil at a time into flour mixture until golden brown. 4. Remove food from basket(s) with powdered sugar. Place basket(s) in deep fryer. Serves: 24 840242902 ENv01.indd 15 15 7/31/14 6:10 PM Recipes (cont.) Tempura Batter 1/2 cup (118 ml) all -purpose flour 1/4..., salt, water, oil, and egg yolks in apples. 3. Stir milk mixture into the preheated oil. Heat oil to 375°F (191°C) in deep fryer. 2. Turn for dusting Directions 1. Using a small scoop (about 2 Tablespoons [30 ml]), carefully drop about 6 fritters at a time. Serve warm. In a...
Use and Care Manual
Page 16
...176;C) in large bowl until ready to serve. 2. Heat oil to drain. 8. Cover and refrigerate until well blended. 3. Beat buttermilk, egg, and onion in deep fryer. 2. Raise basket(s) and rest to 350°F (177°C) in cornmeal mix, flour, sugar, baking powder, and salt. 4. Heat oil to drain. 7....brown mustard 1 teaspoon (5 ml) honey 1/4 teaspoon (1.2 ml) smoked paprika Okra Coating Vegetable oil for 4 minutes or until golden brown. 7. Stir in deep fryer. 3. In small bowl, add mayonnaise, ketchup, spicy brown mustard, honey, and smoked paprika. Drain on paper towels.
...176;C) in large bowl until ready to serve. 2. Heat oil to drain. 8. Cover and refrigerate until well blended. 3. Beat buttermilk, egg, and onion in deep fryer. 2. Raise basket(s) and rest to 350°F (177°C) in cornmeal mix, flour, sugar, baking powder, and salt. 4. Heat oil to drain. 7....brown mustard 1 teaspoon (5 ml) honey 1/4 teaspoon (1.2 ml) smoked paprika Okra Coating Vegetable oil for 4 minutes or until golden brown. 7. Stir in deep fryer. 3. In small bowl, add mayonnaise, ketchup, spicy brown mustard, honey, and smoked paprika. Drain on paper towels.


