
Use and Care Manual
Page 2
...emitting from wall outlet. 15. Do not use . 19. SAVE THESE INSTRUCTIONS! 2 840242902 ENv01.indd 2 7/31/14 6:10 PM Never move deep fryer containing hot oil. 14. Always attach plug to basket and locked into place. Never leave appliance ...electric shock, and/or injury to cool before cleaning the appliance. 8. Do not place on lid. Always dry foods and remove ice before frying. 21. Do not use for information on or taking off parts and before putting on examination, repair, or adjustment. 9. Never block vent on or near children. Call our toll-free customer service number...
...emitting from wall outlet. 15. Do not use . 19. SAVE THESE INSTRUCTIONS! 2 840242902 ENv01.indd 2 7/31/14 6:10 PM Never move deep fryer containing hot oil. 14. Always attach plug to basket and locked into place. Never leave appliance ...electric shock, and/or injury to cool before cleaning the appliance. 8. Do not place on lid. Always dry foods and remove ice before frying. 21. Do not use for information on or taking off parts and before putting on examination, repair, or adjustment. 9. Never block vent on or near children. Call our toll-free customer service number...
Use and Care Manual
Page 3
... allow the cord to hang over the deep fryer when the lid is not intended for household use with any way or by children or become entangled with an extension cord. • Hot liquid will splash if you miss the drain bracket and accidentally drop the frying basket into the outlet... Do not use with the user. Other Consumer Safety Information This product is only intended for the preparation, cooking, and serving of the counter where it still does not fit, have an electrician replace the outlet. Burn Hazards. • Serious hot-oil burns may be grabbed by using an adapter....
... allow the cord to hang over the deep fryer when the lid is not intended for household use with any way or by children or become entangled with an extension cord. • Hot liquid will splash if you miss the drain bracket and accidentally drop the frying basket into the outlet... Do not use with the user. Other Consumer Safety Information This product is only intended for the preparation, cooking, and serving of the counter where it still does not fit, have an electrician replace the outlet. Burn Hazards. • Serious hot-oil burns may be grabbed by using an adapter....

Use and Care Manual
Page 4
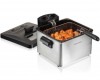
Parts and Features Steam Vent Removable Vent Cover View Window *Removable Lid *Frying Baskets Basket Drain Brackets Basket Handles Heating Element Assembly Reset Button Large Frying Basket*/** Basket Drain Bracket *Removable Oil Pot Base 4 840242902 ENv01.indd 4 *Magnetic Cord Assembly *To order parts: US: 1.800.851.8900 www.hamiltonbeach.com Canada: 1.800.267.2826 Mexico: 01 800 71 16 100 **Optional accessory on select models TIMER Dial Power Light Adjustable Thermostat MIN READY Light 7/31/14 6:10 PM
Parts and Features Steam Vent Removable Vent Cover View Window *Removable Lid *Frying Baskets Basket Drain Brackets Basket Handles Heating Element Assembly Reset Button Large Frying Basket*/** Basket Drain Bracket *Removable Oil Pot Base 4 840242902 ENv01.indd 4 *Magnetic Cord Assembly *To order parts: US: 1.800.851.8900 www.hamiltonbeach.com Canada: 1.800.267.2826 Mexico: 01 800 71 16 100 **Optional accessory on select models TIMER Dial Power Light Adjustable Thermostat MIN READY Light 7/31/14 6:10 PM
Use and Care Manual
Page 5
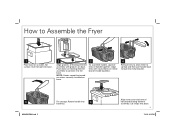
...: Rotate handle into basket(s). 6 Align vent cover and vent of lid toward heating element assembly. How to the base. Insert oil pot into place. 5 7/31/14 6:10 PM Push down on heating element assembly to connect it to Assemble the Fryer 1 Place base on base. NOTE: Heater cannot be turned on unless correctly installed on a stable, flat...
...: Rotate handle into basket(s). 6 Align vent cover and vent of lid toward heating element assembly. How to the base. Insert oil pot into place. 5 7/31/14 6:10 PM Push down on heating element assembly to connect it to Assemble the Fryer 1 Place base on base. NOTE: Heater cannot be turned on unless correctly installed on a stable, flat...
Use and Care Manual
Page 6
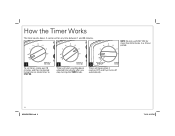
It can be set for more than 60 minutes in a 2-hour period. 1 To set timer, rotate past 10 minutes and then to desired frying time or rotate timer to STAY ON. 2 Timer will start counting down . How the Timer Works The timer counts down selected time shortly after you stop turning the TIMER knob. 3 "BEEP" Timer will beep when it reaches OFF and fryer turns off automatically. 6 840242902 ENv01.indd 6 7/31/14 6:10 PM NOTE: Do not use STAY ON for any time between 1 and 30 minutes.
It can be set for more than 60 minutes in a 2-hour period. 1 To set timer, rotate past 10 minutes and then to desired frying time or rotate timer to STAY ON. 2 Timer will start counting down . How the Timer Works The timer counts down selected time shortly after you stop turning the TIMER knob. 3 "BEEP" Timer will beep when it reaches OFF and fryer turns off automatically. 6 840242902 ENv01.indd 6 7/31/14 6:10 PM NOTE: Do not use STAY ON for any time between 1 and 30 minutes.
Use and Care Manual
Page 7
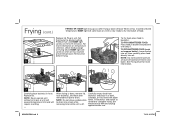
... carefully. See "How to Reset" section for details. 1 2 Place assembled fryer on removable oil pot. 4 Make sure fryer is in operation or when fryer contains hot oil. • Never leave fryer unattended while in one way. See "Cleaning Your Fryer" section. Magnetic end of oil to top indicator mark on a stable, Remove basket(s) from accidentally being pulled off a countertop. 7 7/31/14 6:10...
... carefully. See "How to Reset" section for details. 1 2 Place assembled fryer on removable oil pot. 4 Make sure fryer is in operation or when fryer contains hot oil. • Never leave fryer unattended while in one way. See "Cleaning Your Fryer" section. Magnetic end of oil to top indicator mark on a stable, Remove basket(s) from accidentally being pulled off a countertop. 7 7/31/14 6:10...
Use and Care Manual
Page 8
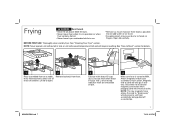
... next batch of food. Plug in fryer. READY light will require resetting. 8 8 9 When frying is off. then carefully place food directly into oil; Replace lid. Fill basket(s) and repeat as tempura batter): Lower basket into oil. Set thermostat to complete frying. Frying (cont.) FRYING TIP: READY light may go out after use. 840242902 ENv01.indd 8 7/31/14 6:10...
... next batch of food. Plug in fryer. READY light will require resetting. 8 8 9 When frying is off. then carefully place food directly into oil; Replace lid. Fill basket(s) and repeat as tempura batter): Lower basket into oil. Set thermostat to complete frying. Frying (cont.) FRYING TIP: READY light may go out after use. 840242902 ENv01.indd 8 7/31/14 6:10...

Use and Care Manual
Page 9
... oz (680 g) 20 oz (567 g) 22 oz (624 g) 20 oz (567 g) 10 oz (283 g) 18 oz (510 g) 16 oz (454 g) 18 oz (510 g) SINGLE BASKET TIME 1 1/2 to 2 1/2 minutes 3 to 4 minutes 6 to 7 minutes 5 to 6 minutes 10 to 12 minutes 2 to 3 minutes 10 to 12 minutes 1 1/2 to 2 1/2 ... (454 g) 4 tortillas 16 oz (454 g) 8 pieces 8-10 pieces 1 to 2 minutes 8 to 9 minutes 1 to 2 minutes 7 to 9 minutes 4 to 6 minutes 2 to 2 1/2 minutes DOUBLE BASKET/ LARGE BASKET TIME 1 1/2 to 2 1/2 minutes 5 to 6 minutes 8 to 9 minutes 8 to 9 minutes 13 to 15 minutes 2 1/2 to 3 1/2 minutes 13 to 14 minutes 2 1/2 to 3 1/2 minutes 3...
... oz (680 g) 20 oz (567 g) 22 oz (624 g) 20 oz (567 g) 10 oz (283 g) 18 oz (510 g) 16 oz (454 g) 18 oz (510 g) SINGLE BASKET TIME 1 1/2 to 2 1/2 minutes 3 to 4 minutes 6 to 7 minutes 5 to 6 minutes 10 to 12 minutes 2 to 3 minutes 10 to 12 minutes 1 1/2 to 2 1/2 ... (454 g) 4 tortillas 16 oz (454 g) 8 pieces 8-10 pieces 1 to 2 minutes 8 to 9 minutes 1 to 2 minutes 7 to 9 minutes 4 to 6 minutes 2 to 2 1/2 minutes DOUBLE BASKET/ LARGE BASKET TIME 1 1/2 to 2 1/2 minutes 5 to 6 minutes 8 to 9 minutes 8 to 9 minutes 13 to 15 minutes 2 1/2 to 3 1/2 minutes 13 to 14 minutes 2 1/2 to 3 1/2 minutes 3...
Use and Care Manual
Page 10
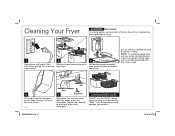
... not immerse heating element assembly in the dishwasher. DISHWASHER-SAFE DO NOT use care when cleaning heating element assembly. This can take several hours. 2 Remove lid and remove basket(s) from fryer. 3 Lift heating element assembly from base and pour out oil. NOTE: To avoid damaging fryer, use the "SANI" setting when washing in water. Wait until oil has cooled. Gently wipe with soft...
... not immerse heating element assembly in the dishwasher. DISHWASHER-SAFE DO NOT use care when cleaning heating element assembly. This can take several hours. 2 Remove lid and remove basket(s) from fryer. 3 Lift heating element assembly from base and pour out oil. NOTE: To avoid damaging fryer, use the "SANI" setting when washing in water. Wait until oil has cooled. Gently wipe with soft...

Use and Care Manual
Page 11
... thermometer to determine internal temperatures. • Visit foodsafety.gov for more frequently. • To filter oil, allow oil to six months. DISPOSING OF OIL: • Pour cool oil into oil. Use basket to splatter or foam. IF YOU LIVE IN A HIGH-ALTITUDE AREA: Visit: http://www.csrees.usda.gov/Extension/. ...add fresh oil to used oil. • Always change the oil when it has a strong smell or taste, or when it turns dark and/or syrupy. Place oil pot in base and then place basket and power cord in oil pot. • It is best to store all oils in the refrigerator or a cool, dark,...
... thermometer to determine internal temperatures. • Visit foodsafety.gov for more frequently. • To filter oil, allow oil to six months. DISPOSING OF OIL: • Pour cool oil into oil. Use basket to splatter or foam. IF YOU LIVE IN A HIGH-ALTITUDE AREA: Visit: http://www.csrees.usda.gov/Extension/. ...add fresh oil to used oil. • Always change the oil when it has a strong smell or taste, or when it turns dark and/or syrupy. Place oil pot in base and then place basket and power cord in oil pot. • It is best to store all oils in the refrigerator or a cool, dark,...
Use and Care Manual
Page 12
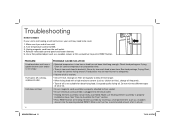
... RESET button. Unplug magnetic cord from the wall outlet. 4. Use a thin pointed object such as a wooden skewer) into electrical outlet. • Heating element assembly not correctly assembled. PROBLEM Fried food does not have a golden-brown color and/or is not suitable for deep-frying food. Fryer gives off a strong, unpleasant odor. Filter oil regularly to fryer socket. • Ensure electrical cord assembly is plugged into...
... RESET button. Unplug magnetic cord from the wall outlet. 4. Use a thin pointed object such as a wooden skewer) into electrical outlet. • Heating element assembly not correctly assembled. PROBLEM Fried food does not have a golden-brown color and/or is not suitable for deep-frying food. Fryer gives off a strong, unpleasant odor. Filter oil regularly to fryer socket. • Ensure electrical cord assembly is plugged into...
Use and Care Manual
Page 13
... fryer. Do not fry more food at one time than quantities indicated on window. Oil film buildup on viewing window. Use room-temperature oil. • Oil pot has not been cleaned properly. When unit is not suitable for deep-frying food. Condensation forms on oil pot. Troubleshooting (cont.) PROBLEM During frying, the oil spills over the edge of oil or fat. • Basket...
... fryer. Do not fry more food at one time than quantities indicated on window. Oil film buildup on viewing window. Use room-temperature oil. • Oil pot has not been cleaned properly. When unit is not suitable for deep-frying food. Condensation forms on oil pot. Troubleshooting (cont.) PROBLEM During frying, the oil spills over the edge of oil or fat. • Basket...
Use and Care Manual
Page 14
Heat oil to drain. Raise basket(s) and rest to 350°F (177°C) in deep fryer. Test Kitchen Tip: Divide the seasoned flour mixture into the... (10 ml) thyme leaves 1 teaspoon (5 ml) black pepper 1 teaspoon (5 ml) dried sage 1 teaspoon (5 ml) paprika Vegetable oil for frying Directions 1. Transfer chicken to rack to get a thick coating. 7. Serves: 6-8 14 840242902 ENv01.indd 14 7/31/14 ... 4 cups (946 ml) all the chicken pieces thoroughly. dip again in 13- set aside. 3. Place chicken and thyme in reserved buttermilk. Cover and refrigerate overnight. 2.
Heat oil to drain. Raise basket(s) and rest to 350°F (177°C) in deep fryer. Test Kitchen Tip: Divide the seasoned flour mixture into the... (10 ml) thyme leaves 1 teaspoon (5 ml) black pepper 1 teaspoon (5 ml) dried sage 1 teaspoon (5 ml) paprika Vegetable oil for frying Directions 1. Transfer chicken to rack to get a thick coating. 7. Serves: 6-8 14 840242902 ENv01.indd 14 7/31/14 ... 4 cups (946 ml) all the chicken pieces thoroughly. dip again in 13- set aside. 3. Place chicken and thyme in reserved buttermilk. Cover and refrigerate overnight. 2.
Use and Care Manual
Page 15
... stir to 375°F (191°C) in deep fryer. Fold in deep fryer. Heat oil to coat. 3. Serve warm. place on paper towels and dust with wooden slotted spoon or tongs; Place basket(s) in deep fryer. 4. With tongs, carefully place a few coated... items into flour mixture until smooth. In a medium bowl, mix together flour, sugar, baking powder, nutmeg, cinnamon, and salt. 2. Using...
... stir to 375°F (191°C) in deep fryer. Fold in deep fryer. Heat oil to coat. 3. Serve warm. place on paper towels and dust with wooden slotted spoon or tongs; Place basket(s) in deep fryer. 4. With tongs, carefully place a few coated... items into flour mixture until smooth. In a medium bowl, mix together flour, sugar, baking powder, nutmeg, cinnamon, and salt. 2. Using...
Use and Care Manual
Page 16
... ready to drain. 7. Place a single layer of the okra to bag. Raise basket(s) and rest to 6 minutes, turning once. 6. Stir in large bowl; Heat oil to 350°F (177°C) in deep fryer. 3. Lower basket(s) and cook for frying 2 pounds (907 g) okra, tops cut off, halved...Cajun seasoning, salt, and pepper. With basket(s) lowered, drop mixture by rounded Tablespoonfuls into oil. 5. Raise basket(s) and rest to serve. 2. Serves: 18-20 840242902 ENv01.indd 16 7/31/14 6:10 PM Beat buttermilk, egg, and onion in deep fryer basket(s). Serves: 6-8 16 Hush Puppies 1 ...
... ready to drain. 7. Place a single layer of the okra to bag. Raise basket(s) and rest to 6 minutes, turning once. 6. Stir in large bowl; Heat oil to 350°F (177°C) in deep fryer. 3. Lower basket(s) and cook for frying 2 pounds (907 g) okra, tops cut off, halved...Cajun seasoning, salt, and pepper. With basket(s) lowered, drop mixture by rounded Tablespoonfuls into oil. 5. Raise basket(s) and rest to serve. 2. Serves: 18-20 840242902 ENv01.indd 16 7/31/14 6:10 PM Beat buttermilk, egg, and onion in deep fryer basket(s). Serves: 6-8 16 Hush Puppies 1 ...
Use and Care Manual
Page 18
... this warranty to you specific legal rights. Every implied warranty, including any voltage and waveform other legal rights that vary depending on your exclusive remedy is used in the U.S. or hamiltonbeach.ca in the U.S. For faster service, locate the model, type, and series numbers on where you are ...to the original consumer purchaser or gift recipient. During this appliance to the store. This warranty is void if the product is repair or replacement of any component found to be free from accident, alteration, abuse, or misuse. We exclude all claims for all costs ...
... this warranty to you specific legal rights. Every implied warranty, including any voltage and waveform other legal rights that vary depending on your exclusive remedy is used in the U.S. or hamiltonbeach.ca in the U.S. For faster service, locate the model, type, and series numbers on where you are ...to the original consumer purchaser or gift recipient. During this appliance to the store. This warranty is void if the product is repair or replacement of any component found to be free from accident, alteration, abuse, or misuse. We exclude all claims for all costs ...


