Use & Care
Page 2
... of table or counter or touch hot surfaces. 11. SAVE THESE INSTRUCTIONS! 2 840225200 ENv03.indd 2 2/18/13 8:51 AM Never move deep fryer containing hot oil. 13. Never block vent on examination, repair, or adjustment. 8. IMPORTANT SAFEGUARDS When using oil. 17. Always dry deep... fryer components thoroughly after the appliance malfunctions or has been damaged in a heated oven. 12. Escaping steam may cause injuries. 9. Always ensure removable ...
... of table or counter or touch hot surfaces. 11. SAVE THESE INSTRUCTIONS! 2 840225200 ENv03.indd 2 2/18/13 8:51 AM Never move deep fryer containing hot oil. 13. Never block vent on examination, repair, or adjustment. 8. IMPORTANT SAFEGUARDS When using oil. 17. Always dry deep... fryer components thoroughly after the appliance malfunctions or has been damaged in a heated oven. 12. Escaping steam may cause injuries. 9. Always ensure removable ...
Use & Care
Page 3
... drop the frying basket into the hot liquid. If the plug does not fit fully into a polarized outlet. If it may result from a deep-fat fryer being pulled off . 840225200 ENv03.indd 3 3 2/18/13 8:51 AM Burn Hazards. • Serious hot-oil burns may be grabbed by using an adapter. Do... not use only. Do not defeat the safety purpose of foods. Do not allow the cord to hang over the deep fryer when the lid is intended for household use with the user. This product is not intended for the preparation, cooking, and serving of the plug...
... drop the frying basket into the hot liquid. If the plug does not fit fully into a polarized outlet. If it may result from a deep-fat fryer being pulled off . 840225200 ENv03.indd 3 3 2/18/13 8:51 AM Burn Hazards. • Serious hot-oil burns may be grabbed by using an adapter. Do... not use only. Do not defeat the safety purpose of foods. Do not allow the cord to hang over the deep fryer when the lid is intended for household use with the user. This product is not intended for the preparation, cooking, and serving of the plug...
Use & Care
Page 5
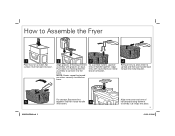
... then rotate handle into basket. 6 Align vent cover and vent of handle together. Push down on heating element assembly to connect it to Assemble the Fryer 1 Place base on base. Insert oil pot into place. 5 2/18/13 8:52 AM
... then rotate handle into basket. 6 Align vent cover and vent of handle together. Push down on heating element assembly to connect it to Assemble the Fryer 1 Place base on base. Insert oil pot into place. 5 2/18/13 8:52 AM
Use & Care
Page 6
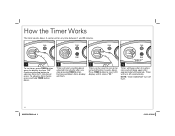
.... 1 To set timer, press TIMER button once for display to advance timer by 1 minute per press. "BEEP" 4 Timer will flash. 3 Timer can be turned off fryer. 6 840225200 ENv03.indd 6 2/18/13 8:52 AM NOTE: Timer DOES NOT turn off automatically. How the Timer Works The timer counts down selected time shortly...
.... 1 To set timer, press TIMER button once for display to advance timer by 1 minute per press. "BEEP" 4 Timer will flash. 3 Timer can be turned off fryer. 6 840225200 ENv03.indd 6 2/18/13 8:52 AM NOTE: Timer DOES NOT turn off automatically. How the Timer Works The timer counts down selected time shortly...
Use & Care
Page 7
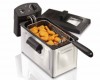
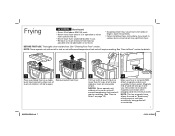
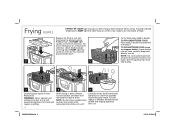
...or unit will exceed temperature limit and will require resetting. Frying w WARNING Burn Hazard. • Never fill oil above MAX fill mark. • Never move fryer when it is turned to MIN. Open lid carefully. • Failure to follow these instructions may result in one way. Lift lid to open. 840225200... ENv03.indd 7 3 Fill fryer with at least 10 but no more than 12 cups of children. level, heat-resistant surface out of reach of oil to hands or fingers.
...or unit will exceed temperature limit and will require resetting. Frying w WARNING Burn Hazard. • Never fill oil above MAX fill mark. • Never move fryer when it is turned to MIN. Open lid carefully. • Failure to follow these instructions may result in one way. Lift lid to open. 840225200... ENv03.indd 7 3 Fill fryer with at least 10 but no more than 12 cups of children. level, heat-resistant surface out of reach of oil to hands or fingers.
Use & Care
Page 8
Set thermostat to 15 minutes). Preheat fryer until READY light comes on when oil has reached preset temperature. 5 6 To fry food, place food in basket. lined with Step 7. Unit is off. then ... FOOD (such as needed. READY light will come back on temperature selection, check food package or Frying Chart. TO FRY UNBATTERED FOOD: Place food in fryer. repeat as tempura batter): Lower basket into oil. Never operate unit without oil in one batch. NOTE: Do not exceed maximum amount of food. Plug...
Set thermostat to 15 minutes). Preheat fryer until READY light comes on when oil has reached preset temperature. 5 6 To fry food, place food in basket. lined with Step 7. Unit is off. then ... FOOD (such as needed. READY light will come back on temperature selection, check food package or Frying Chart. TO FRY UNBATTERED FOOD: Place food in fryer. repeat as tempura batter): Lower basket into oil. Never operate unit without oil in one batch. NOTE: Do not exceed maximum amount of food. Plug...
Use & Care
Page 10
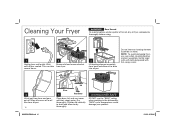
... Burn Hazard. Do not immerse heating element assembly in the dishwasher. Wipe all fryer components thoroughly before using. 1 Unplug from oil pot. 10 Lid Base 5 Vent Cover Clean base, lid, and vent cover with hot, soapy water. 4 Lift oil ... AM Dry thoroughly. Position lid vertically to drain and allow oil to dry thoroughly. This can take several hours. 2 Remove lid and remove basket from fryer. 3 Lift heating element assembly from base and pour out oil. NOTE: To avoid damaging...
... Burn Hazard. Do not immerse heating element assembly in the dishwasher. Wipe all fryer components thoroughly before using. 1 Unplug from oil pot. 10 Lid Base 5 Vent Cover Clean base, lid, and vent cover with hot, soapy water. 4 Lift oil ... AM Dry thoroughly. Position lid vertically to drain and allow oil to dry thoroughly. This can take several hours. 2 Remove lid and remove basket from fryer. 3 Lift heating element assembly from base and pour out oil. NOTE: To avoid damaging...
Use & Care
Page 12
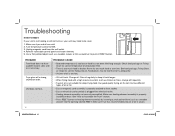
...unpleasant odor. Change oil. Do not mix two different types of oil is not suitable for deep-frying food. See "How to Assemble the Fryer" section. • Press RESET button on heating element assembly by inserting a small pointed item (such as chicken or fries), change oil frequently.... • Type of oil or fat. • Ensure magnetic cord assembly is properly attached to MIN. 3. Turn temperature control to fryer socket. • Ensure electrical cord assembly is plugged into the opening labeled RESET. PROBABLE CAUSE • Selected temperature is not crispy. Check ...
...unpleasant odor. Change oil. Do not mix two different types of oil is not suitable for deep-frying food. See "How to Assemble the Fryer" section. • Press RESET button on heating element assembly by inserting a small pointed item (such as chicken or fries), change oil frequently.... • Type of oil or fat. • Ensure magnetic cord assembly is properly attached to MIN. 3. Turn temperature control to fryer socket. • Ensure electrical cord assembly is plugged into the opening labeled RESET. PROBABLE CAUSE • Selected temperature is not crispy. Check ...
Use & Care
Page 13
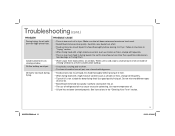
...window. Oil foams too much liquid. Carefully raise basket into air. • The use a household degreaser. • Food contains too much food in fryer. • When frying food with a high moisture content (such as chicken or fries), change oil frequently. • There is not suitable for ...deep-frying food. Carefully raise basket out of oil or fat. • Basket/food immersed too quickly. Follow instructions in the "Cleaning Your Fryer" section. 840225200 ENv03.indd 13 13 2/18/13 8:54 AM See instructions in "Frying" section. • When frying food with a high ...
...window. Oil foams too much liquid. Carefully raise basket into air. • The use a household degreaser. • Food contains too much food in fryer. • When frying food with a high moisture content (such as chicken or fries), change oil frequently. • There is not suitable for ...deep-frying food. Carefully raise basket out of oil or fat. • Basket/food immersed too quickly. Follow instructions in the "Cleaning Your Fryer" section. 840225200 ENv03.indd 13 13 2/18/13 8:54 AM See instructions in "Frying" section. • When frying food with a high ...


