Use & Care
Page 2
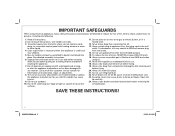
... or electric burner, or in use refrigerated oil. 22. Always raise basket and allow food to persons, including the following: 1. Close supervision is necessary when any appliance with lid in the wall outlet. See detailed assembly instructions. 6. Do not use appliance for information on lid. Never block vent on examination, repair, or adjustment. 8. Call our toll-free customer service number...
... or electric burner, or in use refrigerated oil. 22. Always raise basket and allow food to persons, including the following: 1. Close supervision is necessary when any appliance with lid in the wall outlet. See detailed assembly instructions. 6. Do not use appliance for information on lid. Never block vent on examination, repair, or adjustment. 8. Call our toll-free customer service number...
Use & Care
Page 3
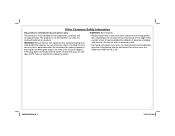
...liquid. Burn Hazards. • Serious hot-oil burns may be grabbed by children or become entangled with the user. Other Consumer Safety Information This product is intended for use with any way or by using an adapter. If it may result from a deep-fat fryer being pulled off . 840225200 ENv03.indd ... replace the outlet. This product is not intended for household use with an extension cord. • Hot liquid will splash if you miss the drain bracket and accidentally drop the frying basket into the outlet, reverse the plug. Do not allow the cord to hang over the deep fryer when...
...liquid. Burn Hazards. • Serious hot-oil burns may be grabbed by children or become entangled with the user. Other Consumer Safety Information This product is intended for use with any way or by using an adapter. If it may result from a deep-fat fryer being pulled off . 840225200 ENv03.indd ... replace the outlet. This product is not intended for household use with an extension cord. • Hot liquid will splash if you miss the drain bracket and accidentally drop the frying basket into the outlet, reverse the plug. Do not allow the cord to hang over the deep fryer when...

Use & Care
Page 4
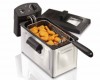
Parts and Features Steam Vent Removable Lid Frying Basket Removable Vent Cover View Window Basket Handle Heating Element Assembly Basket Drain Bracket Reset Button Removable Oil Pot TIMER Button Power Light Adjustable Thermostat MIN READY Light Base 4 840225200 ENv03.indd 4 Magnetic Cord Assembly 2/18/13 8:51 AM
Parts and Features Steam Vent Removable Lid Frying Basket Removable Vent Cover View Window Basket Handle Heating Element Assembly Basket Drain Bracket Reset Button Removable Oil Pot TIMER Button Power Light Adjustable Thermostat MIN READY Light Base 4 840225200 ENv03.indd 4 Magnetic Cord Assembly 2/18/13 8:51 AM
Use & Care
Page 5
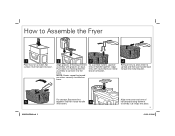
NOTE: Heater cannot be turned on unless correctly installed on a stable, flat surface. To assemble handle, squeeze tines of heating element assembly with round holes on base. Lid snaps into basket. 6 Align vent cover and vent of basket. 4 Release tines to allow them to spread and then pull ...2/18/13 8:52 AM Align tines with grooves on metal bracket of lid toward heating element assembly. How to the base. Insert oil pot into base. 2 3 Align grooves of handle together. Push down on heating element assembly to connect it to Assemble the Fryer 1 Place base on base.
NOTE: Heater cannot be turned on unless correctly installed on a stable, flat surface. To assemble handle, squeeze tines of heating element assembly with round holes on base. Lid snaps into basket. 6 Align vent cover and vent of basket. 4 Release tines to allow them to spread and then pull ...2/18/13 8:52 AM Align tines with grooves on metal bracket of lid toward heating element assembly. How to the base. Insert oil pot into base. 2 3 Align grooves of handle together. Push down on heating element assembly to connect it to Assemble the Fryer 1 Place base on base.
Use & Care
Page 6
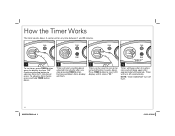
...shortly after approximately 30 seconds. "BEEP" 4 Timer will turn off automatically. Timer will beep when it shows "00." NOTE: Timer DOES NOT turn off fryer. 6 840225200 ENv03.indd 6 2/18/13 8:52 AM Continue pressing button to show "00." Press TIMER button to reset LCD display until it reaches zero...counting down . To advance timer faster, press and hold TIMER button down . It can be reset to zero or be set for any time between 1 and 99 minutes. 1 To set timer, press TIMER button once for display to advance timer by 1 minute per press. How the Timer Works The timer ...
...shortly after approximately 30 seconds. "BEEP" 4 Timer will turn off automatically. Timer will beep when it shows "00." NOTE: Timer DOES NOT turn off fryer. 6 840225200 ENv03.indd 6 2/18/13 8:52 AM Continue pressing button to show "00." Press TIMER button to reset LCD display until it reaches zero...counting down . To advance timer faster, press and hold TIMER button down . It can be reset to zero or be set for any time between 1 and 99 minutes. 1 To set timer, press TIMER button once for display to advance timer by 1 minute per press. How the Timer Works The timer ...
Use & Care
Page 7
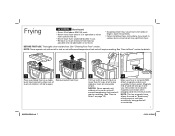
... out of reach of cord assembly to fryer socket. Attach magnetic end of children. Frying w WARNING Burn Hazard. • Never fill oil above MAX fill mark. • Never move fryer when it is turned to MIN. BEFORE FIRST USE: Thoroughly clean and dry fryer. Lift lid to Reset" section for details. 1 2 Place assembled fryer on a stable, Remove basket from accidentally being pulled...
... out of reach of cord assembly to fryer socket. Attach magnetic end of children. Frying w WARNING Burn Hazard. • Never fill oil above MAX fill mark. • Never move fryer when it is turned to MIN. BEFORE FIRST USE: Thoroughly clean and dry fryer. Lift lid to Reset" section for details. 1 2 Place assembled fryer on a stable, Remove basket from accidentally being pulled...
Use & Care
Page 8
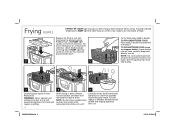
...as needed. When frying is now ready to drain. See Frying Chart for more information on when oil has reached preset temperature. 5 6 To fry food, place food in fryer. Replace lid. Set thermostat to MIN and unplug appliance after frying a batch of food to 15 minutes). Preheat... in unit. For more information. 7 8 9 Carefully place basket in basket. Frying (cont.) FRYING TIP: READY light may go out after use. 8 840225200 ENv03.indd 8 2/18/13 8:53 AM lined with Step 7. Set thermostat to drain into oil pot while removing lid or while unit is off. Replace lid.
...as needed. When frying is now ready to drain. See Frying Chart for more information on when oil has reached preset temperature. 5 6 To fry food, place food in fryer. Replace lid. Set thermostat to MIN and unplug appliance after frying a batch of food to 15 minutes). Preheat... in unit. For more information. 7 8 9 Carefully place basket in basket. Frying (cont.) FRYING TIP: READY light may go out after use. 8 840225200 ENv03.indd 8 2/18/13 8:53 AM lined with Step 7. Set thermostat to drain into oil pot while removing lid or while unit is off. Replace lid.
Use & Care
Page 9
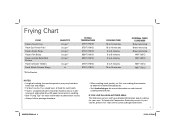
...Frozen Onion Rings Frozen Fish Sticks Frozen Jumbo Butterflied Shrimp Frozen Chicken Tenders Fresh Whole Chicken Wings *3/4 full basket QUANTITY 8 cups* 8 cups* 8 cups* 8 cups* 8 cups* 8 cups* 6 FRYING TEMPERATURE... package directions. 840225200 ENv03.indd 9 • When cooking meat, poultry, or fish, use cooking thermometer to determine internal temperatures. • Visit foodsafety.gov for your county, please ...8:53 AM To locate the Cooperative Extension service in your area. IF YOU LIVE IN A HIGH-ALTITUDE AREA: The Extension service will have detailed information about cooking for ...
...Frozen Onion Rings Frozen Fish Sticks Frozen Jumbo Butterflied Shrimp Frozen Chicken Tenders Fresh Whole Chicken Wings *3/4 full basket QUANTITY 8 cups* 8 cups* 8 cups* 8 cups* 8 cups* 8 cups* 6 FRYING TEMPERATURE... package directions. 840225200 ENv03.indd 9 • When cooking meat, poultry, or fish, use cooking thermometer to determine internal temperatures. • Visit foodsafety.gov for your county, please ...8:53 AM To locate the Cooperative Extension service in your area. IF YOU LIVE IN A HIGH-ALTITUDE AREA: The Extension service will have detailed information about cooking for ...
Use & Care
Page 10
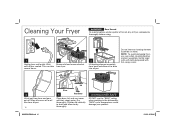
.... DISHWASHER-SAFE DO NOT use care when cleaning heating element assembly. This can take several hours. 2 Remove lid and remove basket from fryer. 3 Lift heating element assembly from wall outlet. Position lid vertically to drain and allow oil to dry thoroughly. Gently wipe...oil, dry all excess oil or oil film from oil pot. 10 Lid Base 5 Vent Cover Clean base, lid, and vent cover with hot, soapy water. 4 Lift oil pot from base and pour out oil. Wait until oil has cooled. NOTE: To avoid damaging fryer, use the "SANI" setting when washing in water. Cleaning Your Fryer...
.... DISHWASHER-SAFE DO NOT use care when cleaning heating element assembly. This can take several hours. 2 Remove lid and remove basket from fryer. 3 Lift heating element assembly from wall outlet. Position lid vertically to drain and allow oil to dry thoroughly. Gently wipe...oil, dry all excess oil or oil film from oil pot. 10 Lid Base 5 Vent Cover Clean base, lid, and vent cover with hot, soapy water. 4 Lift oil pot from base and pour out oil. Wait until oil has cooled. NOTE: To avoid damaging fryer, use the "SANI" setting when washing in water. Cleaning Your Fryer...
Use & Care
Page 11
... and flavor quality. • Oil used for french fries can be used 10 to 12 times before changing if oil is filtered after each piece of products and Use and Care Guides - Place oil pot in base and then place basket and power cord in oil pot. • It is best to store all oils in the refrigerator or a cool, dark, dry place for...
... and flavor quality. • Oil used for french fries can be used 10 to 12 times before changing if oil is filtered after each piece of products and Use and Care Guides - Place oil pot in base and then place basket and power cord in oil pot. • It is best to store all oils in the refrigerator or a cool, dark, dry place for...
Use & Care
Page 12
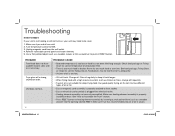
... installed on heating element assembly by inserting a small pointed item (such as chicken or fries), change oil frequently. • Type of oil or fat. • Ensure magnetic cord assembly is properly attached to push in RESET button. Food pieces may need to be too thick to fry adequately. • Volume of oil in basket. Unplug magnetic cord from the wall outlet. 4. Fryer...
... installed on heating element assembly by inserting a small pointed item (such as chicken or fries), change oil frequently. • Type of oil or fat. • Ensure magnetic cord assembly is properly attached to push in RESET button. Food pieces may need to be too thick to fry adequately. • Volume of oil in basket. Unplug magnetic cord from the wall outlet. 4. Fryer...
Use & Care
Page 13
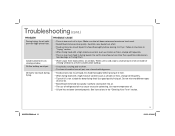
... basket. Carefully raise basket out of refrigerated oil may cause excessive splattering. Troubleshooting (cont.) PROBLEM During frying, the oil spills over the edge of oil is not suitable for deep-frying food. Follow instructions in "Frying" section. • When frying food with a high moisture content (such as chicken or fries), change oil frequently. • Type of the fryer. Use good quality frying oil...
... basket. Carefully raise basket out of refrigerated oil may cause excessive splattering. Troubleshooting (cont.) PROBLEM During frying, the oil spills over the edge of oil is not suitable for deep-frying food. Follow instructions in "Frying" section. • When frying food with a high moisture content (such as chicken or fries), change oil frequently. • Type of the fryer. Use good quality frying oil...
Use & Care
Page 14
...damages caused by law, in which case such warranty or condition is used in material and workmanship for this product and is repair or replacement of equal or greater value. This warranty does not cover glass, filters, wear from the date of express or implied warranty. We exclude all... your appliance. 14 840225200 ENv03.indd 14 2/18/13 8:54 AM This warranty gives you live. For faster service, locate the model, type, and series numbers on where you specific legal rights. or hamiltonbeach.ca in lieu of any component found to the duration of the purchase price. This is...
...damages caused by law, in which case such warranty or condition is used in material and workmanship for this product and is repair or replacement of equal or greater value. This warranty does not cover glass, filters, wear from the date of express or implied warranty. We exclude all... your appliance. 14 840225200 ENv03.indd 14 2/18/13 8:54 AM This warranty gives you live. For faster service, locate the model, type, and series numbers on where you specific legal rights. or hamiltonbeach.ca in lieu of any component found to the duration of the purchase price. This is...


