Use & Care
Page 2
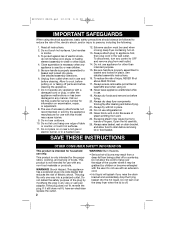
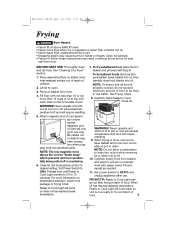
...use with this model may result from outlet when not in water or other than intended purpose. 15. This product is properly assembled to basket and locked into a polarized outlet. WARNING! Do not defeat the safety purpose of electric shock, do not immerse cord, plugs, or heating element assembly in use refrigerated oil...Always dry deep fryer components thoroughly after the appliance malfunctions or has been damaged in a heated oven. 12. Always fry with the user. Escaping steam may be grabbed by or near a hot gas or electric burner, or in any control to cool, before...
...use with this model may result from outlet when not in water or other than intended purpose. 15. This product is properly assembled to basket and locked into a polarized outlet. WARNING! Do not defeat the safety purpose of electric shock, do not immerse cord, plugs, or heating element assembly in use refrigerated oil...Always dry deep fryer components thoroughly after the appliance malfunctions or has been damaged in a heated oven. 12. Always fry with the user. Escaping steam may be grabbed by or near a hot gas or electric burner, or in any control to cool, before...
Use & Care
Page 3
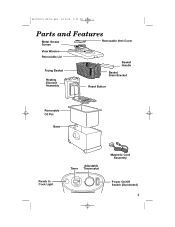
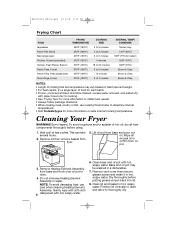
840150301 ENv04.qxd 3/11/08 3:12 PM Page 3 Parts and Features Metal Grease Screen Removable Vent Cover View Window Removable Lid Frying Basket Heating Element Assembly Basket Handle Basket Drain Bracket Reset Button Removable Oil Pot Base Ready to Cook Light Adjustable Timer Thermostat Magnetic Cord Assembly Power On/Off Switch (illuminated) 3
840150301 ENv04.qxd 3/11/08 3:12 PM Page 3 Parts and Features Metal Grease Screen Removable Vent Cover View Window Removable Lid Frying Basket Heating Element Assembly Basket Handle Basket Drain Bracket Reset Button Removable Oil Pot Base Ready to Cook Light Adjustable Timer Thermostat Magnetic Cord Assembly Power On/Off Switch (illuminated) 3
Use & Care
Page 4
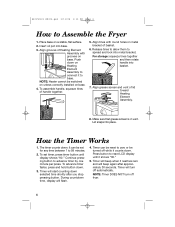
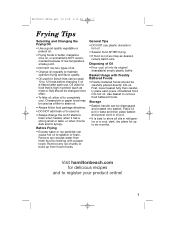
...start counting down . Place base on base. 4. Insert oil pot into place. To assemble handle, squeeze tines of lid toward Heating Element Assembly. 8. Make sure that grease screen is in vent. 840150301 ENv04.qxd 3/11/08 3:12 PM Page 4 How to 99 minutes. 2. For storage... unless correctly installed on a stable, flat surface. 2. NOTE: Timer DOES NOT turn off fryer. 4 Timer will beep when it counts down selected time shortly after approximately 30 seconds. To set for any time between 1 to Assemble the Fryer 1. Align grooves of Heating Element Assembly with round ...
...start counting down . Place base on base. 4. Insert oil pot into place. To assemble handle, squeeze tines of lid toward Heating Element Assembly. 8. Make sure that grease screen is in vent. 840150301 ENv04.qxd 3/11/08 3:12 PM Page 4 How to 99 minutes. 2. For storage... unless correctly installed on a stable, flat surface. 2. NOTE: Timer DOES NOT turn off fryer. 4 Timer will beep when it counts down selected time shortly after approximately 30 seconds. To set for any time between 1 to Assemble the Fryer 1. Align grooves of Heating Element Assembly with round ...
Use & Care
Page 5
... of cord assembly to desired setting. BEFORE FIRST USE: Thoroughly clean and dry fryer. Remove basket from fryer. Never operate unit without oil in pot or unit will exceed temperature limit and will only go out after use . • Escaping steam may go in one batch. Magnetic end of oil to drain.... Be careful not to Cook Light comes on . Preheat fryer until Ready to disturb magnetic connection when plug- For more than 12 cups of cord will require resetting. 9....
... of cord assembly to desired setting. BEFORE FIRST USE: Thoroughly clean and dry fryer. Remove basket from fryer. Never operate unit without oil in pot or unit will exceed temperature limit and will only go out after use . • Escaping steam may go in one batch. Magnetic end of oil to drain.... Be careful not to Cook Light comes on . Preheat fryer until Ready to disturb magnetic connection when plug- For more than 12 cups of cord will require resetting. 9....
Use & Care
Page 6
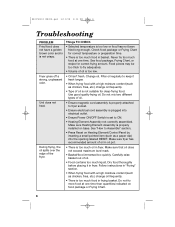
... and wash it in a dishwasher. 7. Dry thoroughly before using. 1. Wait until oil has cooled. Burn Hazard. To avoid eruptions and/or splatter of hot oil, dry all excess oil or oil film from base and pour out oil. Remove lid then remove basket from base and hook onto oil pot to thoroughly dry. Remove Heating Element Assembly from fryer. 5. Cleaning Your Fryer WARNING!
... and wash it in a dishwasher. 7. Dry thoroughly before using. 1. Wait until oil has cooled. Burn Hazard. To avoid eruptions and/or splatter of hot oil, dry all excess oil or oil film from base and pour out oil. Remove lid then remove basket from base and hook onto oil pot to thoroughly dry. Remove Heating Element Assembly from fryer. 5. Cleaning Your Fryer WARNING!
Use & Care
Page 7
...basket and power cord in oil pot. • It is best to store all oils in refrigerator or a cool, dark, dry place for up from fresh food by blotting with Freshly Battered Foods • Freshly battered foods should be carefully placed directly into oil. Oil used oil. • Always change the oil... To filter oil, allow oil to completely cool. Remove any excess water from frozen foods. 840150301 ENv04.qxd 3/11/08 3:12 PM Page 7 Frying Tips Selecting and Changing the Frying Oil • Use a good quality vegetable or peanut oil. • Frying foods in butter, margarine, olive oil, or...
...basket and power cord in oil pot. • It is best to store all oils in refrigerator or a cool, dark, dry place for up from fresh food by blotting with Freshly Battered Foods • Freshly battered foods should be carefully placed directly into oil. Oil used oil. • Always change the oil... To filter oil, allow oil to completely cool. Remove any excess water from frozen foods. 840150301 ENv04.qxd 3/11/08 3:12 PM Page 7 Frying Tips Selecting and Changing the Frying Oil • Use a good quality vegetable or peanut oil. • Frying foods in butter, margarine, olive oil, or...
Use & Care
Page 8
... recipe for deep-frying food. Filter oil regularly to ON. • Heating Element Assembly not correctly assembled. During frying, the oil spills over the edge of oil. • Food contains too much oil in fryer. Make sure that oil does not exceed maximum level mark. • Basket/food immersed too quickly. 840150301 ENv04.qxd 3/11/08 3:12 PM Page 8 Troubleshooting PROBLEM Things TO CHECK...
... recipe for deep-frying food. Filter oil regularly to ON. • Heating Element Assembly not correctly assembled. During frying, the oil spills over the edge of oil. • Food contains too much oil in fryer. Make sure that oil does not exceed maximum level mark. • Basket/food immersed too quickly. 840150301 ENv04.qxd 3/11/08 3:12 PM Page 8 Troubleshooting PROBLEM Things TO CHECK...
Use & Care
Page 9
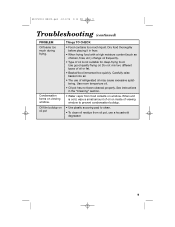
... it in the "Cleaning" section. • Water vapor from oil pot, use of refrigerated oil may cause excessive splattering. 840150301 ENv04.qxd 3/11/08 3:12 PM Page 9 Troubleshooting (continued) PROBLEM Oil foams too much liquid. Condensation forms on window. Use room temperture oil. • Oil pot has not been cleaned properly. When unit is not suitable for deep-frying food. Oil film buildup on...
... it in the "Cleaning" section. • Water vapor from oil pot, use of refrigerated oil may cause excessive splattering. 840150301 ENv04.qxd 3/11/08 3:12 PM Page 9 Troubleshooting (continued) PROBLEM Oil foams too much liquid. Condensation forms on window. Use room temperture oil. • Oil pot has not been cleaned properly. When unit is not suitable for deep-frying food. Oil film buildup on...
Use & Care
Page 10
..., except as noted below. If you have model, series, and type numbers ready for commercial purposes, or any use not in the U.S. LIMITED WARRANTY This product is no warranty with this product at our option. During this period, we will repair or replace this product, including without limitation: glass parts, glass containers, cutter/strainers, blades, seals...
..., except as noted below. If you have model, series, and type numbers ready for commercial purposes, or any use not in the U.S. LIMITED WARRANTY This product is no warranty with this product at our option. During this period, we will repair or replace this product, including without limitation: glass parts, glass containers, cutter/strainers, blades, seals...


