Use & Care
Page 3
... on base if necessary. 840205300 ENv02.qxd:Layout 1 6/24/11 1:26 PM Page 3 CROCK AND LID: PRECAUTIONS AND INFORMATION • Please handle crock and lid carefully to remove crock. 3 Do not place lid in a microwave oven, conventional oven, or on a burner or stove top. Use oven mitts to ... get very warm because the heating elements are located here. Use caution. • The crock and lid can damage countertop. Never place lid on stove top. REMOVING LID AND CROCK When removing lid, tilt so that opening faces away from you to avoid being burned by steam. The sides of ...
... on base if necessary. 840205300 ENv02.qxd:Layout 1 6/24/11 1:26 PM Page 3 CROCK AND LID: PRECAUTIONS AND INFORMATION • Please handle crock and lid carefully to remove crock. 3 Do not place lid in a microwave oven, conventional oven, or on a burner or stove top. Use oven mitts to ... get very warm because the heating elements are located here. Use caution. • The crock and lid can damage countertop. Never place lid on stove top. REMOVING LID AND CROCK When removing lid, tilt so that opening faces away from you to avoid being burned by steam. The sides of ...
Use & Care
Page 4
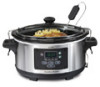
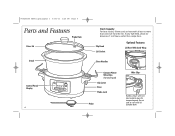
... earlier than one inch from the rim. Clip Hook Lid Gasket Optional Features Lid Rest With Cord Wrap Base Handles Control Panel/ Display 4 Chrome-Plated Wire Clips (for latching lid) Clip Latch Base Probe Jack Probe Wire Clips Handles shown with lid clamped down. 840205300 ENv02.qxd:Layout 1 6/24/11... 1:26 PM Page 4 Parts and Features Probe Hole Glass Lid Crock Crock Capacity For best results, fill the crock...
... earlier than one inch from the rim. Clip Hook Lid Gasket Optional Features Lid Rest With Cord Wrap Base Handles Control Panel/ Display 4 Chrome-Plated Wire Clips (for latching lid) Clip Latch Base Probe Jack Probe Wire Clips Handles shown with lid clamped down. 840205300 ENv02.qxd:Layout 1 6/24/11... 1:26 PM Page 4 Parts and Features Probe Hole Glass Lid Crock Crock Capacity For best results, fill the crock...
Use & Care
Page 6
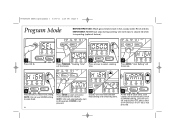
.... Use wire clips to start in hot, soapy water. 840205300 ENv02.qxd:Layout 1 6/24/11 1:26 PM Page 6 Program Mode BEFORE FIRST USE: Wash glass lid and crock in 20 seconds if ENTER is not pressed. 7 Display will alternate between heat setting and remaining time. 6 8 At the end of cook time... hours if OFF (O) is not pressed. IMPORTANT: NEVER lock clips during cooking. NOTE: Do not use WARM setting to cook food. 6 Press ENTER to secure lid when transporting (optional feature). 1 Press ON (I). 2 Press PROGRAM. Rinse and dry.
.... Use wire clips to start in hot, soapy water. 840205300 ENv02.qxd:Layout 1 6/24/11 1:26 PM Page 6 Program Mode BEFORE FIRST USE: Wash glass lid and crock in 20 seconds if ENTER is not pressed. 7 Display will alternate between heat setting and remaining time. 6 8 At the end of cook time... hours if OFF (O) is not pressed. IMPORTANT: NEVER lock clips during cooking. NOTE: Do not use WARM setting to cook food. 6 Press ENTER to secure lid when transporting (optional feature). 1 Press ON (I). 2 Press PROGRAM. Rinse and dry.
Use & Care
Page 7
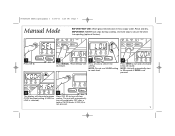
840205300 ENv02.qxd:Layout 1 6/24/11 1:26 PM Page 7 Manual Mode BEFORE FIRST USE: Wash glass lid and crock in 20 seconds if ENTER is not pressed. 5 6 The display will alternate between COOK and heat setting (if HIGH or LOW is not ... during cooking. Use wire clips to select heat setting. Rinse and dry. Press ENTER to cook food. The unit will illuminate. Press arrows to secure lid when transporting (optional feature). 1 Press ON (I). 2 3 4 Press MANUAL. NOTE: Do not use WARM setting to start in hot, soapy water...
840205300 ENv02.qxd:Layout 1 6/24/11 1:26 PM Page 7 Manual Mode BEFORE FIRST USE: Wash glass lid and crock in 20 seconds if ENTER is not pressed. 5 6 The display will alternate between COOK and heat setting (if HIGH or LOW is not ... during cooking. Use wire clips to select heat setting. Rinse and dry. Press ENTER to cook food. The unit will illuminate. Press arrows to secure lid when transporting (optional feature). 1 Press ON (I). 2 3 4 Press MANUAL. NOTE: Do not use WARM setting to start in hot, soapy water...
Use & Care
Page 8
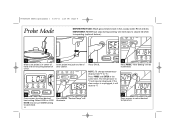
...ENTER at the same time. Select HIGH or LOW. 840205300 ENv02.qxd:Layout 1 6/24/11 1:26 PM Page 8 Probe Mode BEFORE FIRST USE: Wash glass lid and crock in center of food and not touching bottom of crock. 2 Insert probe into jack on side of slow cooker. 3 Press ON (I). 4 Press ... select desired temperature. The temperature in ºC will be displayed. Rinse and dry. IMPORTANT: NEVER lock clips during cooking. Use wire clips to secure lid when transporting (optional feature). 1 Make sure probe is unplugged, it will illuminate. 7 Press arrows to cook food. 8 6 Press ENTER.
...ENTER at the same time. Select HIGH or LOW. 840205300 ENv02.qxd:Layout 1 6/24/11 1:26 PM Page 8 Probe Mode BEFORE FIRST USE: Wash glass lid and crock in center of food and not touching bottom of crock. 2 Insert probe into jack on side of slow cooker. 3 Press ON (I). 4 Press ... select desired temperature. The temperature in ºC will be displayed. Rinse and dry. IMPORTANT: NEVER lock clips during cooking. Use wire clips to secure lid when transporting (optional feature). 1 Make sure probe is unplugged, it will illuminate. 7 Press arrows to cook food. 8 6 Press ENTER.
Use & Care
Page 11
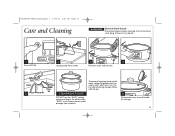
... DO NOT use . "SANI" cycle temperatures could damage your product. 6 Wrap probe wire around handle for storage. 11 Crock 5 Glass Lid To prevent lingering food smells, clean rubber lid gasket with lid ajar. 840205300 ENv02.qxd:Layout 1 6/24/11 1:27 PM Page 11 Care and Cleaning w WARNING Electrical Shock Hazard. Store with hot...
... DO NOT use . "SANI" cycle temperatures could damage your product. 6 Wrap probe wire around handle for storage. 11 Crock 5 Glass Lid To prevent lingering food smells, clean rubber lid gasket with lid ajar. 840205300 ENv02.qxd:Layout 1 6/24/11 1:27 PM Page 11 Care and Cleaning w WARNING Electrical Shock Hazard. Store with hot...
Use & Care
Page 12
..., stew, or sauce, reduce liquid called for in your county, please visit: http://www.csrees.usda.gov/Extension/. If cooking meat with lid, and refrigerate overnight. Instead, divide leftovers into smaller containers and place into the crock, it the night before , where crock should be ...extended. Removing glass lid results in the bottom of meat, the less liquid is placed into refrigerator. 12 • Never allow undercooked or raw meat to a ...
..., stew, or sauce, reduce liquid called for in your county, please visit: http://www.csrees.usda.gov/Extension/. If cooking meat with lid, and refrigerate overnight. Instead, divide leftovers into smaller containers and place into the crock, it the night before , where crock should be ...extended. Removing glass lid results in the bottom of meat, the less liquid is placed into refrigerator. 12 • Never allow undercooked or raw meat to a ...
Use & Care
Page 13
... setting? • Did you select hours based on the slow cooker? My meal was overcooked. The slight fluctuations in power do not have the glass lid placed correctly on a LOW heat recipe? • Foods will continue to 2 hours earlier than recipe time. • Did you have a noticeable effect on WARM setting...
... setting? • Did you select hours based on the slow cooker? My meal was overcooked. The slight fluctuations in power do not have the glass lid placed correctly on a LOW heat recipe? • Foods will continue to 2 hours earlier than recipe time. • Did you have a noticeable effect on WARM setting...


