Use & Care
Page 2
... that reduces the risk of electric shock. The electrical rating of foods. Use handles or knobs. 3. The use appliance for the preparation, cooking, and serving of the extension cord must be used on or taking off parts. 6. Do not place on examination, repair, or adjustment. 7. To disconnect slow cooker, turn control knob to or greater than intended use with any way or using electrical appliances, basic safety precautions...
... that reduces the risk of electric shock. The electrical rating of foods. Use handles or knobs. 3. The use appliance for the preparation, cooking, and serving of the extension cord must be used on or taking off parts. 6. Do not place on examination, repair, or adjustment. 7. To disconnect slow cooker, turn control knob to or greater than intended use with any way or using electrical appliances, basic safety precautions...

Use & Care
Page 3
... slow cooker's base get very warm because the heating elements are located here. Use caution. Never place lid on base if necessary. The sides of crock is microwave safe and oven proof, but never heat crock when empty. Use hot mitts to avoid being burned by steam. REMOVING LID AND CROCK When removing lid, tilt so that opening faces away from you to remove crock. 3 Use caution. • The crock and lid...
... slow cooker's base get very warm because the heating elements are located here. Use caution. Never place lid on base if necessary. The sides of crock is microwave safe and oven proof, but never heat crock when empty. Use hot mitts to avoid being burned by steam. REMOVING LID AND CROCK When removing lid, tilt so that opening faces away from you to remove crock. 3 Use caution. • The crock and lid...
Use & Care
Page 4
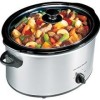
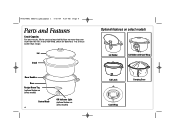
Lid Crock Base Handles Base Recipe Name Tag (optional feature on select models) Control Knob 4 ON Indicator Light (optional feature on select models) Optional features on select models Lid Holder Lid Holder with Cord Wrap Lid Latch Carrying Case Cord Wrap If only half-filled, check for doneness 1 to 2 hours earlier than one inch from the rim. 840174801 ENnv01.qxd:Layout 1 7/10/09 9:39 AM Page 4 Parts and Features Crock Capacity For best results, fill the crock at least half-full but no more than recipe.
Lid Crock Base Handles Base Recipe Name Tag (optional feature on select models) Control Knob 4 ON Indicator Light (optional feature on select models) Optional features on select models Lid Holder Lid Holder with Cord Wrap Lid Latch Carrying Case Cord Wrap If only half-filled, check for doneness 1 to 2 hours earlier than one inch from the rim. 840174801 ENnv01.qxd:Layout 1 7/10/09 9:39 AM Page 4 Parts and Features Crock Capacity For best results, fill the crock at least half-full but no more than recipe.
Use & Care
Page 5
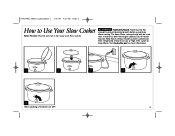
.... 5 Rinse and dry. The Keep Warm setting should only be hot enough to Use Your Slow Cooker Before First Use: Wash lid and crock in hot, soapy water. Food must be used after a recipe has been thoroughly cooked. Do not reheat food on Low or High, then switch to Keep Warm. 840174801 ENnv01.qxd:Layout 1 7/10/09 9:39 AM Page 5 How to prevent bacterial growth before using Keep Warm setting. w WARNING Food Safety...
.... 5 Rinse and dry. The Keep Warm setting should only be hot enough to Use Your Slow Cooker Before First Use: Wash lid and crock in hot, soapy water. Food must be used after a recipe has been thoroughly cooked. Do not reheat food on Low or High, then switch to Keep Warm. 840174801 ENnv01.qxd:Layout 1 7/10/09 9:39 AM Page 5 How to prevent bacterial growth before using Keep Warm setting. w WARNING Food Safety...
Use & Care
Page 6
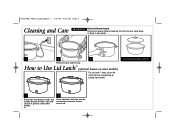
... cord, plug, or base in groove under one handle. How to further secure lid. DISHWASHER-SAFE 1 2 Place latch into groove under other side and secure in any liquid. 1 2 3 Remove crock and let cool. Stretch to other handle. 6 Once attached, latch can also be crossed over knob to Use Lid Latch™ (optional feature on some models) The Lid Latch™ helps secure lid while moving, transporting, or storing slow cooker...
... cord, plug, or base in groove under one handle. How to further secure lid. DISHWASHER-SAFE 1 2 Place latch into groove under other side and secure in any liquid. 1 2 3 Remove crock and let cool. Stretch to other handle. 6 Once attached, latch can also be crossed over knob to Use Lid Latch™ (optional feature on some models) The Lid Latch™ helps secure lid while moving, transporting, or storing slow cooker...
Use & Care
Page 7
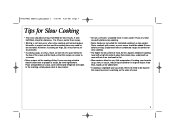
... removing glass lid results in major heat loss and the cooking time may want to stir occasionally. • If cooking soups or stews, leave a 2-inch (5 cm) space between the top of crock. 7 Thaw any meat or poultry before slow cooking. • Some foods are perfect for cooking all ingredients in ) fat. • Slow cookers allow time to 2 hours earlier than recipe. • Stirring is needed...
... removing glass lid results in major heat loss and the cooking time may want to stir occasionally. • If cooking soups or stews, leave a 2-inch (5 cm) space between the top of crock. 7 Thaw any meat or poultry before slow cooking. • Some foods are perfect for cooking all ingredients in ) fat. • Slow cookers allow time to 2 hours earlier than recipe. • Stirring is needed...
Use & Care
Page 8
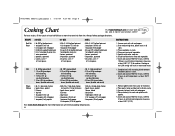
... 5-6 carrots, cut in 1" (2.5 cm) pieces INSTRUCTIONS 1. Season roast with salt and pepper. 4. Place roast on safe internal cooking temperatures. 8 1. Place chicken(s) in crock and sprinkle with onion soup mix. 6. RECIPE Beef Pot Roast 3-5 QT/L 2 lb. (907 g) beef pot roast 1 teaspoon (5 ml) salt 1/2 teaspoon (2.5 ml) pepper 1/4 (60 ml) cup beef broth/water 1/2 to register your product online! Cover and cook on HIGH for 4 hours, LOW for 10 hours or until...
... 5-6 carrots, cut in 1" (2.5 cm) pieces INSTRUCTIONS 1. Season roast with salt and pepper. 4. Place roast on safe internal cooking temperatures. 8 1. Place chicken(s) in crock and sprinkle with onion soup mix. 6. RECIPE Beef Pot Roast 3-5 QT/L 2 lb. (907 g) beef pot roast 1 teaspoon (5 ml) salt 1/2 teaspoon (2.5 ml) pepper 1/4 (60 ml) cup beef broth/water 1/2 to register your product online! Cover and cook on HIGH for 4 hours, LOW for 10 hours or until...
Use & Care
Page 9
always cook on Low or High heat settings. • Was power interrupted? • Did you select the Low heat setting, but use a cooking time based on the High heat setting? • Did you select correct number of hours based on cooking temperature (Low or High)? • Foods will return to thoroughly cook food in the slow cooker by sudden temperature change, like running cold water over a warm lid. The slow cooker has been designed to the original shape within 24 hours...
always cook on Low or High heat settings. • Was power interrupted? • Did you select the Low heat setting, but use a cooking time based on the High heat setting? • Did you select correct number of hours based on cooking temperature (Low or High)? • Foods will return to thoroughly cook food in the slow cooker by sudden temperature change, like running cold water over a warm lid. The slow cooker has been designed to the original shape within 24 hours...
Use & Care
Page 10
... printed directions, or damage to you specific legal rights. All liability is used for a period of one of original purchase. This warranty gives you . Some states or provinces do not return this warranty to the product resulting from the date of equal or greater value. For faster service, locate the model, type, and series numbers on your exclusive remedy is repair or replacement...
... printed directions, or damage to you specific legal rights. All liability is used for a period of one of original purchase. This warranty gives you . Some states or provinces do not return this warranty to the product resulting from the date of equal or greater value. For faster service, locate the model, type, and series numbers on your exclusive remedy is repair or replacement...


