User Guide
Page 1
... Door Connecting the Water Supply Line Preparation Before Use Usage Function About the Fresh Food Compartment Precaution when Refrigerating Food Tips and Hints in Using the Fresh Food Compartment About the Freezer Precaution when Freezing Food Use of the Ice Maker and the Cold Water Dispenser Dismantling and Installing the Ice Container Usage of the Dispenser Precautions in Using the Dispenser About the Convertible Compartment Defrosting, Cleaning Water Filter Discontinuing or Breaking in Usage Troubleshooting Limited Warranty
... Door Connecting the Water Supply Line Preparation Before Use Usage Function About the Fresh Food Compartment Precaution when Refrigerating Food Tips and Hints in Using the Fresh Food Compartment About the Freezer Precaution when Freezing Food Use of the Ice Maker and the Cold Water Dispenser Dismantling and Installing the Ice Container Usage of the Dispenser Precautions in Using the Dispenser About the Convertible Compartment Defrosting, Cleaning Water Filter Discontinuing or Breaking in Usage Troubleshooting Limited Warranty
User Guide
Page 2
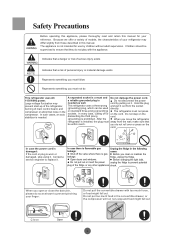
... used directly. Before changing the light bulb, Do not pull out or insert the power unplug the fridge to replace it . Indicates that a danger or risk of serious injury exists Indicates that a risk of your finger: Do not pull the convertible drawer with the appliance. In every case, cutting off the valve where there is Do not disconnect the power needed . Open doors and windows. Before operating...
... used directly. Before changing the light bulb, Do not pull out or insert the power unplug the fridge to replace it . Indicates that a danger or risk of serious injury exists Indicates that a risk of your finger: Do not pull the convertible drawer with the appliance. In every case, cutting off the valve where there is Do not disconnect the power needed . Open doors and windows. Before operating...
User Guide
Page 3
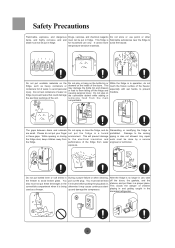
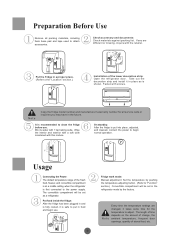
... glass. While opening or closing environment. Any repair the fridge door, keep children away from water engineer or technician. for household use only. performance of the doors. with wet hands, to prevent fridge to the cooling in these beverages in the 5 minutes before putting the plug back in, shelves, and put in the discarded refrigerator. Do not step on the inside of the fridge from t o t h e e l e c t r i c a l i n s u l a t i o n a n d work...
... glass. While opening or closing environment. Any repair the fridge door, keep children away from water engineer or technician. for household use only. performance of the doors. with wet hands, to prevent fridge to the cooling in these beverages in the 5 minutes before putting the plug back in, shelves, and put in the discarded refrigerator. Do not step on the inside of the fridge from t o t h e e l e c t r i c a l i n s u l a t i o n a n d work...
User Guide
Page 4
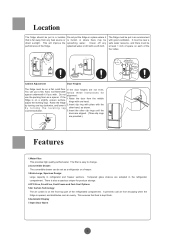
... the fridge hinge with one leg clockwise, and lower it 2.Insert clip ring with pliers with the b y t u r n i n g t h e l e v e l i n g l e g other clip rings until the doors are aligned. (Three clip rings are provided.) Features 1.Water filter: This provides high quality purified water. The fridge should be put in a location that food is kept fresh. 6.Automatic Display 7.Open Door Alarm If the fridge is easy to change. 2.Convertible Drawer...
... the fridge hinge with one leg clockwise, and lower it 2.Insert clip ring with pliers with the b y t u r n i n g t h e l e v e l i n g l e g other clip rings until the doors are aligned. (Three clip rings are provided.) Features 1.Water filter: This provides high quality purified water. The fridge should be put in a location that food is kept fresh. 6.Automatic Display 7.Open Door Alarm If the fridge is easy to change. 2.Convertible Drawer...
User Guide
Page 7
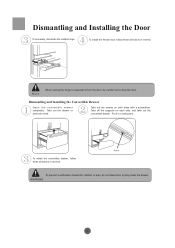
Dismantling and Installing the Door If necessary, dismantle the middle hinge. Dismantling and Installing the Convertible Drawer Open the convertible drawer completely. Take out the drawer or steel wire shelf. Take off the supports on both sides with a screwdriver. When raising the hinge to separate it in reverse. Take out the screws on each side, and take out the convertible drawer. To prevent a suffocation hazard...
Dismantling and Installing the Door If necessary, dismantle the middle hinge. Dismantling and Installing the Convertible Drawer Open the convertible drawer completely. Take out the drawer or steel wire shelf. Take off the supports on both sides with a screwdriver. When raising the hinge to separate it in reverse. Take out the screws on each side, and take out the convertible drawer. To prevent a suffocation hazard...
User Guide
Page 8
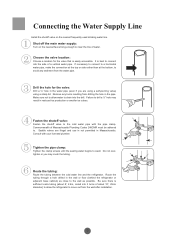
... tubing: Route the tubing between the cold water line and the refrigerator. Saddle valves are using a self-piercing valve) using a sharp bit. Route the tubing through a hole drilled in reduced ice production or smaller ice cubes. If necessary to connect to a horizontal water pipe, make the connection at the top or side rather than at the bottom, to the cold water pipe with your licensed plumber. Shut off the main water supply: Turn...
... tubing: Route the tubing between the cold water line and the refrigerator. Saddle valves are using a self-piercing valve) using a sharp bit. Route the tubing through a hole drilled in reduced ice production or smaller ice cubes. If necessary to connect to a horizontal water pipe, make the connection at the top or side rather than at the bottom, to the cold water pipe with your licensed plumber. Shut off the main water supply: Turn...
User Guide
Page 9
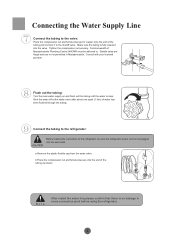
Saddle vales are illegal and use is not permitted in every connection piont before using the refrigerator. Flush out the tubing: Turn the main water supply on and flush out the tubing until the water is not plugged into the valve. Connect the tubing to the refrigerator: Before making the connection to the shutoff valve. After install the water line,please confirm that there is fully inserted into the wall outlet. b.Place...
Saddle vales are illegal and use is not permitted in every connection piont before using the refrigerator. Flush out the tubing: Turn the main water supply on and flush out the tubing until the water is not plugged into the valve. Connect the tubing to the refrigerator: Before making the connection to the shutoff valve. After install the water line,please confirm that there is fully inserted into the wall outlet. b.Place...
User Guide
Page 10
... and install it in the refrigerator mode by pushing the temperature-adjusting button. (Refer to "Function" section.) Convertible compartment will be set as is recommended to clean the fridge before use . Fridge work mode: Manual adjustment: Set the temperature by the factory. Put the fridge in the future. It is shown. If any are changed, it is first connected to attach accessories. Copy the fridge model number and manufacturer's warranty number for the temperature to adjust. The...
... and install it in the refrigerator mode by pushing the temperature-adjusting button. (Refer to "Function" section.) Convertible compartment will be set as is recommended to clean the fridge before use . Fridge work mode: Manual adjustment: Set the temperature by the factory. Put the fridge in the future. It is shown. If any are changed, it is first connected to attach accessories. Copy the fridge model number and manufacturer's warranty number for the temperature to adjust. The...
User Guide
Page 12
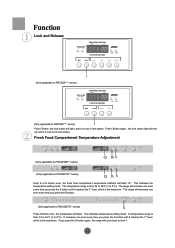
... the maximum. The temperature range is from 34 to 46°F (1 to 8°C). This indicates temperature-setting mode. Lock and Release I (Only applicable to PRCS25**** series) (Only applicable to RRCS25**** series) I Push I Button again , the lock button light will turn off, and it is now not in lock status. It increases one level every time you press the S button again, the range will flash "Q."
... the maximum. The temperature range is from 34 to 46°F (1 to 8°C). This indicates temperature-setting mode. Lock and Release I (Only applicable to PRCS25**** series) (Only applicable to RRCS25**** series) I Push I Button again , the lock button light will turn off, and it is now not in lock status. It increases one level every time you press the S button again, the range will flash "Q."
User Guide
Page 14
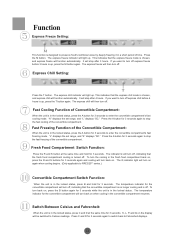
... for 3 seconds. The temperature indicator for 3 seconds to stop after 3 hours. This indicates that the express chill mode is chosen, and express chill will turn the cooling in the convertible compartment resumes. It will light up . Press the A button for 3 seconds again and cooling will turn back on , press the R and S buttons for 3 seconds again to RRCS25** series.) Convertible Compartment Switch Function: When the...
... for 3 seconds. The temperature indicator for 3 seconds to stop after 3 hours. This indicates that the express chill mode is chosen, and express chill will turn the cooling in the convertible compartment resumes. It will light up . Press the A button for 3 seconds again and cooling will turn back on , press the R and S buttons for 3 seconds again to RRCS25** series.) Convertible Compartment Switch Function: When the...
User Guide
Page 15
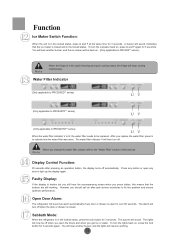
... open the doors and when you replace the water filter, press U to be replaced. A buzzer will resume working . After you get ice or water. When you press button, this manual. To turn off when you should call an after pressing an operation button, the display turns off when the door or drawer is in the locked status. You will hear another buzzer, and the lights will sound, indicating that the water filter was reset. Ice Maker Switch...
... open the doors and when you replace the water filter, press U to be replaced. A buzzer will resume working . After you get ice or water. When you press button, this manual. To turn off when you should call an after pressing an operation button, the display turns off when the door or drawer is in the locked status. You will hear another buzzer, and the lights will sound, indicating that the water filter was reset. Ice Maker Switch...

User Guide
Page 16
... shelf. You can only be used foods should only be taken off after the crisper is removed. When removing the crisper, make it into the refrigerator. This is open. Dismounting the crisper cover Raise the back part of the crisper, and then remove it. When putting the crisper back in the lower part of the crisper up. When you adjust the bins, do not put the dairy bin, the gallon bin...
... shelf. You can only be used foods should only be taken off after the crisper is removed. When removing the crisper, make it into the refrigerator. This is open. Dismounting the crisper cover Raise the back part of the crisper, and then remove it. When putting the crisper back in the lower part of the crisper up. When you adjust the bins, do not put the dairy bin, the gallon bin...
User Guide
Page 17
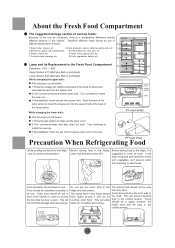
...the time that the door is open. Food should be stored based on the inner line. The stored food should be a space between the inside shelf and the food in different temperature sections. 1.Eggs, butter, cheese, etc 2.Cans, glass jars, spices, ...cooling section. This will prevent freezing food in the fridge, clean food and wipe water off power. 1.Press the stopper pin slightly at the back of the cool air circulation, there is prohibited) While changing the upper bulb: Pull out plug to cut off power. 1.Press the jaw slightly and take out the lamp cover. 2.Turn...
...the time that the door is open. Food should be stored based on the inner line. The stored food should be a space between the inside shelf and the food in different temperature sections. 1.Eggs, butter, cheese, etc 2.Cans, glass jars, spices, ...cooling section. This will prevent freezing food in the fridge, clean food and wipe water off power. 1.Press the stopper pin slightly at the back of the cool air circulation, there is prohibited) While changing the upper bulb: Pull out plug to cut off power. 1.Press the jaw slightly and take out the lamp cover. 2.Turn...
User Guide
Page 18
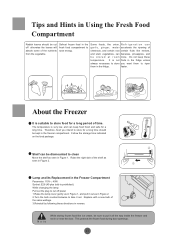
... 2. 2.Turn the bulb counterclockwise to take it all the way inside the freezer and not in or near the door. Lamp and its Replacement in the Freezer Compartment Parameter: 115V~, 40W Socket: E26 (40 plus bulb is not fruits in the fridge unless always necessary to store you intend to clean Move the shelf as seen in Figure 1. faster. Replace with a new bulb of...
... 2. 2.Turn the bulb counterclockwise to take it all the way inside the freezer and not in or near the door. Lamp and its Replacement in the Freezer Compartment Parameter: 115V~, 40W Socket: E26 (40 plus bulb is not fruits in the fridge unless always necessary to store you intend to clean Move the shelf as seen in Figure 1. faster. Replace with a new bulb of...
User Guide
Page 19
... automatic ice making. e.Water supply pipe instruction: The cold water pressure should be assured of icemaker is blocked from the impurities. b.Open water valve to make ice clean and hygienic. After 6 months of packing materials so you change it. Do not put the water supply pipe in a proper place to buy a new filter and change the filter, the indicator light will turn off. e.The filter in the water pipe is clean. At this you have a service engineer install the water pipe...
... automatic ice making. e.Water supply pipe instruction: The cold water pressure should be assured of icemaker is blocked from the impurities. b.Open water valve to make ice clean and hygienic. After 6 months of packing materials so you change it. Do not put the water supply pipe in a proper place to buy a new filter and change the filter, the indicator light will turn off. e.The filter in the water pipe is clean. At this you have a service engineer install the water pipe...
User Guide
Page 20
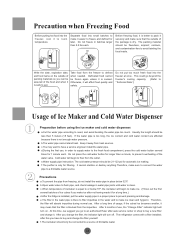
... installing the refrigerator before you may stick together and clog the dispenser. Cubes should dispense normally now. Before putting it back, make 8 ice cubes per cycle. Repeat until the clamp can be fixed in ¼ circle. Usage of Ice Maker and Cold Water Dispenser Working Principle: The ice maker can get stale. If this is considered normal when ice cubes stick together. Then close the valve between the water supply...
... installing the refrigerator before you may stick together and clog the dispenser. Cubes should dispense normally now. Before putting it back, make 8 ice cubes per cycle. Repeat until the clamp can be fixed in ¼ circle. Usage of Ice Maker and Cold Water Dispenser Working Principle: The ice maker can get stale. If this is considered normal when ice cubes stick together. Then close the valve between the water supply...
User Guide
Page 21
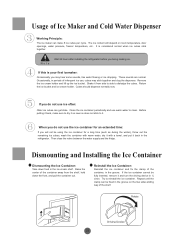
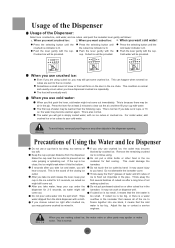
... cooled water, with water. For colder water, add crushed ice or ice cubes to continue using cubed ice, you may be air in the ice outlet for 2-3 seconds, as follows: When you want crushed ice: When you want cold water: Press the selecting button until the crushed ice indicator is lit. Remove the remaining crushed ice to your cup with no ice cubes or crushed ice. Adjust the tap or contact a service...
... cooled water, with water. For colder water, add crushed ice or ice cubes to continue using cubed ice, you may be air in the ice outlet for 2-3 seconds, as follows: When you want crushed ice: When you want cold water: Press the selecting button until the crushed ice indicator is lit. Remove the remaining crushed ice to your cup with no ice cubes or crushed ice. Adjust the tap or contact a service...
User Guide
Page 22
... want to freezer temperatures, remove all of the fridge is prohibited) While changing the lamp: Pull out the plug to cut the power source. 1.Dismantle the cover screw. 2.Press the stopper pin on the fridge with warm water. Changing the Light Bulb Parameter: 115V~, 40W Socket: E17 (40 plus bulb is necessary. This could damage the refrigerator and cause personal injury. 7.Door gaskets often become dirty. Clean them often...
... want to freezer temperatures, remove all of the fridge is prohibited) While changing the lamp: Pull out the plug to cut the power source. 1.Dismantle the cover screw. 2.Press the stopper pin on the fridge with warm water. Changing the Light Bulb Parameter: 115V~, 40W Socket: E17 (40 plus bulb is necessary. This could damage the refrigerator and cause personal injury. 7.Door gaskets often become dirty. Clean them often...
User Guide
Page 23
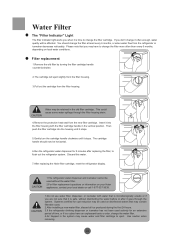
... cartridge handle should change the filter cartridge. Water Filter The "Filter Indicator" Light The filter indicator light alerts you when it goes through the filter housing drain. 4.Remove the protective heat seal from the refrigerator or icemaker decreases noticeably. Please note that it is time to change it stops. This could cause some water spillage through the system. Discard this water. 7.After replacing the Haier filter cartridge, reset the refrigerator display. 1.The refrigerator water dispenser and icemaker cannot be horizontal. 6.Run the refrigerator water dispenser...
... cartridge handle should change the filter cartridge. Water Filter The "Filter Indicator" Light The filter indicator light alerts you when it goes through the filter housing drain. 4.Remove the protective heat seal from the refrigerator or icemaker decreases noticeably. Please note that it is time to change it stops. This could cause some water spillage through the system. Discard this water. 7.After replacing the Haier filter cartridge, reset the refrigerator display. 1.The refrigerator water dispenser and icemaker cannot be horizontal. 6.Run the refrigerator water dispenser...
User Guide
Page 26
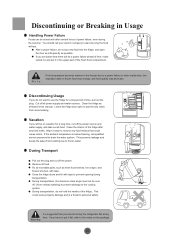
... vertical standing) to prevent damage to use the fridge for a long time, cut off the power. Close the fridge doors and fix with tape. After a power failure, do not hold the handle of the fresh food compartment. During Transport Pull out the plug and cut off all moveable parts, such as fresh food shelves, the crisper, and freezer shelves, with tape to ask how...
... vertical standing) to prevent damage to use the fridge for a long time, cut off the power. Close the fridge doors and fix with tape. After a power failure, do not hold the handle of the fresh food compartment. During Transport Pull out the plug and cut off all moveable parts, such as fresh food shelves, the crisper, and freezer shelves, with tape to ask how...


