
User Manual
Page 6
Important: Test power plug before further use of the device . Do not use . Press ìresetî button again for use if above test fail. In the event this device trips , the cause of the malfunction is to be corrected before each use: 1. Press ìreset ìbutton. 2 . Press ìtest ìbutton, unit should trip. 3.
Important: Test power plug before further use of the device . Do not use . Press ìresetî button again for use if above test fail. In the event this device trips , the cause of the malfunction is to be corrected before each use: 1. Press ìreset ìbutton. 2 . Press ìtest ìbutton, unit should trip. 3.
User Manual
Page 11
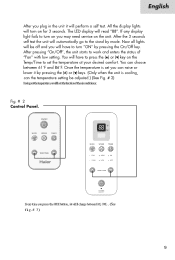
Having set the temperature you press the MODE button, it will set the function of the air conditioner. Every time you will change between FAN, COOL . (See fig.# 3)
Having set the temperature you press the MODE button, it will set the function of the air conditioner. Every time you will change between FAN, COOL . (See fig.# 3)
User Manual
Page 12
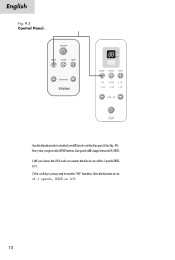
Here the fan runs at one of 2 speeds, HIGH or LOW. Once the function mode is decided you will have to set the fan speed.(See fig. #4) Every time you press the SPEED button, fan speed will change between LOW, HIGH. 1) If you choose the COOL mode you may want to run the fan in one of the 2 speeds HIGH, LOW. 2) For cool days you can run the "FAN" function.
Here the fan runs at one of 2 speeds, HIGH or LOW. Once the function mode is decided you will have to set the fan speed.(See fig. #4) Every time you press the SPEED button, fan speed will change between LOW, HIGH. 1) If you choose the COOL mode you may want to run the fan in one of the 2 speeds HIGH, LOW. 2) For cool days you can run the "FAN" function.
User Manual
Page 15
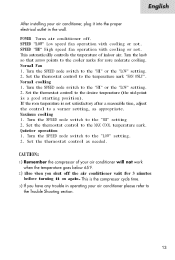
..." setting 2. POWER Turns air conditioner off the air conditioner wait for more moderate cooling. Set the thermostat control to the MAX COOL temperature mark. CAUTION: 1 2 Also when you shut off . Turn the SPEED mode switch to the "HI" or the "LOW" setting. 2. Set the thermostat control as appropriate. Turn the SPEED mode switch to the "HI" or the "LOW" setting. 2. Maximum cooling 1. Turn the SPEED mode switch to the temperature mark "FAN ONLY". Normal cooling 1. If the room temperature is a good starting position). Set the thermostat control...
..." setting 2. POWER Turns air conditioner off the air conditioner wait for more moderate cooling. Set the thermostat control to the MAX COOL temperature mark. CAUTION: 1 2 Also when you shut off . Turn the SPEED mode switch to the "HI" or the "LOW" setting. 2. Set the thermostat control as appropriate. Turn the SPEED mode switch to the "HI" or the "LOW" setting. 2. Maximum cooling 1. Turn the SPEED mode switch to the temperature mark "FAN ONLY". Normal cooling 1. If the room temperature is a good starting position). Set the thermostat control...
User Manual
Page 18
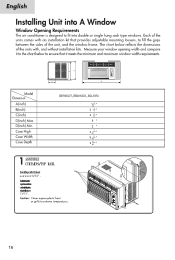
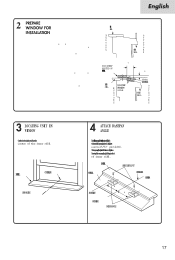
Inserthseidceurtainisnttohe topandbottomrailsoftheair conditionerF.astetnhceurtains totheunitwit8shhortscrews 13/32". HWF06XC5,HWR06XC6,ESA3056 5523 21 3 5 31 3 8 83 2 21 7 61 81 9 61 41 11 61 ASSEMBLE CURTAINS/TOP RAIL Install top rail with 3 short screws13/32".
Inserthseidceurtainisnttohe topandbottomrailsoftheair conditionerF.astetnhceurtains totheunitwit8shhortscrews 13/32". HWF06XC5,HWR06XC6,ESA3056 5523 21 3 5 31 3 8 83 2 21 7 61 81 9 61 41 11 61 ASSEMBLE CURTAINS/TOP RAIL Install top rail with 3 short screws13/32".
User Manual
Page 19
.../32" OUTERSILL CENTERLINE INSIDE SHORTSIDE OUTSIDE BASEPAN ANGLE CENTERLINE INNERSILL INDOOR SIDE INER SILL I N D O O R S O U T D O O OUTER R SILL S WOOD STRIP MOUNTED ON TOIPFNNESRILL INNER SILL WOOD STRIP I FORBASEPAN N ANGLE D O O R S STORM WINDOWFRAME O U T OUTER D SILL O O R S ATTACH BASEPAN ANGLE Instaltlhbeasepaannglbeehintdhiennewrindoswillw,ith theshortsideofbasepanangleashown.Usethe2short screws13/32" provided. Thebasepananglehelpstoholdunitsecurelyinplace. 2 LOCATING UNIT IN WINDOW Openthewindowandmarkcenterlineonthe center of inner...
.../32" OUTERSILL CENTERLINE INSIDE SHORTSIDE OUTSIDE BASEPAN ANGLE CENTERLINE INNERSILL INDOOR SIDE INER SILL I N D O O R S O U T D O O OUTER R SILL S WOOD STRIP MOUNTED ON TOIPFNNESRILL INNER SILL WOOD STRIP I FORBASEPAN N ANGLE D O O R S STORM WINDOWFRAME O U T OUTER D SILL O O R S ATTACH BASEPAN ANGLE Instaltlhbeasepaannglbeehintdhiennewrindoswillw,ith theshortsideofbasepanangleashown.Usethe2short screws13/32" provided. Thebasepananglehelpstoholdunitsecurelyinplace. 2 LOCATING UNIT IN WINDOW Openthewindowandmarkcenterlineonthe center of inner...
User Manual
Page 20
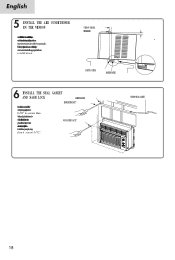
... widthS.tuftfhseassheabletweetnhe glassandthewindowtopreventair anidnsectfsrogmettinigntohreoom. WOOD SCREW31/32" WINDOW SEAL GASKET WINDOW FRAME UPPER GUIDE BOTTOM GUIDE BASEPAN ANGLE INSTALL THE SEAL GASKET AND SASH LOCK BASEPAN ANGLE SHORT SCREW13/32" Extendthesidecurtainstofillthe windowopeningusingw4oodscrews 31/32" to secure them. Fastenthebasepanangle,usinga short screw13/32". INSTALL THE AIR CONDITIONER IN THE WINDOW Carefullyifthaeicronditionearnsdlidietntohoepen window.Makesurethebottomguideoftheairconditioner drops into the notches of the basepan...
... widthS.tuftfhseassheabletweetnhe glassandthewindowtopreventair anidnsectfsrogmettinigntohreoom. WOOD SCREW31/32" WINDOW SEAL GASKET WINDOW FRAME UPPER GUIDE BOTTOM GUIDE BASEPAN ANGLE INSTALL THE SEAL GASKET AND SASH LOCK BASEPAN ANGLE SHORT SCREW13/32" Extendthesidecurtainstofillthe windowopeningusingw4oodscrews 31/32" to secure them. Fastenthebasepanangle,usinga short screw13/32". INSTALL THE AIR CONDITIONER IN THE WINDOW Carefullyifthaeicronditionearnsdlidietntohoepen window.Makesurethebottomguideoftheairconditioner drops into the notches of the basepan...
User Manual
Page 21
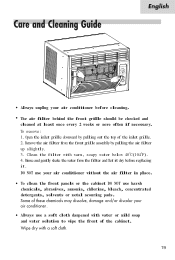
To remove: 1. Clean the filter with water or mild soap and water solution to wipe the front of the inlet grille. 2. Open the inlet grille downward by pulling the air filter up slightly. 3. Rinse and gently shake the water from the front grille assembly by pulling out the top of the cabinet. To clean the front panels or the cabinet DO NOT use your air conditioner before replacing it...
To remove: 1. Clean the filter with water or mild soap and water solution to wipe the front of the inlet grille. 2. Open the inlet grille downward by pulling the air filter up slightly. 3. Rinse and gently shake the water from the front grille assembly by pulling out the top of the cabinet. To clean the front panels or the cabinet DO NOT use your air conditioner before replacing it...


