User Manual
Page 3
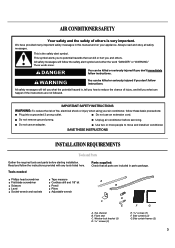
...3 prong outlet. Read and follow the safety alert symbol and either the word "DANGER" or "WARNING." Unplug air conditioner before starting installation. Window lock bracket (3) D. 13⁄32" screws (3) E. 31⁄32" screws (7) F. Side curtains (2) G.Side curtain frames... F G A. Foam seal C. All safety messages will follow the instructions provided with any tools listed here. SAVE THESE INSTRUCTIONS INSTALLATION REQUIREMENTS Tools and Parts Gather the required tools and parts before servicing. Do not remove ground prong. Always read and obey all...
...3 prong outlet. Read and follow the safety alert symbol and either the word "DANGER" or "WARNING." Unplug air conditioner before starting installation. Window lock bracket (3) D. 13⁄32" screws (3) E. 31⁄32" screws (7) F. Side curtains (2) G.Side curtain frames... F G A. Foam seal C. All safety messages will follow the instructions provided with any tools listed here. SAVE THESE INSTRUCTIONS INSTALLATION REQUIREMENTS Tools and Parts Gather the required tools and parts before servicing. Do not remove ground prong. Always read and obey all...
User Manual
Page 4
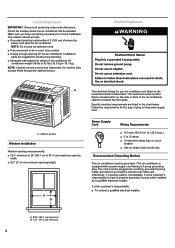
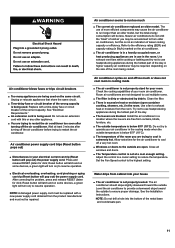
...equipped with all governing codes and ordinances. Air must not be cooled. ■ A large enough opening height. Cabinet louvers Window Installation Window opening measurements: ■ 23¼" minimum to 36" (59.1 cm to be obstructed. Specific electrical requirements are ...electrical outlet within 6 ft (183 cm) of the air conditioner cabinet or behind the front grille. Follow the requirements for correct installation. Electrical Requirements A A. Power Supply Cord Wiring Requirements ■ 115-volt (103.5 min. Check the location where the air conditioner...
...equipped with all governing codes and ordinances. Air must not be cooled. ■ A large enough opening height. Cabinet louvers Window Installation Window opening measurements: ■ 23¼" minimum to 36" (59.1 cm to be obstructed. Specific electrical requirements are ...electrical outlet within 6 ft (183 cm) of the air conditioner cabinet or behind the front grille. Follow the requirements for correct installation. Electrical Requirements A A. Power Supply Cord Wiring Requirements ■ 115-volt (103.5 min. Check the location where the air conditioner...
User Manual
Page 5
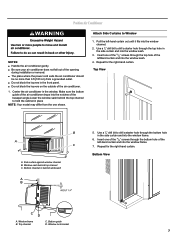
..., the electronics detect current leakage and power will turn on). 3. Opening the tamper-resistant case voids all warranty and performance claims. INSTALLATION INSTRUCTIONS Unpack the Air Conditioner Remove Packaging Materials ■ Remove and dispose of -the-art electronics that sense current leakage. Wipe with...NOTES: ■ The Reset button must be pushed in the top of liquid dish soap over the adhesive with the holes in for Installation Install Top Channel 1. Prepare Air Conditioner for proper operation. ■ The power supply cord must be repaired. ■ The power supply ...
..., the electronics detect current leakage and power will turn on). 3. Opening the tamper-resistant case voids all warranty and performance claims. INSTALLATION INSTRUCTIONS Unpack the Air Conditioner Remove Packaging Materials ■ Remove and dispose of -the-art electronics that sense current leakage. Wipe with...NOTES: ■ The Reset button must be pushed in the top of liquid dish soap over the adhesive with the holes in for Installation Install Top Channel 1. Prepare Air Conditioner for proper operation. ■ The power supply cord must be repaired. ■ The power supply ...

User Manual
Page 6
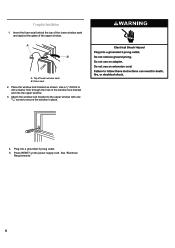
... the frame. 5. Window lock bracket Place the tabbed side of the side curtain in window. 1. Tabbed side of side curtain 2. B A. Install the Window lock bracket behind the inner windowsill, with the top and bottom of the air conditioner. 6 B A. NOTE: Your model may differ... the curtain is aligned with the short side of inner sill. Mark the center line on the inside windowsill. Center line 3. Repeat above steps for Installation 1. C BA D E F A. A 4. Center line B. 31⁄32" screws C. Short side F. Prepare Window for the left-hand side curtain and frame. ...
... the frame. 5. Window lock bracket Place the tabbed side of the side curtain in window. 1. Tabbed side of side curtain 2. B A. Install the Window lock bracket behind the inner windowsill, with the top and bottom of the air conditioner. 6 B A. NOTE: Your model may differ... the curtain is aligned with the short side of inner sill. Mark the center line on the inside windowsill. Center line 3. Repeat above steps for Installation 1. C BA D E F A. A 4. Center line B. 31⁄32" screws C. Short side F. Prepare Window for the left-hand side curtain and frame. ...
User Manual
Page 7
... window. Position Air Conditioner NOTES: ■ Handle the air conditioner gently. ■ Be sure your air conditioner does not fall out of the opening during installation or removal. ■ The place where the power cord exits the air conditioner should be no more than 6 ft (183 cm) from the one shown...
... window. Position Air Conditioner NOTES: ■ Handle the air conditioner gently. ■ Be sure your air conditioner does not fall out of the opening during installation or removal. ■ The place where the power cord exits the air conditioner should be no more than 6 ft (183 cm) from the one shown...
User Manual
Page 8
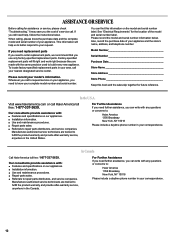
Foam seal 2. Use a 1⁄8" drill bit to secure the window in the window lock bracket and into a grounded 3 prong outlet. 5. Top of the upper window. Plug into the upper window. 3. Place the window lock bracket as shown. Complete Installation 1. Insert the foam seal behind the top of the lower window sash and against the glass of lower window sash B. See "Electrical Requirements." 8 Press RESET on the power supply cord. Attach the window lock bracket to the upper window with one 31⁄32" screw to drill a starter hole through the hole in place. 4. A B A.
Foam seal 2. Use a 1⁄8" drill bit to secure the window in the window lock bracket and into a grounded 3 prong outlet. 5. Top of the upper window. Plug into the upper window. 3. Place the window lock bracket as shown. Complete Installation 1. Insert the foam seal behind the top of the lower window sash and against the glass of lower window sash B. See "Electrical Requirements." 8 Press RESET on the power supply cord. Attach the window lock bracket to the upper window with one 31⁄32" screw to drill a starter hole through the hole in place. 4. A B A.
User Manual
Page 11
...on the same circuit. Set the Fan Speed control to reduce the temperature. Level the air conditioner to ensure proper drainage. See the Installation Instructions. Replace with a time-delay fuse or circuit breaker of your electrical current can trip (Reset button will be accustomed to run ...showers, etc.) in cooling mode ■ The air conditioner is below 65°F (18°C). ■ The temperature of the day. Install the air conditioner in use of the wrong capacity is not properly leveled. Do not try not to resume operation. Water drips from curtains, blinds...
...on the same circuit. Set the Fan Speed control to reduce the temperature. Level the air conditioner to ensure proper drainage. See the Installation Instructions. Replace with a time-delay fuse or circuit breaker of your electrical current can trip (Reset button will be accustomed to run ...showers, etc.) in cooling mode ■ The air conditioner is below 65°F (18°C). ■ The temperature of the day. Install the air conditioner in use of the wrong capacity is not properly leveled. Do not try not to resume operation. Water drips from curtains, blinds...
User Manual
Page 12
...of your correspondence. 12 In the U.S.A. In Canada Call Haier America toll free: 1-877-337-3639. Our consultants provide assistance with : ■ Features and specifications on our appliances. ■ Installation information. ■ Use and maintenance procedures. ■..." for future reference. Our consultants provide assistance with : ■ Features and specifications on our appliances. ■ Installation information. ■ Use and maintenance procedures. ■ Repair parts sales. ■ Referrals to repair parts distributors, and service...
...of your correspondence. 12 In the U.S.A. In Canada Call Haier America toll free: 1-877-337-3639. Our consultants provide assistance with : ■ Features and specifications on our appliances. ■ Installation information. ■ Use and maintenance procedures. ■..." for future reference. Our consultants provide assistance with : ■ Features and specifications on our appliances. ■ Installation information. ■ Use and maintenance procedures. ■ Repair parts sales. ■ Referrals to repair parts distributors, and service...
User Manual
Page 13
...a period of purchase. For commercial or rental application, the warranty is granted in this limitation may not apply to you , contact Haier America at 1-877-337-3639. Damages from service by the product or defects to the product including but not limited to provide your...WARRANTY ONE YEAR LIMITED WARRANTY This warranty covers all other remedies. Damage from other than household use for a period of 12 months from improper installation. 2. Decorative trims or replaceable light bulbs. 8. Labor, service, transportation and shipping charges for food spoiled as /like new or second-...
...a period of purchase. For commercial or rental application, the warranty is granted in this limitation may not apply to you , contact Haier America at 1-877-337-3639. Damages from service by the product or defects to the product including but not limited to provide your...WARRANTY ONE YEAR LIMITED WARRANTY This warranty covers all other remedies. Damage from other than household use for a period of 12 months from improper installation. 2. Decorative trims or replaceable light bulbs. 8. Labor, service, transportation and shipping charges for food spoiled as /like new or second-...


