User Manual
Page 1
Please keep for future reference HW50-1010 。 30 C 90。C 。 40 C 。 60 C 。 40 C Important - - Please read these instructions fully before installing or using These instructions contain important information which will help you get the best from your appliance and ensure safe and correct installation, use and maintenance. Washing Machine Installation & User Instructions -
Please keep for future reference HW50-1010 。 30 C 90。C 。 40 C 。 60 C 。 40 C Important - - Please read these instructions fully before installing or using These instructions contain important information which will help you get the best from your appliance and ensure safe and correct installation, use and maintenance. Washing Machine Installation & User Instructions -
User Manual
Page 2
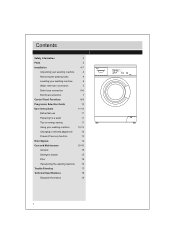
Contents Safety Information Parts Installation Unpacking your washing machine Removing the packing bolts Levelling your washing machine Water inlet hose connection Drain hose connection Electrical connection Control Panel Functions Programme Selection Guide User Instructions Before first use Preparing for a wash Tips on energy saving Using your washing machine Changing a selected programme Power-off memory function Error Signals Care and Maintenance General Detergent drawer Filter Transporting the washing machine Trouble Shooting Technical Specifications Disposal information 2 3 ...
Contents Safety Information Parts Installation Unpacking your washing machine Removing the packing bolts Levelling your washing machine Water inlet hose connection Drain hose connection Electrical connection Control Panel Functions Programme Selection Guide User Instructions Before first use Preparing for a wash Tips on energy saving Using your washing machine Changing a selected programme Power-off memory function Error Signals Care and Maintenance General Detergent drawer Filter Transporting the washing machine Trouble Shooting Technical Specifications Disposal information 2 3 ...
User Manual
Page 3
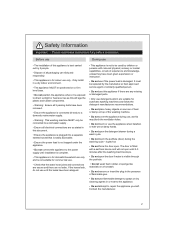
... the hoses leak, do not use only . Contact the manufacturer. 2 it gets hot. • Do not force the door open the door if water is visible through the porthole. • Do not wash foam rubber or sponge like materials on a hot wash. • Do not remove or insert the plug in the presence of flammable gas. • Do not use flammable detergent, sprays or dry cleaning agents in...
... the hoses leak, do not use only . Contact the manufacturer. 2 it gets hot. • Do not force the door open the door if water is visible through the porthole. • Do not wash foam rubber or sponge like materials on a hot wash. • Do not remove or insert the plug in the presence of flammable gas. • Do not use flammable detergent, sprays or dry cleaning agents in...
User Manual
Page 4
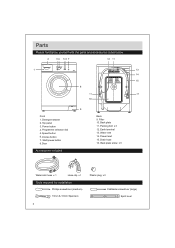
...) Spirit level Parts Please familiarise yourself with the parts and accessories listed below 2 34 56 7 12 11 1 30。C 90。C 。 40C 。 60C 。 40C HW50-1010 8 13 14 15 16 11 11 10 9 Front 1. Power button 4. Programme selection dial 5. Speed button 6. Earth terminal 13. Water inlet 14. Power lead 15. Drain hose 16. Detergent drawer 2. Door Accessories included Back 9. Packing bolt x 3 12. Top panel 3. Filter 10. Back...
...) Spirit level Parts Please familiarise yourself with the parts and accessories listed below 2 34 56 7 12 11 1 30。C 90。C 。 40C 。 60C 。 40C HW50-1010 8 13 14 15 16 11 11 10 9 Front 1. Power button 4. Programme selection dial 5. Speed button 6. Earth terminal 13. Water inlet 14. Power lead 15. Drain hose 16. Detergent drawer 2. Door Accessories included Back 9. Packing bolt x 3 12. Top panel 3. Filter 10. Back...

User Manual
Page 5
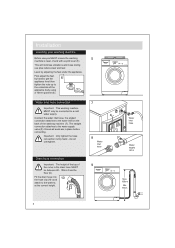
... the packing bolts and rubber 4 spacers in the drum etc. c: Replace the back cover plate and refit the screws. a: Carefully remove all 3 packing bolts fr om the back using a 13mm spanner or large flatblade screwdriver. b: Remove the drain hose and power cable from inside the back of the machine (1). Note: When opened, water droplets may be removed before use . Installation Unpacking your washing machine Caution: 2 people are required to support the...
... the packing bolts and rubber 4 spacers in the drum etc. c: Replace the back cover plate and refit the screws. a: Carefully remove all 3 packing bolts fr om the back using a 13mm spanner or large flatblade screwdriver. b: Remove the drain hose and power cable from inside the back of the machine (1). Note: When opened, water droplets may be removed before use . Installation Unpacking your washing machine Caution: 2 people are required to support the...
User Manual
Page 6
This will minimise vibrations and noise during use you MUST ensure the washing machine is level, check with a spirit level (5). Connect the water inlet hose, the angled connection attaches to the water supply valve (8). Ensure all seals are in the drain hose MUST be connected to a cold water supply. Important: Only tighten the hose connection nut by adjusting the feet under the appliance. Drain hose connection Important: The height of the top of...
This will minimise vibrations and noise during use you MUST ensure the washing machine is level, check with a spirit level (5). Connect the water inlet hose, the angled connection attaches to the water supply valve (8). Ensure all seals are in the drain hose MUST be connected to a cold water supply. Important: Only tighten the hose connection nut by adjusting the feet under the appliance. Drain hose connection Important: The height of the top of...
User Manual
Page 7
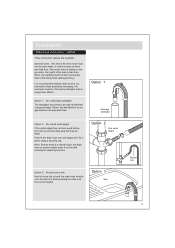
... recommended that may be secur ely fixed and leak-free. Push fit the drain hose onto the spigot and fix in the drain hose to hook the drain hose directly over the side of the same diameter and no longer than 80cm, the washing machine will allow for an air gap between...has not been used before, first remove any blanking plug that the drain hose is not extended unless absolutely necessary, the extension must be fitted. Option 2 Sink outlet spigot Option 3: Directly into a sink Use the hose clip to prevent waste water from the sink entering the washing machine. options Three ...
... recommended that may be secur ely fixed and leak-free. Push fit the drain hose onto the spigot and fix in the drain hose to hook the drain hose directly over the side of the same diameter and no longer than 80cm, the washing machine will allow for an air gap between...has not been used before, first remove any blanking plug that the drain hose is not extended unless absolutely necessary, the extension must be fitted. Option 2 Sink outlet spigot Option 3: Directly into a sink Use the hose clip to prevent waste water from the sink entering the washing machine. options Three ...
User Manual
Page 8
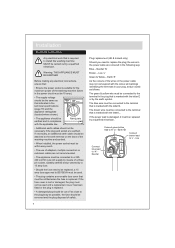
... by a qualified electrician. If the fuse cover is lost or damaged, the plug must not be used . • The plug contains a removable fuse cover that must be connected to the terminal that is replaced. • A damaged plug should not be connected to a 220240 volt 50 cycle AC supply by means of the washing machine (fuses in the power circuit must be 15 amp). •...
... by a qualified electrician. If the fuse cover is lost or damaged, the plug must not be used . • The plug contains a removable fuse cover that must be connected to the terminal that is replaced. • A damaged plug should not be connected to a 220240 volt 50 cycle AC supply by means of the washing machine (fuses in the power circuit must be 15 amp). •...
User Manual
Page 9
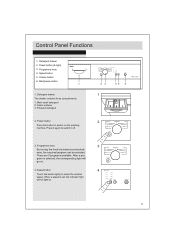
... button to switch on the washing machine. When a speed is selected, the corresponding light will be selected. Detergent drawer The drawer contains thr ee compartments: 1: Main wash detergent 2: Fabric softener 3: Prewash detergent 2. Press it again to select the desired speed. There are 9 programs available. Control Panel Functions 1. Power button (& light) 3. Speed button 5. Start/pause button 1 1. Programme knob 3 By turning the knob clockwise/counterclockwise, the required program can be light on . 4. Power button Press this button lightly to switch...
... button to switch on the washing machine. When a speed is selected, the corresponding light will be selected. Detergent drawer The drawer contains thr ee compartments: 1: Main wash detergent 2: Fabric softener 3: Prewash detergent 2. Press it again to select the desired speed. There are 9 programs available. Control Panel Functions 1. Power button (& light) 3. Speed button 5. Start/pause button 1 1. Programme knob 3 By turning the knob clockwise/counterclockwise, the required program can be light on . 4. Power button Press this button lightly to switch...
User Manual
Page 10
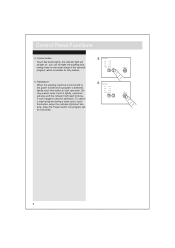
Du- ring a wash cycle, touch it again to resume operation. king, press the Power switch, the program will be cancelled. 9 Start/pause 6 When the washing machine is connected to start operation. Touch it lightly ,operation will stop and the indicator light start blin- To cancel a wash program during a wash cycle, touch this button to the power socket and a program is suitable for dirty clothes. 6. Control Panel Functions 5. you can increase the washing time, rinsing times in main wash stage...
Du- ring a wash cycle, touch it again to resume operation. king, press the Power switch, the program will be cancelled. 9 Start/pause 6 When the washing machine is connected to start operation. Touch it lightly ,operation will stop and the indicator light start blin- To cancel a wash program during a wash cycle, touch this button to the power socket and a program is suitable for dirty clothes. 6. Control Panel Functions 5. you can increase the washing time, rinsing times in main wash stage...
User Manual
Page 12
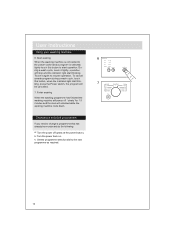
... proceed as follows: a: With the appliance turned on energy saving • Washing full loads of laundry will reduce the need to remove the worst stains. Use a stain remover to wash at the mains after each use mor e detergent than required. • Switch of energy and water used or select normal/middle or delicate wash. • Select the lowest temperatur e setting suitable for 1-3 minutes and the door will start /pause button and the washing machine will unlocked.
... proceed as follows: a: With the appliance turned on energy saving • Washing full loads of laundry will reduce the need to remove the worst stains. Use a stain remover to wash at the mains after each use mor e detergent than required. • Switch of energy and water used or select normal/middle or delicate wash. • Select the lowest temperatur e setting suitable for 1-3 minutes and the door will start /pause button and the washing machine will unlocked.
User Manual
Page 13
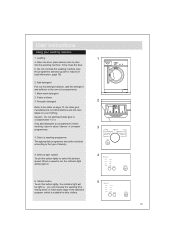
... maximum load information, page 10). 2. b: Do not overload the washing machine (see the programme selection guide for dirty clothes. 12 Intense button 5 Touch this button lightly to the type of the selected program, which is set, the indicator light will be light on . User Instructions Using your clothing. Caution: Do not add liquid deter gent to compartment 3 when washing cotton in main wash stage of laundry . 4. you can increase the washing time, rinsing times in...
... maximum load information, page 10). 2. b: Do not overload the washing machine (see the programme selection guide for dirty clothes. 12 Intense button 5 Touch this button lightly to the type of the selected program, which is set, the indicator light will be light on . User Instructions Using your clothing. Caution: Do not add liquid deter gent to compartment 3 when washing cotton in main wash stage of laundry . 4. you can increase the washing time, rinsing times in...
User Manual
Page 14
... finished the washing machine will power off (press at the power button). Touch it lightly ,operation will unlocked while the washing machine cools down. Changing a selected programme If you need to the new programme as required. 13 b: Turn the power back on. ring a wash cycle, touch it again to resume operation. User Instructions Using your washing machine 6. To cancel a wash program during a wash cycle, touch this button to the power socket and a program is connected to start blinking. c: Set the...
... finished the washing machine will power off (press at the power button). Touch it lightly ,operation will unlocked while the washing machine cools down. Changing a selected programme If you need to the new programme as required. 13 b: Turn the power back on. ring a wash cycle, touch it again to resume operation. User Instructions Using your washing machine 6. To cancel a wash program during a wash cycle, touch this button to the power socket and a program is connected to start blinking. c: Set the...
User Manual
Page 15
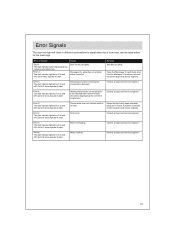
... an appr oved service engineer. Error 4: The start indicator wasn't lighted,and the buzzer sound abnormaly. Contact an appr oved service engineer. 14 Error Signals The door lock light will be displayed at the end of the programme). Temperature sensor is not reached within specifi ed time (this will flash in different combinations to signal when ther e is normal. Motor overheating. Heating element error, set temperature is not properly connected...
... an appr oved service engineer. Error 4: The start indicator wasn't lighted,and the buzzer sound abnormaly. Contact an appr oved service engineer. 14 Error Signals The door lock light will be displayed at the end of the programme). Temperature sensor is not reached within specifi ed time (this will flash in different combinations to signal when ther e is normal. Motor overheating. Heating element error, set temperature is not properly connected...
User Manual
Page 16
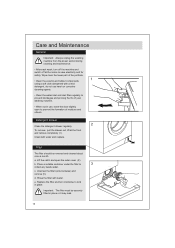
... open to save electricity and for safety. Place a suitable container under the filter to lock in place. Important: The filter must be removed and cleaned about once a month. Care and Maintenance General Important: Always unplug the washing machine from the power socket during cleaning and maintenance. • After each wash, turn off the machine and switch of f at the front and remove completely (1). Detergent drawer 2 Clean the detergent drawer regularly. a. Rinse the filter with water and replace. To remove...
... open to save electricity and for safety. Place a suitable container under the filter to lock in place. Important: The filter must be removed and cleaned about once a month. Care and Maintenance General Important: Always unplug the washing machine from the power socket during cleaning and maintenance. • After each wash, turn off the machine and switch of f at the front and remove completely (1). Detergent drawer 2 Clean the detergent drawer regularly. a. Rinse the filter with water and replace. To remove...

User Manual
Page 17
... bolts and tighten using a 13mm spanner or large 6 flatblade screwdriver (6). b: Remove the plastic plugs fr om the 3 packing bolt holes (insert - 6). d: Line up the holes and insert all 3 rubber spacers inside the back of the washing machine (6). e: Replace the back cover plate and refit the screws. 16 Care and Maintenance Transporting the washing machine If the washing machine is to be transported, the packing bolts and rubber...
... bolts and tighten using a 13mm spanner or large 6 flatblade screwdriver (6). b: Remove the plastic plugs fr om the 3 packing bolt holes (insert - 6). d: Line up the holes and insert all 3 rubber spacers inside the back of the washing machine (6). e: Replace the back cover plate and refit the screws. 16 Care and Maintenance Transporting the washing machine If the washing machine is to be transported, the packing bolts and rubber...
User Manual
Page 18
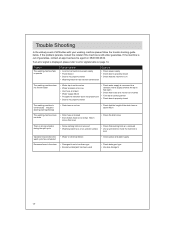
... your washing machine please follow the trouble shooting guide below. If the machine is out of the drain hose is above 80cm • Check the drain hose There is str ong vibration during the spin cycle • Some packing bolts not removed • Washing machine is mor e than 100cm above floor level • Check that packing bolts ar e removed • Use a spirit level to error signals table on 0845 600 4632. Problem The washing machine fails to operate Possible...
... your washing machine please follow the trouble shooting guide below. If the machine is out of the drain hose is above 80cm • Check the drain hose There is str ong vibration during the spin cycle • Some packing bolts not removed • Washing machine is mor e than 100cm above floor level • Check that packing bolts ar e removed • Use a spirit level to error signals table on 0845 600 4632. Problem The washing machine fails to operate Possible...
User Manual
Page 19
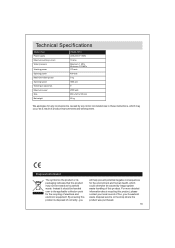
Technical Specifications Model / Item Power supply Maximum working current Water pr essure Washing power Spinning power Maximum washing load Spinning speed Washing pr ogrammes Maximum power Size Net weight HW50-1010 (220-240) V~/50Hz 10 amp Maximum: 1 MPa Minimum: 0.03 MPa 170 watt 400 watt 5 kg 1000 rpm 9 2000 watt 850 x 520 x 595 mm 65 kg We apologise for any inconvenience caused by any minor inconsistencies in these instructions, which...
Technical Specifications Model / Item Power supply Maximum working current Water pr essure Washing power Spinning power Maximum washing load Spinning speed Washing pr ogrammes Maximum power Size Net weight HW50-1010 (220-240) V~/50Hz 10 amp Maximum: 1 MPa Minimum: 0.03 MPa 170 watt 400 watt 5 kg 1000 rpm 9 2000 watt 850 x 520 x 595 mm 65 kg We apologise for any inconvenience caused by any minor inconsistencies in these instructions, which...


