

Product Manual
Page 4
English Table Of Contents PAGE Safety Precautions 1-2 Unpacking 4 Parts and Features 5 Freezer Installation 6 Electrical Connections 7 Operating Your Freezer 8-11 Normal Operating Sounds 11 Proper Care and Cleaning 12 Frost-Free 13 Extended Non-Use and Moving 13 Troubleshooting Guide 14 Warranty 15 3
English Table Of Contents PAGE Safety Precautions 1-2 Unpacking 4 Parts and Features 5 Freezer Installation 6 Electrical Connections 7 Operating Your Freezer 8-11 Normal Operating Sounds 11 Proper Care and Cleaning 12 Frost-Free 13 Extended Non-Use and Moving 13 Troubleshooting Guide 14 Warranty 15 3
Product Manual
Page 6
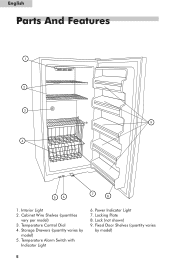
Fixed Door Shelves (quantity varies by model) 5. Power Indicator Light 7. Cabinet Wire Shelves (quantities vary per model) 3. Interior Light 2. Locking Plate 8. Temperature Control Dial 4. Lock (not shown) 9. Storage Drawers (quantity varies by model) 5 English Parts And Features 1 2 3 9 4 56 7 8 1. Temperature Alarm Switch with Indicator Light 6.
Fixed Door Shelves (quantity varies by model) 5. Power Indicator Light 7. Cabinet Wire Shelves (quantities vary per model) 3. Interior Light 2. Locking Plate 8. Temperature Control Dial 4. Lock (not shown) 9. Storage Drawers (quantity varies by model) 5 English Parts And Features 1 2 3 9 4 56 7 8 1. Temperature Alarm Switch with Indicator Light 6.
Product Manual
Page 13
... cleaner with a solution of warm water and baking soda (2 tablespoons of baking soda to clean any part of the compressor com- Note: Do not attempt to "1", unplug the freezer and remove all frozen items from the shelves. Cleaning the Interior Clean the inside with a brush attachment... Turn the temperature control dial to "1" and unplug the freezer before cleaning. • Carefully slide the freezer away from the back of the freezer and the outside of the freezer. Turn the temperature control dial to clean inside the freezer or damage the protective coating on the shelves. 12 Use...
... cleaner with a solution of warm water and baking soda (2 tablespoons of baking soda to clean any part of the compressor com- Note: Do not attempt to "1", unplug the freezer and remove all frozen items from the shelves. Cleaning the Interior Clean the inside with a brush attachment... Turn the temperature control dial to "1" and unplug the freezer before cleaning. • Carefully slide the freezer away from the back of the freezer and the outside of the freezer. Turn the temperature control dial to clean inside the freezer or damage the protective coating on the shelves. 12 Use...
Product Manual
Page 16
... condenser and evaporator from state to be no charge to the authorized service center before warranty repairs are covered in only) 90 days parts No other than manufacturing. What will repair or replace, at our discretion any covered items during the warranty period so specified. 3. Damage... 12 months parts 5 years sealed system The warranty commences on the date the item was purchased and the original purchase receipt must be done? 1. Defects other warranty applies What is granted in shipping. There will not be presented to the purchaser for how long? Haier America New ...
... condenser and evaporator from state to be no charge to the authorized service center before warranty repairs are covered in only) 90 days parts No other than manufacturing. What will repair or replace, at our discretion any covered items during the warranty period so specified. 3. Damage... 12 months parts 5 years sealed system The warranty commences on the date the item was purchased and the original purchase receipt must be done? 1. Defects other warranty applies What is granted in shipping. There will not be presented to the purchaser for how long? Haier America New ...


