User Manual
Page 2
... 5-6 Door removal 7-8 Setting up the Refrigerator/Freezer Combi 9 Start-up 10 Digital display operation 11-13 Notes on the refrigerator compartment Refrigerator compartment 14-16 Notes on refrigeration 17 Tips on refrigeration 18 Notes on the freezer compartment Freezer compartment 19 Notes on freezing 20 Defrosting Cleaning Inoperation Defrosting 21 Cleaning 21 Inoperation 22-23 Troubleshooting & Customer Service Troubleshooting 24-25 Customer service 26-27 Before start-up, be sure to read the User's Guide. Keep...
... 5-6 Door removal 7-8 Setting up the Refrigerator/Freezer Combi 9 Start-up 10 Digital display operation 11-13 Notes on the refrigerator compartment Refrigerator compartment 14-16 Notes on refrigeration 17 Tips on refrigeration 18 Notes on the freezer compartment Freezer compartment 19 Notes on freezing 20 Defrosting Cleaning Inoperation Defrosting 21 Cleaning 21 Inoperation 22-23 Troubleshooting & Customer Service Troubleshooting 24-25 Customer service 26-27 Before start-up, be sure to read the User's Guide. Keep...

User Manual
Page 3
.... To prevent damage to handling household appliances. Components Freezer Light Shelves Ice tray Bottle rack Freezer drawers Refrigerator compartment Bottle cover Light Shelves Bottle rack Veggie drawer cover Veggie drawer Note The power plug must be covered or blocked. In case of the refrigerant circuit is damaged. Check the appliance for damages sustained during transportation. Make sure that you can accept our right to change their customer service or an equally qualified person...
.... To prevent damage to handling household appliances. Components Freezer Light Shelves Ice tray Bottle rack Freezer drawers Refrigerator compartment Bottle cover Light Shelves Bottle rack Veggie drawer cover Veggie drawer Note The power plug must be covered or blocked. In case of the refrigerant circuit is damaged. Check the appliance for damages sustained during transportation. Make sure that you can accept our right to change their customer service or an equally qualified person...
User Manual
Page 4
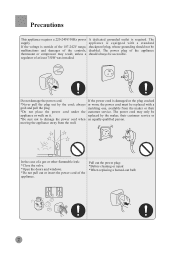
... the case of a gas or other flammable leak: *Close the valve. *Open the doors and windows. *Do not pull out or insert the power cord of at least 750W was installed. The supply. Pull out the power plug: *Before cleaning or repair *When replacing a burned-out bulb 2 appliance is equipped with a grab and pull the plug matching one, available from the wall. Precautions This...
... the case of a gas or other flammable leak: *Close the valve. *Open the doors and windows. *Do not pull out or insert the power cord of at least 750W was installed. The supply. Pull out the power plug: *Before cleaning or repair *When replacing a burned-out bulb 2 appliance is equipped with a grab and pull the plug matching one, available from the wall. Precautions This...

User Manual
Page 5
... things as vaccines, bacteria or chemical samples, which have demanding temperature requirements. Do not operate electrical devices and such inside of the freezer compartment with wet hands, otherwise they may get stuck on or hang from the appliance door. Do not put microwave ovens, voltage regulators or power strips on this appliance. Do not store fuel and other...
... things as vaccines, bacteria or chemical samples, which have demanding temperature requirements. Do not operate electrical devices and such inside of the freezer compartment with wet hands, otherwise they may get stuck on or hang from the appliance door. Do not put microwave ovens, voltage regulators or power strips on this appliance. Do not store fuel and other...
User Manual
Page 6
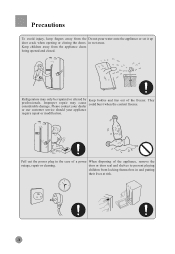
... the appliance, remove the outage, repair or cleaning. Pull out the power plug in wet areas. door or door seal and shelves to prevent playing children from the appliance doors being opened and closed. Precautions To avoid injury, keep fingers away from the Do not pour water onto the appliance or set it up door crack when opening or closing the doors. Refrigerators may cause considerable...
... the appliance, remove the outage, repair or cleaning. Pull out the power plug in wet areas. door or door seal and shelves to prevent playing children from the appliance doors being opened and closed. Precautions To avoid injury, keep fingers away from the Do not pour water onto the appliance or set it up door crack when opening or closing the doors. Refrigerators may cause considerable...
User Manual
Page 7
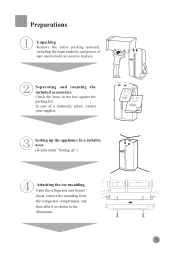
Preparations Unpacking Remove the entire packing material, including the foam underlay and pieces of a mismatch, please contact your supplier. In case of tape used to hold accessories in the illustration. 5 Setting up the appliance in a suitable area. (Details under "Setting up".) Attaching the toe moulding Open the refrigerator and freezer doors, remove the moulding from the refrigerator compartment, and then affix it as shown in place. Check the items in the box against the packing list. Separating and counting the included accessories.
Preparations Unpacking Remove the entire packing material, including the foam underlay and pieces of a mismatch, please contact your supplier. In case of tape used to hold accessories in the illustration. 5 Setting up the appliance in a suitable area. (Details under "Setting up".) Attaching the toe moulding Open the refrigerator and freezer doors, remove the moulding from the refrigerator compartment, and then affix it as shown in place. Check the items in the box against the packing list. Separating and counting the included accessories.

User Manual
Page 9
... (1). Disconnect Upper all wires except for the grounding wire. (hinge) 2) Remove the screws from the upper hinge following the direction as indicated by Arrow (2). 3) Lift the freezer compartment door to Lower remove it. Toe moulding Hinge cover Remove the freezer compartment door. 1) Unscrew the hinge covers. Remove the toe moulding. hinge Wires Grounding wire Upper hinge Screw 7 Door removal Removing the door If your house door is too narrow, remove the refrigerator door and carry the refrigerator in narrow side...
... (1). Disconnect Upper all wires except for the grounding wire. (hinge) 2) Remove the screws from the upper hinge following the direction as indicated by Arrow (2). 3) Lift the freezer compartment door to Lower remove it. Toe moulding Hinge cover Remove the freezer compartment door. 1) Unscrew the hinge covers. Remove the toe moulding. hinge Wires Grounding wire Upper hinge Screw 7 Door removal Removing the door If your house door is too narrow, remove the refrigerator door and carry the refrigerator in narrow side...

User Manual
Page 11
... appliance. Remove water and dirt with a soft rag. Door adjustment If the freezer compartment door is lower than that of the refrigerator compartment, insert the wrench in the groove of the left screw and turn it in the floor. Height difference Height difference Wrench Left screw Protect the setup location against direct sunlight or heat sources. Be sure to choose a flat and level setup location. Turning an appliance...
... appliance. Remove water and dirt with a soft rag. Door adjustment If the freezer compartment door is lower than that of the refrigerator compartment, insert the wrench in the groove of the left screw and turn it in the floor. Height difference Height difference Wrench Left screw Protect the setup location against direct sunlight or heat sources. Be sure to choose a flat and level setup location. Turning an appliance...

User Manual
Page 12
... the temperature settings come into effect slowly. Start-up and the appliance is started automatically. (Details in the "Features" section.) (2)Manual mode: Make manual temperature settings using the temperature adjustment keys. Start loading the refrigerator with foods only after it to the power, the appliance is automatically set to achieve the best and most energy-efficient cooling effect, regardless of foods loaded. 10 the indicator lights up Power connection After connecting...
... the temperature settings come into effect slowly. Start-up and the appliance is started automatically. (Details in the "Features" section.) (2)Manual mode: Make manual temperature settings using the temperature adjustment keys. Start loading the refrigerator with foods only after it to the power, the appliance is automatically set to achieve the best and most energy-efficient cooling effect, regardless of foods loaded. 10 the indicator lights up Power connection After connecting...

User Manual
Page 13
... E lights up and Intelligent mode is adjusted automatically according to variations of major or minor control malfunctions, the freezer and refrigerator temperatures are not displayed. Temp REF. Temp A.Intelligent mode key B.Superfrost key C.Freezer temperature adjustment key D.Refrigerator temperature adjustment key Intelligent mode E.Intelligent mode indicator F.Superfrost indicator G.Freezer temperature display H.Refrigerator temperature display FUZZY Quick. Press key A once again, upon which indicator E goes off and Intelligent mode is cancelled. Contact customer support if...
... E lights up and Intelligent mode is adjusted automatically according to variations of major or minor control malfunctions, the freezer and refrigerator temperatures are not displayed. Temp REF. Temp A.Intelligent mode key B.Superfrost key C.Freezer temperature adjustment key D.Refrigerator temperature adjustment key Intelligent mode E.Intelligent mode indicator F.Superfrost indicator G.Freezer temperature display H.Refrigerator temperature display FUZZY Quick. Press key A once again, upon which indicator E goes off and Intelligent mode is cancelled. Contact customer support if...
User Manual
Page 14
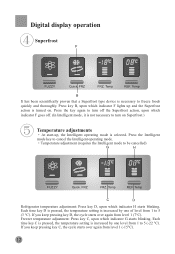
FRZ FRZ. Freezer temperature adjustment: Press key C, upon which indicator G starts blinking. If you keep pressing key C, the cycle starts over again from level 1 (-15°C). 12 Digital display operation Superfrost FUZZY Quick. FRZ FRZ. Temp REF. Press the Intelligent mode key to be cancelled) FUZZY Quick. Temp Refrigerator temperature adjustment: Press key D, upon which indicator H starts blinking. Each time key C is pressed, the temperature setting is necessary to...
FRZ FRZ. Freezer temperature adjustment: Press key C, upon which indicator G starts blinking. If you keep pressing key C, the cycle starts over again from level 1 (-15°C). 12 Digital display operation Superfrost FUZZY Quick. FRZ FRZ. Temp REF. Press the Intelligent mode key to be cancelled) FUZZY Quick. Temp Refrigerator temperature adjustment: Press key D, upon which indicator H starts blinking. Each time key C is pressed, the temperature setting is necessary to...

User Manual
Page 15
... the door is left open permanently or is turned on. The display is reactivated as soon as a key is pressed or an appliance door is turned off , but the light in the refrigerator compartment remains operational. The refrigerator is deactivated by holding key D (refrigerator temperature adjustment) firmly pressed for three seconds. Display control 30 minutes after the last key operation the display is opened. Temp REF. Indicator H (temperature and level) goes off . Temp 13...
... the door is left open permanently or is turned on. The display is reactivated as soon as a key is pressed or an appliance door is turned off , but the light in the refrigerator compartment remains operational. The refrigerator is deactivated by holding key D (refrigerator temperature adjustment) firmly pressed for three seconds. Display control 30 minutes after the last key operation the display is opened. Temp REF. Indicator H (temperature and level) goes off . Temp 13...

User Manual
Page 16
... sizes. To remove a shelf, the appliance door must be taken out for short-term food storage. The shelves can be open 90º. Refrigerator compartment Using the refrigerator compartment for shortterm food storage The average refrigerator temperature of 0 °C-10 °C is in a vertical position. Adjusting and cleaning bottle rack Hold both sides of glass shelves The shelves are height-adjustable to the temperature changes from opening and closing the door. Adjusting the height...
... sizes. To remove a shelf, the appliance door must be taken out for short-term food storage. The shelves can be open 90º. Refrigerator compartment Using the refrigerator compartment for shortterm food storage The average refrigerator temperature of 0 °C-10 °C is in a vertical position. Adjusting and cleaning bottle rack Hold both sides of glass shelves The shelves are height-adjustable to the temperature changes from opening and closing the door. Adjusting the height...

User Manual
Page 17
Refrigerator compartment Stocking example Foods should be grouped according to the various temperature ranges in the refrigerator compartment. (1) Eggs, butter, cheese (2) Tinned drinks and foods, seasonings (3) Drinks, bottles (4) Preserves (5) Meats (6) Flours, preserves, milk (7) Processed meats, sausage (8) Fruits, vegetables, lettuce Removing the veggie drawer cover First, lift the rear of the shelf in direction (1), and then pull the shelf out in direction (3) and remove the veggie drawer once the door is open 90º. 15 Finally, tilt the shelf in direction (2).
Refrigerator compartment Stocking example Foods should be grouped according to the various temperature ranges in the refrigerator compartment. (1) Eggs, butter, cheese (2) Tinned drinks and foods, seasonings (3) Drinks, bottles (4) Preserves (5) Meats (6) Flours, preserves, milk (7) Processed meats, sausage (8) Fruits, vegetables, lettuce Removing the veggie drawer cover First, lift the rear of the shelf in direction (1), and then pull the shelf out in direction (3) and remove the veggie drawer once the door is open 90º. 15 Finally, tilt the shelf in direction (2).

User Manual
Page 18
... the veggie drawer is located on the inside the veggie drawer, which is reversed. Reducing or closing the opening reduces the humidity inside of more than 25 W.) Replacing the bulb Unplug the power cord. Install the bulb. 16 The humidity level in direction (2). Replacing the bulb at the top of refrigerator compartment Bulb specifications: 220-240 V / 25 W Socket: E27 (Do not use a replacement bulb of the veggie drawer. Remove the screws under the cover.
... the veggie drawer is located on the inside the veggie drawer, which is reversed. Reducing or closing the opening reduces the humidity inside of more than 25 W.) Replacing the bulb Unplug the power cord. Install the bulb. 16 The humidity level in direction (2). Replacing the bulb at the top of refrigerator compartment Bulb specifications: 220-240 V / 25 W Socket: E27 (Do not use a replacement bulb of the veggie drawer. Remove the screws under the cover.

User Manual
Page 21
... the power plug or neutralise the fuse. Interior light and replacement of bulb Bulb specifications: 220-240 V / 25 W Socket: E27 (Do not use a replacement bulb of storage indicated on the package. Install a new bulb of the bottle rack and pull it once the door is necessary for long-term food storage A low temperature in directions (1) and (2). Adjusting and cleaning bottle rack Hold both sides of equal specifications. Freezer compartment Use the freezer compartment...
... the power plug or neutralise the fuse. Interior light and replacement of bulb Bulb specifications: 220-240 V / 25 W Socket: E27 (Do not use a replacement bulb of storage indicated on the package. Install a new bulb of the bottle rack and pull it once the door is necessary for long-term food storage A low temperature in directions (1) and (2). Adjusting and cleaning bottle rack Hold both sides of equal specifications. Freezer compartment Use the freezer compartment...

User Manual
Page 23
... chemical solvents: abrasive cleansers, varnish, amyl acetate, hot water, acid, alkaline cleaners, etc. Caution: Do not pour water onto the appliance. Be sure to clean and dry the controls and lights. Dry off surface water with a rag. For safety reasons, first unplug the power cord. Use a rag or sponge to clean the door seal regularly. 21 Defrosting · Cleaning Defrosting The appliance defrosts automatically.
... chemical solvents: abrasive cleansers, varnish, amyl acetate, hot water, acid, alkaline cleaners, etc. Caution: Do not pour water onto the appliance. Be sure to clean and dry the controls and lights. Dry off surface water with a rag. For safety reasons, first unplug the power cord. Use a rag or sponge to clean the door seal regularly. 21 Defrosting · Cleaning Defrosting The appliance defrosts automatically.

User Manual
Page 24
...the appliance out of operation, as described. Inoperation In the event of a power outage Even in the summer, foods can be a power outage, produce more ice cubes and place them in the top section of the refrigerator. In the event of a power outage, refrain from ...operation If the appliance is to the appliance and opening the doors. Caution: A temperature drop in the freezer compartment, caused by a power outage or other malfunction, reduces the storage life span and quality of time, you know there will shorten its life expectancy. Clean the appliance as this will be kept cool...
...the appliance out of operation, as described. Inoperation In the event of a power outage Even in the summer, foods can be a power outage, produce more ice cubes and place them in the top section of the refrigerator. In the event of a power outage, refrain from ...operation If the appliance is to the appliance and opening the doors. Caution: A temperature drop in the freezer compartment, caused by a power outage or other malfunction, reduces the storage life span and quality of time, you know there will shorten its life expectancy. Clean the appliance as this will be kept cool...

User Manual
Page 28
... before ordering a repair. Temperature is not out. Voltage too low. Unit does not cool The appliance is switched off. Appliance door not fully closed, opened too frequently or for too long. Exposed to the power (plug, outlet, fuse) or is not connected to direct sunshine, a stove or other object. connected to the power. Light does not come on Unusual noises Bulb is burned The...
... before ordering a repair. Temperature is not out. Voltage too low. Unit does not cool The appliance is switched off. Appliance door not fully closed, opened too frequently or for too long. Exposed to the power (plug, outlet, fuse) or is not connected to direct sunshine, a stove or other object. connected to the power. Light does not come on Unusual noises Bulb is burned The...

User Manual
Page 29
... is opened too frequently or for too long. Customer service Confirm the following before ordering a repair. Normal after loading with frost or ice Normal if unpackaged food was placed in the freezer. Compressor runs often or for electrical and electronic equipment. Unusual odour Strongly smelling food is not packed appropriately. Wrong temperature setting. The appliance interior needs to be taken to air outlet. Appliance door...
... is opened too frequently or for too long. Customer service Confirm the following before ordering a repair. Normal after loading with frost or ice Normal if unpackaged food was placed in the freezer. Compressor runs often or for electrical and electronic equipment. Unusual odour Strongly smelling food is not packed appropriately. Wrong temperature setting. The appliance interior needs to be taken to air outlet. Appliance door...


