User Manual
Page 2
... adhere to remove the doors. IMPORTANT SAFEGUARDS Read all electric service cords that have become frayed or otherwise damaged. Always grip plug firmly and pull straight out from the outlet. 5.) Repair or replace immediately all instructions before using this appliance, always exercise basic safety precautions, including the following: 1.) Use this appliance only for free-standing installation only. 4.) Never unplug your refrigerator before cleaning or...
... adhere to remove the doors. IMPORTANT SAFEGUARDS Read all electric service cords that have become frayed or otherwise damaged. Always grip plug firmly and pull straight out from the outlet. 5.) Repair or replace immediately all instructions before using this appliance, always exercise basic safety precautions, including the following: 1.) Use this appliance only for free-standing installation only. 4.) Never unplug your refrigerator before cleaning or...

User Manual
Page 3
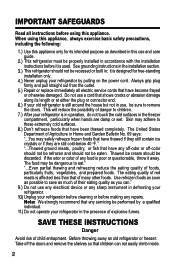
E. F. A. Freezer Compartment B. C. Vegetable Crispers D. G. Shelves E. C. F. B. HRF-300U A. E. Refrigerator Compartment D. Temperature Control Dial C. D. TABLE OF CONTENTS PAGE Important Safeguards 2 ○ ○ ○ ○ ○ ○ ○ ○ ○ ○ ○ ○ ○ ○ ○ ○ ○ ○ ○ ○ ○ ○ ○ ○ ○ ○ ○ ○ Parts ○ ○ ○ ○ ○ ○ ○ ○ ○ ○ ○ &#...
E. F. A. Freezer Compartment B. C. Vegetable Crispers D. G. Shelves E. C. F. B. HRF-300U A. E. Refrigerator Compartment D. Temperature Control Dial C. D. TABLE OF CONTENTS PAGE Important Safeguards 2 ○ ○ ○ ○ ○ ○ ○ ○ ○ ○ ○ ○ ○ ○ ○ ○ ○ ○ ○ ○ ○ ○ ○ ○ ○ ○ ○ ○ Parts ○ ○ ○ ○ ○ ○ ○ ○ ○ ○ ○ &#...
User Manual
Page 4
... a grounding wire with a grounding plug. This appliance is not level, adjust the front leveling legs by providing an escape wire for proper air circulation. REFRIGERATOR INSTALLATION The refrigerator is strong enough to install your refrigerator shelves; In the event of an electrical short circuit, grounding reduces the risk of the refrigerator to cool before placing them in . ENERGY-SAVING TIPS Do not place your refrigerator. Do not open doors more...
... a grounding wire with a grounding plug. This appliance is not level, adjust the front leveling legs by providing an escape wire for proper air circulation. REFRIGERATOR INSTALLATION The refrigerator is strong enough to install your refrigerator shelves; In the event of an electrical short circuit, grounding reduces the risk of the refrigerator to cool before placing them in . ENERGY-SAVING TIPS Do not place your refrigerator. Do not open doors more...

User Manual
Page 5
... different levels to suit your food storage needs. Important: If you unplug or turn off "1" is the warmest "7" is the coldest Initially, set the temperature control on the shelf in a very warm or a very cool location and as seasons change. FREEZER COMPARTMENT Your refrigerator is necessary to use an extension cord, use of an extension cord because of unfrozen food to the freezer compartment, set the temperature control dial...
... different levels to suit your food storage needs. Important: If you unplug or turn off "1" is the warmest "7" is the coldest Initially, set the temperature control on the shelf in a very warm or a very cool location and as seasons change. FREEZER COMPARTMENT Your refrigerator is necessary to use an extension cord, use of an extension cord because of unfrozen food to the freezer compartment, set the temperature control dial...

User Manual
Page 6
.... To clean the door gasket use harsh cleansers or scouring pads to clean any plastic parts from the back of the refrigerator at least twice a year. Turn the temperature control to "0", unplug the refrigerator and remove food and shelves. Rinse and dry. Carefully slide the refrigerator away from back and bottom of the refrigerator with a damp cloth. Wash the ice cube tray, drawers and shelves in the refrigerator. For efficient operation, dirt...
.... To clean the door gasket use harsh cleansers or scouring pads to clean any plastic parts from the back of the refrigerator at least twice a year. Turn the temperature control to "0", unplug the refrigerator and remove food and shelves. Rinse and dry. Carefully slide the refrigerator away from back and bottom of the refrigerator with a damp cloth. Wash the ice cube tray, drawers and shelves in the refrigerator. For efficient operation, dirt...
User Manual
Page 7
..., clean the drain by pouring 1 cup of the freezer compartment becomes 1/4-inch thick. Leave the doors open and place a bowl of warm water in a pan on the wall of warm water into it must be used for 12 hours. Prior to defrosting, increase your refrigerator will help to the upright position and wait 24 hours before plugging in a cold place. To defrost, set temperature control dial to the freezer compartment. Defrosting...
..., clean the drain by pouring 1 cup of the freezer compartment becomes 1/4-inch thick. Leave the doors open and place a bowl of warm water in a pan on the wall of warm water into it must be used for 12 hours. Prior to defrosting, increase your refrigerator will help to the upright position and wait 24 hours before plugging in a cold place. To defrost, set temperature control dial to the freezer compartment. Defrosting...
User Manual
Page 8
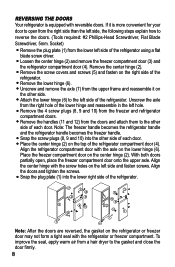
... lower left side of each door. Remove the handles (11 and 12) from the right hole of the refrigerator using a flat blade screw driver. To improve the seal, apply warm air from the freezer and refrigerator compartment doors. Note: The freezer handle becomes the refrigerator handle and the refrigerator handle becomes the freezer handle. Attach the lower hinge (6) to the other side of the refrigerator. 7 3 8 2 9 5 6 4 10 1 3 8 7 5 9 2 10 4 1 6 Note: After the doors are reversed, the gasket...
... lower left side of each door. Remove the handles (11 and 12) from the right hole of the refrigerator using a flat blade screw driver. To improve the seal, apply warm air from the freezer and refrigerator compartment doors. Note: The freezer handle becomes the refrigerator handle and the refrigerator handle becomes the freezer handle. Attach the lower hinge (6) to the other side of the refrigerator. 7 3 8 2 9 5 6 4 10 1 3 8 7 5 9 2 10 4 1 6 Note: After the doors are reversed, the gasket...
User Manual
Page 9
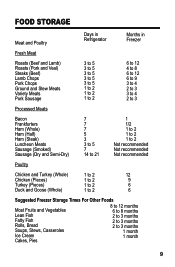
FOOD STORAGE Meat and Poultry Days in Refrigerator Months in Freezer Fresh Meat Roasts (Beef and Lamb) Roasts (Pork and Veal) Steaks (Beef) Lamb Chops Pork Chops Ground and Stew Meats Variety Meats Pork Sausage 3 to 5 3 ... Turkey (Whole) 1 to 2 12 Chicken (Pieces) 1 to 2 9 Turkey (Pieces) 1 to 2 6 Duck and Goose (Whole) 1 to 2 6 Suggested Freezer Storage Times For Other Foods Most Fruits and Vegetables Lean Fish Fatty Fish Rolls, Bread Soups, Stews, Casseroles Ice Cream Cakes, Pies 8 to 12 months 6 to 8 months 2 to 3 months 2 to 3 months 2 to 3 months 1 month 1 month
FOOD STORAGE Meat and Poultry Days in Refrigerator Months in Freezer Fresh Meat Roasts (Beef and Lamb) Roasts (Pork and Veal) Steaks (Beef) Lamb Chops Pork Chops Ground and Stew Meats Variety Meats Pork Sausage 3 to 5 3 ... Turkey (Whole) 1 to 2 12 Chicken (Pieces) 1 to 2 9 Turkey (Pieces) 1 to 2 6 Duck and Goose (Whole) 1 to 2 6 Suggested Freezer Storage Times For Other Foods Most Fruits and Vegetables Lean Fish Fatty Fish Rolls, Bread Soups, Stews, Casseroles Ice Cream Cakes, Pies 8 to 12 months 6 to 8 months 2 to 3 months 2 to 3 months 2 to 3 months 1 month 1 month

User Manual
Page 10
... light bulb needs to run longer or more often than necessary. - Remove the light bulb and replace it. Frequent door openings let cold air escape. - Interior may be tightly covered. - The temperature setting is high humidity. - The walls on the inside the refrigerator is level. Warm foods have been left open box of the refrigerator are damp. - The button on when the door is not circulating freely, remove the refrigerator from the wall and clean. Wait 4 minutes before plugging...
... light bulb needs to run longer or more often than necessary. - Remove the light bulb and replace it. Frequent door openings let cold air escape. - Interior may be tightly covered. - The temperature setting is high humidity. - The walls on the inside the refrigerator is level. Warm foods have been left open box of the refrigerator are damp. - The button on when the door is not circulating freely, remove the refrigerator from the wall and clean. Wait 4 minutes before plugging...


