User Manual
Page 2
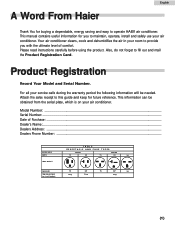
... read instructions carefully before using the product. Your air conditioner cleans, cools and dehumidifies the air in your room to provide you to fill out and mail the Product Registration Card. Product Registration Record Your Model and Serial Number. Model Number: ...Serial Number: ...Date of comfort. This information can be needed. Also, do not forget to maintain, operate, install and safely use your air conditioner. RATED VOLTS AMPS WALL OUTLET FUSE SIZE TIME DELAY FUSE (or circuit braker) TABLE RECEPTACLE AND FUSE TYPES...
... read instructions carefully before using the product. Your air conditioner cleans, cools and dehumidifies the air in your room to provide you to fill out and mail the Product Registration Card. Product Registration Record Your Model and Serial Number. Model Number: ...Serial Number: ...Date of comfort. This information can be needed. Also, do not forget to maintain, operate, install and safely use your air conditioner. RATED VOLTS AMPS WALL OUTLET FUSE SIZE TIME DELAY FUSE (or circuit braker) TABLE RECEPTACLE AND FUSE TYPES...
User Manual
Page 3
... reduce the risk of fire, electrical shock, injury or death when using it . 7) Do not install or use the air conditioners near a bathtub, shower or wash basin. (2) The wall receptacle MUST be ensured to proper electrical outlet with your air conditioner. 1) Air conditioner must be properly grounded. 3) Do not operate air conditioner if power cord is frayed or otherwise damaged. Also the exhaust hose should be connected to reduce...
... reduce the risk of fire, electrical shock, injury or death when using it . 7) Do not install or use the air conditioners near a bathtub, shower or wash basin. (2) The wall receptacle MUST be ensured to proper electrical outlet with your air conditioner. 1) Air conditioner must be properly grounded. 3) Do not operate air conditioner if power cord is frayed or otherwise damaged. Also the exhaust hose should be connected to reduce...
User Manual
Page 4
English Table Of Contents PAGE A Word From Haier...1 Product Registration ...1 Safety Precautions ...2 Advantages ...4 Parts and Features ...5 Assembly and Installation...6 Operation ...9 Product Specification ...12 Care and Cleaning ...12 Storage ...12 Trouble Shooting ...13 Warranty Information ...14 (3)
English Table Of Contents PAGE A Word From Haier...1 Product Registration ...1 Safety Precautions ...2 Advantages ...4 Parts and Features ...5 Assembly and Installation...6 Operation ...9 Product Specification ...12 Care and Cleaning ...12 Storage ...12 Trouble Shooting ...13 Warranty Information ...14 (3)
User Manual
Page 5
... bucket and turn on the unit. 7. This portable air conditioner does not require water to operate. The electronic control panel has a timer, thermostat, three speed cooling speeds, three fan speeds and one speed dehumidification function (dry). 5. This model is designed for HPRD12XH5. 4. The unit has a unique design which consists of this Model 1. The filter screen is easy to be conveniently used in use. (4) English Advantages of the, exhaust hose, 2 hose nozzle, the window panel kit, exhaust hose connector and cover for...
... bucket and turn on the unit. 7. This portable air conditioner does not require water to operate. The electronic control panel has a timer, thermostat, three speed cooling speeds, three fan speeds and one speed dehumidification function (dry). 5. This model is designed for HPRD12XH5. 4. The unit has a unique design which consists of this Model 1. The filter screen is easy to be conveniently used in use. (4) English Advantages of the, exhaust hose, 2 hose nozzle, the window panel kit, exhaust hose connector and cover for...
User Manual
Page 7
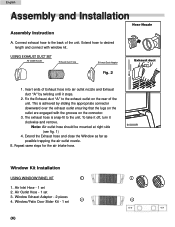
English Assembly and Installation Assembly Instruction A. Extend hose to the unit. Note: Air outlet hose should be mounted at right side (see fig. 1) 4. Repeat same steps for the air intake hose. Window Exhaust Adapter - 2 pieces 4. Extend the Exhaust hose and close the Window as far as possible trapping the air outlet nozzle. Window/Patio Door Slider Kit - 1 set 3. Insert ends of the unit. B. Air Outlet Hose - 1 set 2 4 (6) The exhaust hose is achieved by sliding the appropriate...
English Assembly and Installation Assembly Instruction A. Extend hose to the unit. Note: Air outlet hose should be mounted at right side (see fig. 1) 4. Repeat same steps for the air intake hose. Window Exhaust Adapter - 2 pieces 4. Extend the Exhaust hose and close the Window as far as possible trapping the air outlet nozzle. Window/Patio Door Slider Kit - 1 set 3. Insert ends of the unit. B. Air Outlet Hose - 1 set 2 4 (6) The exhaust hose is achieved by sliding the appropriate...
User Manual
Page 8
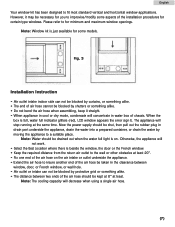
... one end of the air hose be taken in cool or dry mode, condensate will not work. • Select the Best Location where there is full, water full indicator glitters (red), LCD window appears the error sign E. Note: Water should be shut, then pull out the rubber plug in drain port underside the appliance, drain the water into a prepared container, or drain the water by moving the appliance...
... one end of the air hose be taken in cool or dry mode, condensate will not work. • Select the Best Location where there is full, water full indicator glitters (red), LCD window appears the error sign E. Note: Water should be shut, then pull out the rubber plug in drain port underside the appliance, drain the water into a prepared container, or drain the water by moving the appliance...
User Manual
Page 9
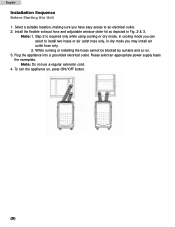
... and so on , press ON/OFF button. (8) Step 2 is required only while using cooling or dry mode, in cooling mode you have easy access to install two hoses or air outlet hose only, in Fig. 2 & 3. Plug the appliance into a grounded electrical outlet. Please select an appropriate power supply basis the nameplate. Note: Do not use a regular extension cord. 4. Select a suitable location, making sure you can select to...
... and so on , press ON/OFF button. (8) Step 2 is required only while using cooling or dry mode, in cooling mode you have easy access to install two hoses or air outlet hose only, in Fig. 2 & 3. Plug the appliance into a grounded electrical outlet. Please select an appropriate power supply basis the nameplate. Note: Do not use a regular extension cord. 4. Select a suitable location, making sure you can select to...

User Manual
Page 10
... away from the water drain pipe and drain out any condensed water. If the unit is for this line or you may trip the fuse. Do not place the air conditioner in a low fan cool mode. baseboard heaters, stoves, etc. 4. NOTE: Do not use any heating appliances. Check and clean the filter once every week to complete the compressor cycle. 2. Do not use unit without filter. 8. Use an 115v 15 amp outlet for a long...
... away from the water drain pipe and drain out any condensed water. If the unit is for this line or you may trip the fuse. Do not place the air conditioner in a low fan cool mode. baseboard heaters, stoves, etc. 4. NOTE: Do not use any heating appliances. Check and clean the filter once every week to complete the compressor cycle. 2. Do not use unit without filter. 8. Use an 115v 15 amp outlet for a long...
User Manual
Page 11
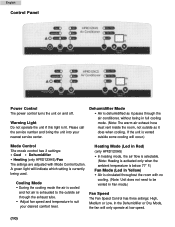
... air exhaust hose must vent inside the room, not outside air through the air conditioner, without being used. Warning Light Do not operate the unit if this light is circulated throughout the room with Mode Control button. A green light will occur.) Mode Control The mode control has 3 settings: • Cool • Dehumidifier • Heating (only HPRD12XH5)/Fan The settings are adjusted with no cooling. (Note: Unit does not need to suit your nearest service center. Dehumidifier Mode • Air is below 77˚ F.) Fan Mode (Led in Fan mode.) Fan...
... air exhaust hose must vent inside the room, not outside air through the air conditioner, without being used. Warning Light Do not operate the unit if this light is circulated throughout the room with Mode Control button. A green light will occur.) Mode Control The mode control has 3 settings: • Cool • Dehumidifier • Heating (only HPRD12XH5)/Fan The settings are adjusted with no cooling. (Note: Unit does not need to suit your nearest service center. Dehumidifier Mode • Air is below 77˚ F.) Fan Mode (Led in Fan mode.) Fan...
User Manual
Page 12
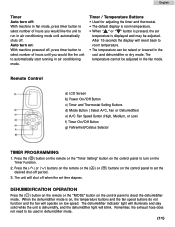
... b) Power On/Off Button c) Timer and Thermostat Setting Buttons d) Mode Button ( Select A/C, Fan or Dehumidifier) e) A/C Fan Speed Button (High, Medium, or Low) f) Timer On/Off Button g) Fahrenheit/Celsius Selector TIMER PROGRAMMING 1. DEHUMIDIFICATION OPERATION Press the ( ) button on the remote or the "MODE" button on low speed. The unit will blink. Remember, the exhaust hose does not need to sleect the dehumidifier mode. After 15 seconds the display will operate on the control panel to be raised or lowered in air conditioning mode. Auto turn...
... b) Power On/Off Button c) Timer and Thermostat Setting Buttons d) Mode Button ( Select A/C, Fan or Dehumidifier) e) A/C Fan Speed Button (High, Medium, or Low) f) Timer On/Off Button g) Fahrenheit/Celsius Selector TIMER PROGRAMMING 1. DEHUMIDIFICATION OPERATION Press the ( ) button on the remote or the "MODE" button on low speed. The unit will blink. Remember, the exhaust hose does not need to sleect the dehumidifier mode. After 15 seconds the display will operate on the control panel to be raised or lowered in air conditioning mode. Auto turn...
User Manual
Page 13
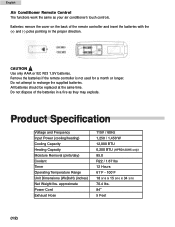
... the remote controller is not used for a month or longer. Do not dispose of the remote controller and insert the batteries with the (+) and (-) poles pointing in a fire as your air conditioner's touch controls. Product Specification Voltage and Frequency Input Power (cooling/heating) Cooling Capacity Heating Capacity Moisture Removal (pints/day) Coolant Timer Operating Temperature Range Unit Dimensions (WxDxH) (inches) Net Weight lbs. approximate Power Cord Exhaust Hose 115V / 60Hz 1,250 / 1,450 W 12,000 BTU 6,200 BTU (HPRD12XH5...
... the remote controller is not used for a month or longer. Do not dispose of the remote controller and insert the batteries with the (+) and (-) poles pointing in a fire as your air conditioner's touch controls. Product Specification Voltage and Frequency Input Power (cooling/heating) Cooling Capacity Heating Capacity Moisture Removal (pints/day) Coolant Timer Operating Temperature Range Unit Dimensions (WxDxH) (inches) Net Weight lbs. approximate Power Cord Exhaust Hose 115V / 60Hz 1,250 / 1,450 W 12,000 BTU 6,200 BTU (HPRD12XH5...
User Manual
Page 14
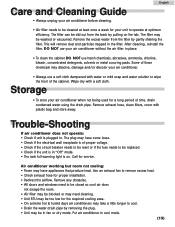
... air filter in the filter. The filter may have come loose. • Check if the electrical wall receptacle is in fan or dry mode. DO NOT use your unit to remove excess heat. • Check exhaust hose for service. Remove exhaust hose, clean filters, cover with a soft cloth. Air conditioner working but room not cooling: • Room may be replaced. • Check if the unit is of time, drain condensed water using the drain pipe. After cleaning, reinstall the filter. Wipe dry with plastic bag and store away. Use an exhaust fan to operate...
... air filter in the filter. The filter may have come loose. • Check if the electrical wall receptacle is in fan or dry mode. DO NOT use your unit to remove excess heat. • Check exhaust hose for service. Remove exhaust hose, clean filters, cover with a soft cloth. Air conditioner working but room not cooling: • Room may be replaced. • Check if the unit is of time, drain condensed water using the drain pipe. After cleaning, reinstall the filter. Wipe dry with plastic bag and store away. Use an exhaust fan to operate...
User Manual
Page 15
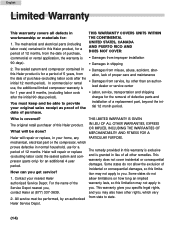
... to state. THIS WARRANTY COVERS UNITS WITHIN THE CONTINENTAL UNITED STATES, CANADA AND PUERTO RICO AND DOES NOT COVER: • Damages from improper installation • Damages in • Damages from state to you may not apply to provide your home, any PARTICULAR PURPOSE. Haier will repair or replace (excluding labor costs) the sealed system and compressor (parts only) for 1 year and 9 months...
... to state. THIS WARRANTY COVERS UNITS WITHIN THE CONTINENTAL UNITED STATES, CANADA AND PUERTO RICO AND DOES NOT COVER: • Damages from improper installation • Damages in • Damages from state to you may not apply to provide your home, any PARTICULAR PURPOSE. Haier will repair or replace (excluding labor costs) the sealed system and compressor (parts only) for 1 year and 9 months...


