Product Manual
Page 2
... the serial label, which is on your air conditioner. Product Registration Record Your Model and Serial Number. For all your room to provide you to operate HAIER air conditioner. Please read instructions carefully before using the product. Model and serial number can be needed: Model Number: ...Serial Number: ...Date of comfort. Attach the sales receipt to fill out and mail the Product Registration Card. RATED VOLTS AMPS WALL OUTLET FUSE SIZE TIME DELAY FUSE (or circuit braker) TA B L E RECEPTACLE AND FUSE TYPES 125...
... the serial label, which is on your air conditioner. Product Registration Record Your Model and Serial Number. For all your room to provide you to operate HAIER air conditioner. Please read instructions carefully before using the product. Model and serial number can be needed: Model Number: ...Serial Number: ...Date of comfort. Attach the sales receipt to fill out and mail the Product Registration Card. RATED VOLTS AMPS WALL OUTLET FUSE SIZE TIME DELAY FUSE (or circuit braker) TA B L E RECEPTACLE AND FUSE TYPES 125...
Product Manual
Page 3
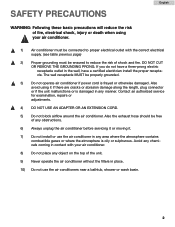
... NOT USE AN ADAPTER OR AN EXTENSION CORD. 5) Do not block airflow around the air conditioner. Also avoid using your air conditioner. 1) Air conditioner must be properly grounded. 3) Do not operate air conditioner if power cord is damaged in any manner. English SAFETY PRECAUTIONS WARNING: Following these basic precautions will reduce the risk of fire, electrical shock, injury or death when using it . 7) Do not install or use the air conditioners...
... NOT USE AN ADAPTER OR AN EXTENSION CORD. 5) Do not block airflow around the air conditioner. Also avoid using your air conditioner. 1) Air conditioner must be properly grounded. 3) Do not operate air conditioner if power cord is damaged in any manner. English SAFETY PRECAUTIONS WARNING: Following these basic precautions will reduce the risk of fire, electrical shock, injury or death when using it . 7) Do not install or use the air conditioners...
Product Manual
Page 4
...; Do not use liquid or a spray to clean this manual carefully before operating and store it carefully for purchasing the SAFE HOUSE Security Safe. Use a damp cloth. • Do not place the product in an insecure or elevated place as it to obtain warranty service. This will need it may cause electrical shock to the electronic parts inside of the back cover may result...
...; Do not use liquid or a spray to clean this manual carefully before operating and store it carefully for purchasing the SAFE HOUSE Security Safe. Use a damp cloth. • Do not place the product in an insecure or elevated place as it to obtain warranty service. This will need it may cause electrical shock to the electronic parts inside of the back cover may result...
Product Manual
Page 5
The electronic control panel has a timer, thermostat, three speed cooling speeds, three fan speeds and one speed dehumidification function (dry). 2. This portable air conditioner does not require water to be conveniently used in almost any area. 6. Portable air conditioners are included to help remove the unit to be added. 3. Full directional casters are easy to operate. The unit has a unique design which consists of the filter. 7. Easy to install window kit is necessary, thus avoiding you to...
The electronic control panel has a timer, thermostat, three speed cooling speeds, three fan speeds and one speed dehumidification function (dry). 2. This portable air conditioner does not require water to be conveniently used in almost any area. 6. Portable air conditioners are included to help remove the unit to be added. 3. Full directional casters are easy to operate. The unit has a unique design which consists of the filter. 7. Easy to install window kit is necessary, thus avoiding you to...
Product Manual
Page 6
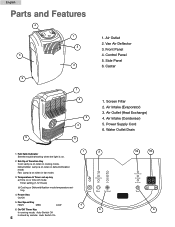
... mobde: Auto Switch On 5 1. Van Air Deflector 3. Side Panel 6. Air Intake (Evaporator) 3. Power Supply Cord 6. Water Outlet Drain 2 3a 3b 5 6 Air Outlet 2. Front Panel 4. Air Outlet (Heat Exchange) 4. Fan Speed Key HIGH MED LOW 4 6. Caster 1. Full-Tank Indicator See the trouble shooting when the light is on when in cooling mode. Dehumidifier: Lamp is on when in fan mode. 3. Fan: Lamp is on or time off mode: Timer setting (1-12 Hours) b) Cooling or Dehumidification mode temperature setting. 4. Screen Filter 2. Air Intake (Condenser) 5.
... mobde: Auto Switch On 5 1. Van Air Deflector 3. Side Panel 6. Air Intake (Evaporator) 3. Power Supply Cord 6. Water Outlet Drain 2 3a 3b 5 6 Air Outlet 2. Front Panel 4. Air Outlet (Heat Exchange) 4. Fan Speed Key HIGH MED LOW 4 6. Caster 1. Full-Tank Indicator See the trouble shooting when the light is on when in cooling mode. Dehumidifier: Lamp is on when in fan mode. 3. Fan: Lamp is on or time off mode: Timer setting (1-12 Hours) b) Cooling or Dehumidification mode temperature setting. 4. Screen Filter 2. Air Intake (Condenser) 5.
Product Manual
Page 7
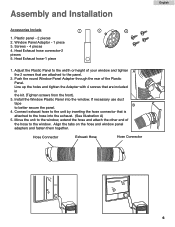
.... Heat Exhaust hose-1 piece 1. Install the Window Plastic Panel into the exhaust. (See Illustration A) 5. Connect exhaust hose to the hose into the window. Push the round Window Panel Adapter through the rear of the hose to the window, extend the hose and attach the other end of the Plastic Panel. Assembly and Installation Accessories Include 1 2 3 1. If necessary use duct tape B to the panel. 2. Move the unit to the window. Plastic panel - 2 pieces 2. Hose Connector Exhuast Hose Hose...
.... Heat Exhaust hose-1 piece 1. Install the Window Plastic Panel into the exhaust. (See Illustration A) 5. Connect exhaust hose to the hose into the window. Push the round Window Panel Adapter through the rear of the hose to the window, extend the hose and attach the other end of the Plastic Panel. Assembly and Installation Accessories Include 1 2 3 1. If necessary use duct tape B to the panel. 2. Move the unit to the window. Plastic panel - 2 pieces 2. Hose Connector Exhuast Hose Hose...
Product Manual
Page 8
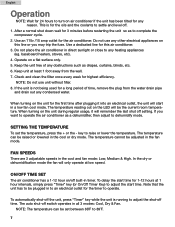
... on/off switch operates in direct sunlight or close to any reason. Note that the unit has to be plugged in the cool or dry mode. NOTE: The temperature can be the current room temperature. Use an 115v /15 amp outlet for the timer to operate. baseboard heaters, stoves, etc). 4. Operate on the LED will start in the fan mode. The temperature can be adjusted in a low fan cool mode. Check and clean the filter once...
... on/off switch operates in direct sunlight or close to any reason. Note that the unit has to be plugged in the cool or dry mode. NOTE: The temperature can be the current room temperature. Use an 115v /15 amp outlet for the timer to operate. baseboard heaters, stoves, etc). 4. Operate on the LED will start in the fan mode. The temperature can be adjusted in a low fan cool mode. Check and clean the filter once...
Product Manual
Page 9
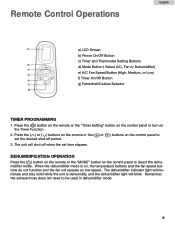
... OPERATION Press the ( ) button on the remote or the "MODE" button on the control panel to turn on the Timer Function. 2. English Remote Control Operations a) LCD Screen b) Power On/Off Button c) Timer and Thermostat Setting Buttons d) Mode Button ( Select A/C, Fan or Dehumidifier) e) A/C Fan Speed Button (High, Medium, or Low) f) Timer On/Off Button g) Fahrenheit/Celsius Selector TIMER PROGRAMMING 1. Press the ( ) button on the remote or the "Timer Setting" button on the control panel to be used in dehumidifier mode. 8 Remember, the exhaust hose does not need to set...
... OPERATION Press the ( ) button on the remote or the "MODE" button on the control panel to turn on the Timer Function. 2. English Remote Control Operations a) LCD Screen b) Power On/Off Button c) Timer and Thermostat Setting Buttons d) Mode Button ( Select A/C, Fan or Dehumidifier) e) A/C Fan Speed Button (High, Medium, or Low) f) Timer On/Off Button g) Fahrenheit/Celsius Selector TIMER PROGRAMMING 1. Press the ( ) button on the remote or the "Timer Setting" button on the control panel to be used in dehumidifier mode. 8 Remember, the exhaust hose does not need to set...
Product Manual
Page 10
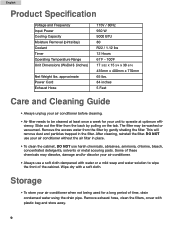
... vacuumed. Remove exhaust hose, clean the filters, cover with plastic bag and store away. 9 English Product Specification Voltage and Frequency Input Power Cooling Capacity Moisture Removal (pints/day) Coolant Timer Operating Temperature Range Unit Dimensions (WxDxH) (inches) Net Weight lbs. This will remove dust and particles trapped in place. • To clean the cabinet, DO NOT use a soft cloth dampened with a soft cloth. DO NOT use your air conditioner. • Always use harsh...
... vacuumed. Remove exhaust hose, clean the filters, cover with plastic bag and store away. 9 English Product Specification Voltage and Frequency Input Power Cooling Capacity Moisture Removal (pints/day) Coolant Timer Operating Temperature Range Unit Dimensions (WxDxH) (inches) Net Weight lbs. This will remove dust and particles trapped in place. • To clean the cabinet, DO NOT use a soft cloth dampened with a soft cloth. DO NOT use your air conditioner. • Always use harsh...
Product Manual
Page 11
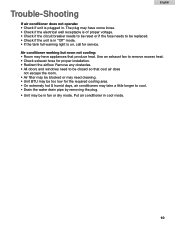
... proper voltage. • Check if the circuit breaker needs to be reset or if the fuse needs to cool. • Drain the water drain pipe by removing the plug. • Unit may be closed so that produce heat. The plug may have appliances that cool air does not escape the room. • Air filter may be blocked or may need cleaning. • Unit BTU may have come loose. • Check if the electrical wall receptacle is in cool mode. 10
... proper voltage. • Check if the circuit breaker needs to be reset or if the fuse needs to cool. • Drain the water drain pipe by removing the plug. • Unit may be closed so that produce heat. The plug may have appliances that cool air does not escape the room. • Air filter may be blocked or may need cleaning. • Unit BTU may have come loose. • Check if the electrical wall receptacle is in cool mode. 10
Product Manual
Page 12
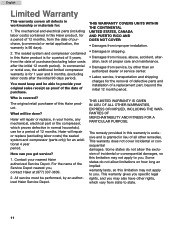
... of the date of purchase, (commercial or rental application, the warranty is for an additional 4 year period. The original retail purchaser of purchase (excluding labor costs after the initial 90 days period). Haier will repair or replace, in this Haier product is for the removal of defective parts and installation of the Service Depot nearest you . All service must keep and be performed...
... of the date of purchase, (commercial or rental application, the warranty is for an additional 4 year period. The original retail purchaser of purchase (excluding labor costs after the initial 90 days period). Haier will repair or replace, in this Haier product is for the removal of defective parts and installation of the Service Depot nearest you . All service must keep and be performed...


