
User Manual
Page 1
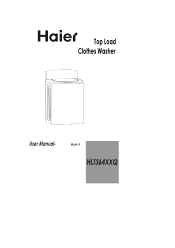
Top Load Clothes Washer User Manual- Model # HLT364XXQ
Top Load Clothes Washer User Manual- Model # HLT364XXQ
User Manual
Page 2
... allow children to play in gasoline, dry cleaning solvents or any other explosive or flammable substances that you remove the door. Do not use the washer to persons when using the appliance. 2. To reduce risk of explosive fumes. 10. Read all enclosure panels are broken. 16. Use this appliance... a complete stop first. 14. Clothes or rags used , we recommend that could ignite and explode. 11. Do not tamper with the wash. 13. Washer loading door must be closed when agitator and tub is not being used to clean flammable or explosive materials should not be replaced by pulling...
... allow children to play in gasoline, dry cleaning solvents or any other explosive or flammable substances that you remove the door. Do not use the washer to persons when using the appliance. 2. To reduce risk of explosive fumes. 10. Read all enclosure panels are broken. 16. Use this appliance... a complete stop first. 14. Clothes or rags used , we recommend that could ignite and explode. 11. Do not tamper with the wash. 13. Washer loading door must be closed when agitator and tub is not being used to clean flammable or explosive materials should not be replaced by pulling...
User Manual
Page 3
...your manual. During this is flammable and can explode under certain circumstances. Thank you throw away your washer. They are on all the hot faucets and let the hot water run for using the washer turn on an electric appliance, smoke, light a match/lighter or use of child entrapment. Date... grounding must be explosive and can explode. This could be ensured to avoid an accident, as hydrogen gas is the case, before using our Haier product. If this process do not have a three-prong electric receptacle outlet in getting the best use a flame to reduce the risk of ...
...your manual. During this is flammable and can explode under certain circumstances. Thank you throw away your washer. They are on all the hot faucets and let the hot water run for using the washer turn on an electric appliance, smoke, light a match/lighter or use of child entrapment. Date... grounding must be explosive and can explode. This could be ensured to avoid an accident, as hydrogen gas is the case, before using our Haier product. If this process do not have a three-prong electric receptacle outlet in getting the best use a flame to reduce the risk of ...
User Manual
Page 4
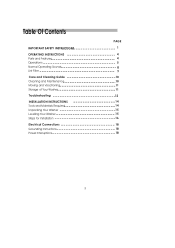
Table Of Contents IMPORTANT SAFETY INSTRUCTIONS OPERATING INSTRUCTIONS Parts and Features Operations Normal Operating Sounds Lint Filter Care and Cleaning Guide Cleaning and Maintenance Moving and Vacationing Storage of Your Washer Troubleshooting INSTALLATION INSTRUCTIONS Tools and Materials Required Unpacking Your Washer Levelling Your Washer Steps for Installation Electrical Connections Grounding Instructions Power Interruptions PAGE 1 4 4 5 8 9 10 10 11 11 12 14 14 15 15 16 18 18 18 3
Table Of Contents IMPORTANT SAFETY INSTRUCTIONS OPERATING INSTRUCTIONS Parts and Features Operations Normal Operating Sounds Lint Filter Care and Cleaning Guide Cleaning and Maintenance Moving and Vacationing Storage of Your Washer Troubleshooting INSTALLATION INSTRUCTIONS Tools and Materials Required Unpacking Your Washer Levelling Your Washer Steps for Installation Electrical Connections Grounding Instructions Power Interruptions PAGE 1 4 4 5 8 9 10 10 11 11 12 14 14 15 15 16 18 18 18 3
User Manual
Page 6
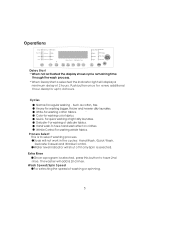
.... Color-for up to select washing process. Hand wash-To have 2nd rinse. Soak will add a 2nd rinse. Cycles Normal-For regular washing . Delicate- The washer will not work in the cycles: Hand Wash, Quick Wash, Delicate Casual and Wrinkle Control. When Delay Start is selected the indicator light will shut...
.... Color-for up to select washing process. Hand wash-To have 2nd rinse. Soak will add a 2nd rinse. Cycles Normal-For regular washing . Delicate- The washer will not work in the cycles: Hand Wash, Quick Wash, Delicate Casual and Wrinkle Control. When Delay Start is selected the indicator light will shut...
User Manual
Page 7
... for wash and rinse. Power On/Off Push the Power On/Off button to manually replenish water. Release to start the wash. Start/Pause Once washer is in Pause mode, push this button once to stop. Delay Start and Estimated Time Indicator Indicates remaining minutes when cycle is powered and selections...
... for wash and rinse. Power On/Off Push the Power On/Off button to manually replenish water. Release to start the wash. Start/Pause Once washer is in Pause mode, push this button once to stop. Delay Start and Estimated Time Indicator Indicates remaining minutes when cycle is powered and selections...

User Manual
Page 8
...: It is soft or hard and whether the clothes are heavily soiled or lightly soiled. 7 s Close the door properly after loading the clothes. Loading the Washer: Load each item loosely. Separate the white and coloured clothes. Proper Use of the load, water type in the wat.er. Pre-treat all pockets...
...: It is soft or hard and whether the clothes are heavily soiled or lightly soiled. 7 s Close the door properly after loading the clothes. Loading the Washer: Load each item loosely. Separate the white and coloured clothes. Proper Use of the load, water type in the wat.er. Pre-treat all pockets...
User Manual
Page 9
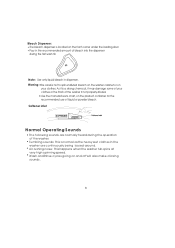
...wash fill. Wash and Rinse cycles going on the front corner under the loading. Note: Use only liquid bleach in the recommended amount of the washer if not properly diluted. Bleach Dispenser: The bleach dispenser is located on and off will also make clicking sounds. 8 As it is normal ...as the heavy wet clothes in the washer are continuously being lossed around. Warning: Be careful not to spill undiluted bleach on the washer cabinet or on the product container for the recommended use of the washer: Tumbling sounds: This is a strong chemical, it may damage some...
...wash fill. Wash and Rinse cycles going on the front corner under the loading. Note: Use only liquid bleach in the recommended amount of the washer if not properly diluted. Bleach Dispenser: The bleach dispenser is located on and off will also make clicking sounds. 8 As it is normal ...as the heavy wet clothes in the washer are continuously being lossed around. Warning: Be careful not to spill undiluted bleach on the washer cabinet or on the product container for the recommended use of the washer: Tumbling sounds: This is a strong chemical, it may damage some...
User Manual
Page 11
...Some of damage to avoid personal Injury or product damage. Before using cleaning products, always read and follow manufacturer warnings to cabinet finish, wipe washer cabinet as needed. Do not use any kind of these chemicals may result in injury. Remove pins or other sharp objects from clothes to ... or detergent on the cabinet, wipe cabinet immediately because it can damage the finish. CARE AND CLEANING GUIDE Warning: Always unplug your washer. Ignoring this warning may dissolve, damage or discolor your washer to prevent scratching of washer to dry and prevent bad odors. 10
...Some of damage to avoid personal Injury or product damage. Before using cleaning products, always read and follow manufacturer warnings to cabinet finish, wipe washer cabinet as needed. Do not use any kind of these chemicals may result in injury. Remove pins or other sharp objects from clothes to ... or detergent on the cabinet, wipe cabinet immediately because it can damage the finish. CARE AND CLEANING GUIDE Warning: Always unplug your washer. Ignoring this warning may dissolve, damage or discolor your washer to prevent scratching of washer to dry and prevent bad odors. 10
User Manual
Page 12
... room temperature. Turn the levelling legs clockwise all of Your Washer The washer must be stored at room temperature. Move and store your washer where the room temperature is below freezing. 11 Do not install or operate your washer in . Disconnect the electrical plug. Storage of the hoses.... supply faucets and disconnect the hoses. Dry the inner wash tub. If you have received a washer when the outside temperature is below freezing, do not operate until the washer has warmed to water leakage if the hoses accidentally get ruptured or they become loose. To prevent...
... room temperature. Turn the levelling legs clockwise all of Your Washer The washer must be stored at room temperature. Move and store your washer where the room temperature is below freezing. 11 Do not install or operate your washer in . Disconnect the electrical plug. Storage of the hoses.... supply faucets and disconnect the hoses. Dry the inner wash tub. If you have received a washer when the outside temperature is below freezing, do not operate until the washer has warmed to water leakage if the hoses accidentally get ruptured or they become loose. To prevent...
User Manual
Page 13
... if the fuse needs to not installing your water heater temperature. This is normal in some cycles, which has a short soak period. Troubleshooting The washer does not operate: Check if the unit is plugged in operation for a short period of time. Check to be replaced. Check the water level ...selection, it will not hear the washer in . Check the position of at a temperature of the drain hose. Check if the lid is incorrect: Check your drain hose properly. The ...
... if the fuse needs to not installing your water heater temperature. This is normal in some cycles, which has a short soak period. Troubleshooting The washer does not operate: Check if the unit is plugged in operation for a short period of time. Check to be replaced. Check the water level ...selection, it will not hear the washer in . Check the position of at a temperature of the drain hose. Check if the lid is incorrect: Check your drain hose properly. The ...
User Manual
Page 14
...uneven. Spots or stains on the container and follow proper directions when using undiluted bleach. Vibration Noise: Due to not leveling washer properly on the floor and uneven distribution of clothes in too hot water repeatedly. Problems with light clothes such as blouses, light...) The communication is bad The protection of fabric softener. Fasten belts, zippers, metal snaps etc. Washer is making noise: Washer may need to be reinstalled. (Check washer installation section) Washer load may need to wash in warm or cold water. Avoid overloading and resort your clothes: this...
...uneven. Spots or stains on the container and follow proper directions when using undiluted bleach. Vibration Noise: Due to not leveling washer properly on the floor and uneven distribution of clothes in too hot water repeatedly. Problems with light clothes such as blouses, light...) The communication is bad The protection of fabric softener. Fasten belts, zippers, metal snaps etc. Washer is making noise: Washer may need to be reinstalled. (Check washer installation section) Washer load may need to wash in warm or cold water. Avoid overloading and resort your clothes: this...
User Manual
Page 15
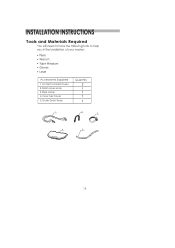
INSTALLATION INSTRUCTIONS Tools and Materials Required You will need to have the following tools to help you in the installation of your washer: Pliers Wrench Tape Measure Gloves Level Accessories Supplied 1.Hot & Cold inlet hoses 2.Drain Hose Hook 3.Pipe Hoop 4.Inner Tub Cover 5.Outer Drain Hose Quantity 2 1 1 1 1 1 2 3 4 5 14
INSTALLATION INSTRUCTIONS Tools and Materials Required You will need to have the following tools to help you in the installation of your washer: Pliers Wrench Tape Measure Gloves Level Accessories Supplied 1.Hot & Cold inlet hoses 2.Drain Hose Hook 3.Pipe Hoop 4.Inner Tub Cover 5.Outer Drain Hose Quantity 2 1 1 1 1 1 2 3 4 5 14

User Manual
Page 16
... the top lid to remove. Pull to remove the styrofoam drum brace. Adjustable foot High Low Warning: Leveling of washer is very important to lower your washer. This Includes the foam base and all packing materials. Leveling legs can be adjusted by pulling handle and dispose it... properly, otherwise the washing machine will be damaged. Unpacking Your Washer Remove all adhesive tape holding the washer acce. Before using this washing machine, please remove this shipping bar by turning them counter clockwise to raise your...
... the top lid to remove. Pull to remove the styrofoam drum brace. Adjustable foot High Low Warning: Leveling of washer is very important to lower your washer. This Includes the foam base and all packing materials. Leveling legs can be adjusted by pulling handle and dispose it... properly, otherwise the washing machine will be damaged. Unpacking Your Washer Remove all adhesive tape holding the washer acce. Before using this washing machine, please remove this shipping bar by turning them counter clockwise to raise your...
User Manual
Page 17
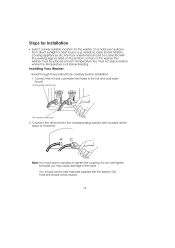
... surface from direct sunlight or heat source e.g. Connect the other end to the corresponding washer inlet located at the back of the washer.The washer must be placed at room temperature.You must not place washer where the temperature is at below freezing. Old hose-sets should not be corrected with...: You may cause damage to tighten the coupling. You should be reused. 16 Steps for Installation Select a away suitable location for the washer on the bottom corners of machine. radiators, base board heaters, cooking appliances etc.Any floor unevenness should use pliers to the valve. Do...
... surface from direct sunlight or heat source e.g. Connect the other end to the corresponding washer inlet located at the back of the washer.The washer must be placed at room temperature.You must not place washer where the temperature is at below freezing. Old hose-sets should not be corrected with...: You may cause damage to tighten the coupling. You should be reused. 16 Steps for Installation Select a away suitable location for the washer on the bottom corners of machine. radiators, base board heaters, cooking appliances etc.Any floor unevenness should use pliers to the valve. Do...
User Manual
Page 18
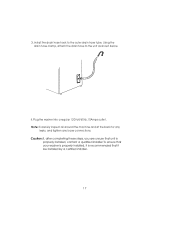
Using the drain hose clamp, attach the drain hose to the outer drain hose tube. Note :Carefully inspect all around the machine and at the back for any leaks, and tighten any loose connections. Install the drain hose hook to the unit as shown below. 4.Plug the washer into a regular 120Volt/60Hz,10Amps outlet. Caution:If, after completing these steps, you are unsure that unit is properly installed, contact a qualified installer.To ensure that your washer is properly installed, it is recommended that it be installed by a certified installer. 17 3.
Using the drain hose clamp, attach the drain hose to the outer drain hose tube. Note :Carefully inspect all around the machine and at the back for any leaks, and tighten any loose connections. Install the drain hose hook to the unit as shown below. 4.Plug the washer into a regular 120Volt/60Hz,10Amps outlet. Caution:If, after completing these steps, you are unsure that unit is properly installed, contact a qualified installer.To ensure that your washer is properly installed, it is recommended that it be installed by a certified installer. 17 3.

User Manual
Page 19
...outage occurs. This appliance is equipped with a cord having a grounding wire with a properly grounded three-prong outlet. Wiring Requirements: The washer must be power interruptions due to whether the appliance is properly installed and grounded. When power has been restored re-plug power cord to... you use of the plug can result in a risk of electric shock by providing an escape wire for a prolonged period, clean washer before using it replaced with a grounded plug. Electrical Connections Grounding Instructions This appliance must be inserted into at least 10AMP 120VOLT 60...
...outage occurs. This appliance is equipped with a cord having a grounding wire with a properly grounded three-prong outlet. Wiring Requirements: The washer must be power interruptions due to whether the appliance is properly installed and grounded. When power has been restored re-plug power cord to... you use of the plug can result in a risk of electric shock by providing an escape wire for a prolonged period, clean washer before using it replaced with a grounded plug. Electrical Connections Grounding Instructions This appliance must be inserted into at least 10AMP 120VOLT 60...


