
Use and Care Manual
Page 3
... Precautions 3 General Safety Precautions 3-4 PARTS AND FEATURES 5-6 Front of the Unit...5 Back of the Unit...6 INSTALLATION INSTRUCTIONS 7-14 Installing Your Combination Washer / Dryer 7 Tools Needed ...7 Parts Supplied ...7 Location Requirements 8 Unit Dimensions and Clearances 8 Unpacking Your Appliance 9 Drain Connections 10 Water Connections 11-12 Electrical ...
... Precautions 3 General Safety Precautions 3-4 PARTS AND FEATURES 5-6 Front of the Unit...5 Back of the Unit...6 INSTALLATION INSTRUCTIONS 7-14 Installing Your Combination Washer / Dryer 7 Tools Needed ...7 Parts Supplied ...7 Location Requirements 8 Unit Dimensions and Clearances 8 Unpacking Your Appliance 9 Drain Connections 10 Water Connections 11-12 Electrical ...
Use and Care Manual
Page 5
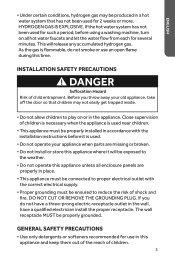
...GENERAL SAFETY PRECAUTIONS • Use only detergents or softeners recommended for such a period, before it will release any accumulated hydrogen gas. INSTALLATION SAFETY PRECAUTIONS DANGER Suffocation Hazard Risk of shock and fire. If you throw away your appliance when parts are missing... this time. If the hot water system has not been used near children. • This appliance must be properly installed in accordance with the installation instructions before using a washing machine, turn on or in the appliance. Close supervision of children is necessary when the ...
...GENERAL SAFETY PRECAUTIONS • Use only detergents or softeners recommended for such a period, before it will release any accumulated hydrogen gas. INSTALLATION SAFETY PRECAUTIONS DANGER Suffocation Hazard Risk of shock and fire. If you throw away your appliance when parts are missing... this time. If the hot water system has not been used near children. • This appliance must be properly installed in accordance with the installation instructions before using a washing machine, turn on or in the appliance. Close supervision of children is necessary when the ...
Use and Care Manual
Page 9
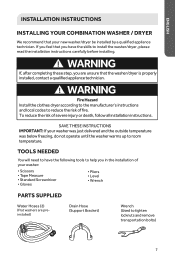
...according to the manufacturer's instructions and local codes to reduce the risk of severe injury or death, follow all installation instructions. ENGLISH ENGLISH INSTALLATION INSTRUCTIONS INSTALLING YOUR COMBINATION WASHER / DRYER We recommend that you have the following tools to help you are preinstalled) Drain... Bracket) Wrench (Used to room temperature. TOOLS NEEDED You will need to have the skills to install the washer/dryer, please read the installation instructions carefully before installing. To reduce the risk of fire. WARNING If, after completing these step, you in...
...according to the manufacturer's instructions and local codes to reduce the risk of severe injury or death, follow all installation instructions. ENGLISH ENGLISH INSTALLATION INSTRUCTIONS INSTALLING YOUR COMBINATION WASHER / DRYER We recommend that you have the following tools to help you are preinstalled) Drain... Bracket) Wrench (Used to room temperature. TOOLS NEEDED You will need to have the skills to install the washer/dryer, please read the installation instructions carefully before installing. To reduce the risk of fire. WARNING If, after completing these step, you in...
Use and Care Manual
Page 10
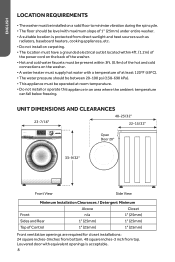
...-3inches from bottom. 48 square inches-3 inch from direct sunlight and heat sources such as radiators, baseboard heaters, cooking appliances, etc. • Do not install on carpeting. • The location must have a grounded electrical outlet located within 4ft. (1.2m) of the power cord on the washer. • A... water heater must be operated at room temperature. • Do not install or operate this appliance in an area where the ambient temperature can fall below freezing. Louvered door with a temperature of at least 120ºF (...
...-3inches from bottom. 48 square inches-3 inch from direct sunlight and heat sources such as radiators, baseboard heaters, cooking appliances, etc. • Do not install on carpeting. • The location must have a grounded electrical outlet located within 4ft. (1.2m) of the power cord on the washer. • A... water heater must be operated at room temperature. • Do not install or operate this appliance in an area where the ambient temperature can fall below freezing. Louvered door with a temperature of at least 120ºF (...

Use and Care Manual
Page 11
... factory. Fill shipping bolt holes with plastic hole plugs. NOTE: Save all adhesive tape holding the washer accessories inside the washer. Four transportation bolts are installed by removing the four screws that can occur from shock during transportation. 1. Remove the back plate of the opening and replace the four screws that...
... factory. Fill shipping bolt holes with plastic hole plugs. NOTE: Save all adhesive tape holding the washer accessories inside the washer. Four transportation bolts are installed by removing the four screws that can occur from shock during transportation. 1. Remove the back plate of the opening and replace the four screws that...
Use and Care Manual
Page 13
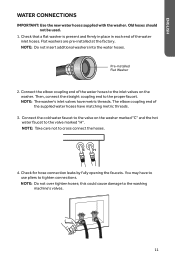
...Check for hose connection leaks by fully opening the faucets. this could cause damage to the proper faucet. Check that a flat the factory. Pre-installed Flat Washer 2. NOTE: Do not over tighten hoses; NOTE: Do not insert additional washers into the water hoses. Then, connect the straight coupling end ... to the valve on the washer marked "C" and the hot water faucet to the inlet valves on the washer. C H 4. Flat washers are pre-installed at washer is present and firmly in place in each end of the water hoses to the valve marked "H". Connect the elbow coupling end...
...Check for hose connection leaks by fully opening the faucets. this could cause damage to the proper faucet. Check that a flat the factory. Pre-installed Flat Washer 2. NOTE: Do not over tighten hoses; NOTE: Do not insert additional washers into the water hoses. Then, connect the straight coupling end ... to the valve on the washer marked "C" and the hot water faucet to the inlet valves on the washer. C H 4. Flat washers are pre-installed at washer is present and firmly in place in each end of the water hoses to the valve marked "H". Connect the elbow coupling end...

Use and Care Manual
Page 15
..., 3 prong outlet, grounded in accordance with a power cord that has a 3 prong plug. This appliance must be grounded. The washer must be connected to have one installed. • Do not use an extension cord. 13
..., 3 prong outlet, grounded in accordance with a power cord that has a 3 prong plug. This appliance must be grounded. The washer must be connected to have one installed. • Do not use an extension cord. 13

Use and Care Manual
Page 30
... in the washtub. • Remove the drain hose from the drain and snap it in place 28 Loosen locking nuts as far as shown below. Install the Transportation Bolts with wrench Replace the back plate and the (4) screws to hold it back into the cabinet as far as possible. • Reinstall...
... in the washtub. • Remove the drain hose from the drain and snap it in place 28 Loosen locking nuts as far as shown below. Install the Transportation Bolts with wrench Replace the back plate and the (4) screws to hold it back into the cabinet as far as possible. • Reinstall...

Use and Care Manual
Page 31
The door has not been closed properly. The inlet hose is between 2'6" and 3'3" high. D. See "installation" (p12-13) B. A. Make sure to the tap. The drain hose support bracket should be looped over a sink or into the power socket securely. B. There is ...
The door has not been closed properly. The inlet hose is between 2'6" and 3'3" high. D. See "installation" (p12-13) B. A. Make sure to the tap. The drain hose support bracket should be looped over a sink or into the power socket securely. B. There is ...
Use and Care Manual
Page 32
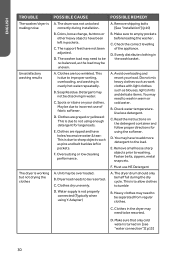
...excessive water & tear: This is due to empty pockets before loading the washer. Detergent may be resorted. A. B. Remove shipping bolts [See "installation"] (p10) B. D. A. F. C. The support feet have been left in pockets. Clothes are ripped and have to add more detergent to ... large loads. C. Soap Residue. Clothes dry unevenly. Use less detergent. B. Dryer load needs to be half full during installation. B. Check the correct levelling of fabric softener. ENGLISH TROUBLE The washer/dryer is making noise Unsatisfactory washing results The dryer ...
...excessive water & tear: This is due to empty pockets before loading the washer. Detergent may be resorted. A. B. Remove shipping bolts [See "installation"] (p10) B. D. A. F. C. The support feet have been left in pockets. Clothes are ripped and have to add more detergent to ... large loads. C. Soap Residue. Clothes dry unevenly. Use less detergent. B. Dryer load needs to be half full during installation. B. Check the correct levelling of fabric softener. ENGLISH TROUBLE The washer/dryer is making noise Unsatisfactory washing results The dryer ...
Use and Care Manual
Page 35
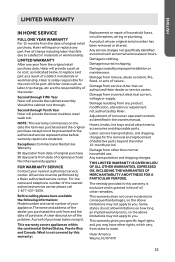
...repairs are the responsibility of the owner. All other rights, which vary, from state to state. Second through . Damage caused by a Haier authorized service center. Labor, service transportation, and shipping charges for the cost of the part. This warranty gives you specific legal ... the date of purchase. All service must be performed by improper installation or maintenance. Damage resulting from any part free of charge including labor that fails due to clothing. Damage from other remedies. Haier America Wayne, NJ 07470 33 What is solely responsible for the...
...repairs are the responsibility of the owner. All other rights, which vary, from state to state. Second through . Damage caused by a Haier authorized service center. Labor, service transportation, and shipping charges for the cost of the part. This warranty gives you specific legal ... the date of purchase. All service must be performed by improper installation or maintenance. Damage resulting from any part free of charge including labor that fails due to clothing. Damage from other remedies. Haier America Wayne, NJ 07470 33 What is solely responsible for the...


